Wednesday, May 31, 2017

Mini Card Smiles for Miles

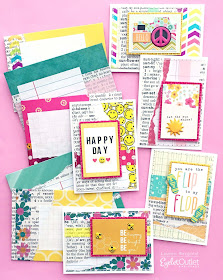
You know how we all eat MORE candy when they come in those little fun size bars? It turns out the same is true for cards... well, not the eating part, lol, but I (Lauren) find that once I start making mini-cards it's really hard to stop! Especially since an ATC format (2.5 x 3.5") showcases Summer-Themed Eyelet Outlet Brads so wonderfully well!


In this case, my little "family" of cards was inspired by the fact that one of my Simple Stories 6 x 6" paper pads featured a bunch of scaled down journal cards, with little icons just right to be swapped for brads. Who could resist something as amazingly serendipitous as that, eh? You can see in the photo that one the cards has a smiley face EXACTLY the same size-- and expression-- as a Mini Emotion Brad and another has a sun just a tiny bit smaller than the one in the Sun and Cloud Brads. The Flip Flop Brads weren't actually pictured on their card, but the text is in the perfect colors and there was just enough room to attach them along the edges. Shifting through another collection from the same manufacturer I found a camera with an iconic center which precisely fit the Peace Sign Brads and another mini card that was a brilliant home for Mini Bee Brads... right down to the honeycomb pattern!


Once I started making the cards, I decided to combine the colors in the paper collection, add some dictionary text paper with strategically placed words, and highlight the designs with a bit of Washi Tape in coordinating shades and patterns.


Flower Tape with Cute Bugs looked adorable with the Mini BeesChevron Tape was a natural choice with that sweet camera and bold Peace Sign. The Blue Dots Tape always reminds me of bubbles in an aquarium (or the ocean?!) so that was perfect with the Flip Flops. And Smiley Face Tape was an obviously fab accent for the Mini Smiley. I've also used some Foil Dots tape and my very favorite, super-colorful Skinny Washi Set as accents.


When all the cards were finished, it seemed a shame not to make some tiny envelopes for them, using the leftover bits of paper and a little more coordinating tape; though these will be tucked into a gift or mailed in a larger envelope, since 3.5 x 5" is the smallest size you can mail on its own!


I hope you'll be inspired to look at your own paper collections and your stamp sets, to see which ones will pair perfectly with some super-fun Eyelet Outlet Brads! Meanwhile Miss Carri has another great project to show you, so why not scroll down and see that right now?! ♥

can be found here every Wednesday, 
and on her blog most of the rest of the week!

It is going to be a "Super" day! Wishing you an Adventurous Birthday! Super Hero Style!

Hello crafty friends! It is going to be a "SUPER" day here at the Eyelet Outlet Blog! I made this into a birthday card but this can easily be made for a Super Father's Day Card!


Super Hero SVG from Too Cute by Jessica
Tissue papers for layering
Me and my Big Ideas School Days Paper
Magic Scraps Tie Dye Paper
Recollections Super Hero Theme Die cuts
Peachy Keen Face Stamp Retro Paper Doll
Ticket Punch
Wishing you an Adventures Birthday Stamp from Scrappy Mom Stamps

 The Eyelet Outlet Products Used:
Super Hero Brads
Enamel Dots: Blue
Heart Enamel: Pink/Red


Thanks for visiting today!


Follow on Bloglovin 


Follow me on Instagram!
Instagram


Tuesday, May 30, 2017

Hello Cupcake

Hello again, it's my day to post on the Eyelet Outlet Blog,  I love using as many items as I can on one card without cluttering it up.  When I saw the cupcake paper flowers I knew I had the perfect image to showcase them with.  It's an older Stamping Bella stamp and the image was coloured with prisma colour pencils and sitting in a box with other usable images and it was perfect for the paper flowers.


In my stash of EO product I saw those cute heart sticky back bumpy bling, I also used some of the enamel dots in white and pink on her dress and there was no sense in leaving three little dots so sprinkled them on one side. 


These paper flowers are just adorable and come in many colours and many patterns.


Since I had pink dragonflies I just had to use a couple  on my card.

Eyelet Outlet Products I used:


(these are on the daily deal)

All these items are available at the Eyelet Outlet and Brads store.

Check out Stephanie's use of Washi tape on the Eyelet Outlet Blog it's just below my post.

Thanks for visiting today and have an awesome week.


Washi Tape Light Switch Covers

Did you know that Washi Tape isn't just for paper?  There are so many other things you can decorate.


Today I'm decorating some light switch covers.  For the first one I used Wide Flower Washi Tape.


It's easiest if you start by centering your first piece in the middle of the plate.  I used my Tim Holtz Retractable Knife to trim the switch opening from the back and folding it back along the edges.  

I overlapped each edge, and then folded around the back.  I then attached small strips of packing tape to make sure the Washi stay attached to the back.

For the next one I used three different tapes - Green Owl Washi Tape, Foil Washi Tape - Green/ Gold Dots, Foil Washi Tape - Green/Gold Stripes.


Again, I started in the middle and worked my way up and down the plate, repeating the patterns.


With all of the Washi Tape varieties at Eyelet Outlet, the possibilities are endless.


Products Used:


You can visit me in blogland at Ingenious Inkling

Monday, May 29, 2017

Puyallup, WA

Our next stop...


June 2-3, 2017
Puyallup, WA!


What's on your wish list?

Sunday, May 28, 2017

Bean thinking about you

Hey Everyone!
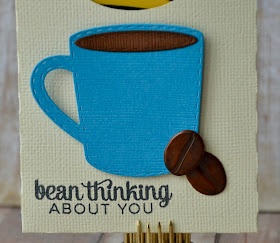
It's Nancy from kandykrazee and I've got another coffee themed project to share!
Last week I used the coffee cup brads from Eyelet Outlet,
this week I'm using the coffee beans that come with the coffee brads.


I layered the coffee beans on the mug and added the sentiment to the tag.
I also added a coffee bean to the ribbon.


Here's a closer look at the brads.
Perfect embellishment for the coffee lover!

Eyelet Outlet has many different styles of brads to choose from, 
as well as washi tape, bling, eyelets and more.
Stop by the store and take a look. 
You will probably find the perfect embellishment for your next project!

Hope you enjoyed my project!  Thanks for stopping by.


Saturday, May 27, 2017

High-Flying

Hi!  It's Kim from Katydid Cards.

For my post today, I enlisted the help of these adorable Woodland Animal Brads.  Their job was to pick up the balloons for the birthday celebration; but on their way back, something happened...


...it seems those helium filled balloons were a bit too powerful for these cuties and up, up and away!  Only a few left safely on the ground.  But I think they might be having fun!


The card base was made using a cut file purchased in the Silhouette store.  Bashful Blue Small Polka Dot digital paper was used to fill the sky panel; embossed using the Cloudy Day folder.  The hills were filled with Garden Green Grid digital paper; embossed using the Square Lattice folder.


I cut the balloon outlines from white card stock and then the balloons from shimmer paper in various colors.  The stars of the show are holding on (for dear life) to the balloons and, in some cases, each other.


On the ground, three more animals witnessing these high-flying escapades.  The little skunk is busy holding the happy birthday greeting that was intended to be attached to the balloons.
 

Inside, I converted the sky panel and the balloon outlines to print only.  I added the balloons using the same paper and typed the sentiment.


When they eventually land, these Woodland Animals will be able to help the recipient celebrate their birthday!


Kim from Katydid Cards 
Who provided the inspiration for these cards?  Katy did!

Friday, May 26, 2017

Fashionista!


Hello again and happy Friday!  I hope you're gearing up for an exceptional weekend, and for my American friends, a nice long Memorial Day holiday as we pay tribute to those who gave their lives for our freedom. 

I'm back with another card-upon-request, this one for a fashion school graduate.  I think this vintage kraft, red, black and ivory is one of my favorite color schemes!  My friend asked for a dress form image and some toile paper or fabric, and with that as a starting point, this is what I came up with.  


In addition to fabric, fitting a pattern requires a measuring tape, some straight pins and scissors, a spool of thread and some machine stitching.  Once the garment is completed, it is tagged and hung on a rack...you can see the thought process behind the choices for this particular design and these embellishments.  :)


Since I used to make most of my own clothes, I really LOVED making this project!  It was a lot of fun!  I was pleased with the way it turned out, and I hope you like it, too!

Have a great weekend, everyone!


From a Flower to a Butterfly! Happy Birthday!

Hello friends! Today I am filling in for Georgiana! I had so much fun making this card! I used some yellow paper as a base then covered it in white Gesso. I used my water colors to create the background then added drops of color using Colorshine.
It worked out so great since I could not find the colored pattern paper I wanted, I just created my own!


I created the butterflies using the Eyelet Outlet Flowers. I found a tutorial on YouTube: Wildorchidcrafts


I just love how sweet they turned out! I created an embellishment cluster at the bottom to bring all the colors together.


Happy Birthday Stamp from Forever in time

The Eyelet Outlet Products used:

Paper flowers: Purple Dot
Swirl Bling: Clear
Jewel Bling: Clear Edge
Pearl Bling: White
Pearl Bling Strips: Purple
Jewel Bling: Clear 


Thanks for visiting today!


Follow on Bloglovin 


Follow me on Instagram!
Instagram


Thursday, May 25, 2017

Eyelets Eyelets Eyelets!

Good afternoon crafty friends!  You've come to know Eyelet Outlet & Brads as your premier stop for the cutest brads on the planet, but don't forget about our Eyelets!  Our Eyelet Collection includes all the colors in the rainbow and many sizes to choose from!

It's fun to include Eyelets in your designs and today I'm bringing you a couple of projects to inspire you.  First up is a colorful birthday card using 1/8" eyelets in many different colors to create an interesting border.


I used an image from Close to My Heart Artbooking Cricut cartridge called, "Circle Link Border," which I drew with my Cricut Explore.  This image added interest to my row of eyelets and also guided me in straight placement of them on my canvas. My Crop-A-Dial Big Bite is my go-to tool for setting eyelets.  

Since it's Thursday, how about a little "Throw Back Thursday!" I made this card several years ago during my first term as an Eyelet Outlet Designer and it's one of my favorite uses of Eyelet Outlet Eyelets!  


This high top from Cricut's Nifty Fifties cartridge looks down-right real with the addition of some Eyelet Outlet Eyelets, don't you think?  And for even more authenticity, I added one of Eyelet Outlet's Enamel Stars!  

Thanks for stopping in and I hope you'll give Eyelet Outlet Eyelets a try on your next project!


Thanks Dad For Steering Me In The Right Direction!

Hello Everyone!

I'm back today with another Father's Day card as promised! If you remember, last week was all about those Dad's who love fishing and the great outdoors. Today's card is another for those Father's who love the great outdoors when it's on the water ;O)

I used 4 different products from the store on this card our Anchor Washi Tape1/16 Mini Round Brads - Blue MixBlue Enamel Dots - Stars & Green Matte Finish Enamel Dots
I started off with the card being blue and white but soon realized I wanted another color so I added the green paper and found a marker that matched.


I traced the green marker along the edges of the tape to give some added dimension and brushed the same green along the edge of the circles. I wanted to add some green enamel dots but didn't have them in the exact color, so guess what? It didn't matter because these matte enamel dots are perfect to color on, so I did, with my marker!


As for the inside, I wanted a "flowing" look throughout the card so I used the tape again.


My stamp says"Thanks For Steering Me In The Right Direction" so I wanted to keep the emphasizes on direction, hence the use of the Wind Rose Stamp. I also wanted to use those mini brads on the wheel so I needed to use the stamp instead of the wheel brad, but, for those of you who may want to focus on anchors or use the other sailing brads, you should check out these great brads:


Anchor Brads
Anchor Brads Red/White/Blue

Bell Brads

Ship Wheel Brads

You can check out my Blog and YouTube Channel for more details, pics and video tutorials on my projects.


I hope you've enjoyed todays project and that it's inspired you to create something of your own.
Thanks for stopping by and have a safe & creative day Everyone :O)