Wednesday, November 30, 2016

Playful Snowman


Hi friends!  It's the last day of November, so the holiday countdown is seriously on!  Are you ready?  It goes by so fast!

We had a few cooler days last week but for the most part it has been really warm in Florida, especially for the last several days, so I really enjoyed pulling out some cool colors for this sparkly, whimsical card. 


I played with some distress inks, splashes of water and shimmer spray to make the Winter sky background.  Glitter enamel dots in various sizes make the perfect centers for the sparkly heat-embossed snowflakes.  Glitter washi tape in blue, purple and pink add more even color and sparkle, and I couldn't resist a twist of wired pom pom ribbon that I've had in my stash for who knows how long!  This cute little guy looks like he's having such a good time!

Thanks for visiting!  Enjoy your day!  
   

Tuesday, November 29, 2016

Minnie Yoo Hoo!

Yoo Hoo! Hello Eyelet Outlet Fans, the Prince of Paper - Barry here to show you a creative way to make a traditional shaker card but using unconventional materials.  I created this Minnie Mouse shaker card using the inside of a business window envelope.  The ones that might contain your tax information.  I used the inside because of the interesting grey cross hatch design of secure print.

With pop dot tape secured to the back (front of the envelope) I placed it on top of a polka dot piece of cardstock.  But first I had to fill it with red and white sequins and Eyelet Outlet Vacation Arrow sign brads (with the brads cut off).  Next, I added a fresh flower bright - brad to her hat, and two small white enamel dots on her dress from the "Enamel Stars -Patriotic" enamel dots set.  Lastly, I added a small red enamel heart from the "Heart Enamel - Bright" set.  

So much fun to do and you can do it too by re purposing an old window envelope and embellishing with sequins and Eyelet Outlet Products!  Thanks for coming by today.  I have some wonderful Holiday card ideas in store for December so come back and see me.

Monday, November 28, 2016

Wishes...

Whether you have snowflakes or palm trees on Christmas Day,
you'll love the glitz and glam of Eyelet Outlet Products!


Supplies:

A few strips of glitter washi tape will create an interesting band of sparkle and it is an economical and simple way to add interest to your card and scrapbook pages!
Be sure to tag us in your creative uploads
We would love to see your own sparkle and glitz and creativity! 
Enjoy your day, snow or shine!


Sunday, November 27, 2016

Winter Wonderland Gift Bag

I found this pretty green gift bag on my recent travels, and I knew I could make it into something special with my Eyelet Outlet Brads & Bling.


I started with the gorgeous jewel blue swirl bling and then added coordinating flower jewels.


And since it's going to hold a Christmas gift, I finished with lovely snowflake brads.


Products used:
Have you followed Eyelet Outlet on Twitter yet?  How about Facebook?


You can visit me in blogland at Ingenious Inkling


Saturday, November 26, 2016

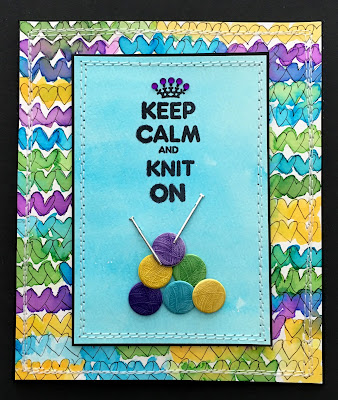
Keep Calm and Knit On

Long holiday weekends spent with friends and family are one of the best-- and most hectic-- things in life, don't you think? But I (Lauren) have a no-fail action plan for any eventuality:


Luckily I also have some Eyelet Outlet Knitting Brads to bring it to life in card form. I love that the packets include knitting needles and balls of yarn, and that the yarn comes in a few different colors, because let's face it, there are very few knitters who will content themselves with just ONE color of yarn! I made my own knitted background paper by painting little V's in coordinated shades with my favorite watercolor pigment powders, and a solid panel to hold my stamped sentiment. A few tiny gems from a Jewel Bling Strip and a bit of machine stitching complete the design.


I hope that your weekend is full of food, fun, family... and a little creativity, too! ♥

likes yarn almost as much as she likes paper...
and loves to talk about both on her blog!

Friday, November 25, 2016

Decorative Home Decor Letter w/ Video


I love the large decorative paper mache letters you find at all the big box craft stores.  You can do so much them with them, and when I got my Rinea foil papers I knew I had to make something fun with it!!
 This letter can be used for all kinds of things, as a decorative mantle home decor piece, by the way the "R" is for Reed my last name. Right now it is sitting on my mantel over my fireplace, but this is so light it can be hung on a wall, on a table surface, as a letter for a kids door.  You can even do the rest of the letters in your name and make it larger.  The possibilities are endless.


Here is the full video on how I made this fun decorative letter.


The main part of the letter is covered in Rinea foils, I used the embossed copper color and it make it look so rich and beautiful!! I even added in the foils to the flower up in the corner!!  Top it off with some beautiful brads and pearls swirls from eyelet Outlet and you have a beautiful decor piece.


The paper takes distressing really well.  I used a little bit of sandpaper to distress the foil and it looks amazing!!


Supplies Used
Letter - Michaels
Foil - Rinea
Decoupage - Mod Podge
Pearls - Eyelet Outlet
Brads - Eyelet Outlet
Flowers - Eyelet Outlet
Punches - EK & McGill
Cutting Tool - EK
Sandpaper
Glue - Beacon Adhesives


Erin Reed - Designer & Artist
Blog
YouTube
ETSY
Instagram

Wednesday, November 23, 2016

holiday card by Marina Gridasova

Hello ladies! It's Marina here with my holiday card with Eyelet Outlet christmas embellishments ))))
holiday card by Marina Gridasova @akonitt #card #eyeletoutlet #by_marina_gridasova #enamels #holidaycard #brads
a few details:

it's a simple card without lots of detail, but with the special accents it's look so pretty and in the right mood, isn't it? )))

as usual I used here a lot of Eyelet Outlet products:
Enamel Stars - Patriotic
12mm Jewel Bling - Clear Edge
Glitter Enamel - Yellow
Enamel Dots - Single Colors (White)
Cardinal Brads
Elf Brads  
 
Hope you will like my card ))))


 Marina


Tuesday, November 22, 2016

Thanksgiving Place Cards


Are you ready for Thanksgiving?  This year the prep in our household is all happening last minute because we have had so many other things going on.  Our Thanksgiving meal is much more of a production than Christmas, so I'll be in the kitchen nearly every waking moment from now until the food is on the table!  Lots of love is being poured into every detail!
   

Keeping a gratitude journal for the month of November has really helped me to realize how much I have to be thankful for, and I love that at this time of year we all become more deliberate about saying so!  Little things mean a lot...setting a beautiful table and cooking "family heirloom" recipes are tangible ways to express the love we share for each other!  


I used a lovely dip pen that I purchased as a souvenir from Venice to calligraph our names on some hand-stamped Thanksgiving place cards.   They're simple but the sparkle of gold ink, gold glitter washi tape and the rich colors of the Fall leaf brads make them elegant and traditional.


Blessings to you and yours this Thanksgiving, and every day all year through!  

Monday, November 21, 2016

String wreath easel card

Hi Eyelet Outlet fans!  Barry, your Prince of Paper here to show you a fall inspired easel card.  I used the leaf brads, gold washi tape and multi-sized enamel dots in shades of orange to complete the look. The fun part of this is using some string for a wreath.  I used a Silhouette Cameo easel card file and then it was just a matter of choosing paper and colors.  After cutting a piece of wood grain paper I added a piece of gold washi tape strip and then attached the string wreath. 

I strategically placed the fall leaf brads around the wreath and then for a final touch added some enamel dots in orange.  For the inside sentiment I typed this out and printed them onto clear file labels and stuck it onto a tan piece of scrap paper.  For the lip I attached five more small orange enamel dots.

Thank you for coming by today.  I hope you enjoyed my fall inspired string lasso easel card.  I will be back soon with a fun take on a shaker card that is whimsical and impressive using an ordinary window envelope.


Sunday, November 20, 2016

Glorious bling!


Merry Christmas, fellow Crafters! 
Another Christmas card...but this time in the shabby chic style!

But I used daubers and various colors of red ink to make it into a poinsettia that even Frosty would want to go into a green house for!  The leaves were made from green flowers. Clip 1 or 2 petals to create leaves!  
I used Craft Glue Dots to build up my flower.
Matt finish yellow enamels complete my poinsettia!


Swirl bling in a champagne color ties it all together!
I hope you are finalizing your holiday craft plans this week.
Check out the Eyelet Outlet website for so many amazing products for your designs.


Thanks for stopping by today!


Saturday, November 19, 2016

Howdy Pilgrim

Since Thanksgiving is on the way, I had to have some fun with Eyelet Outlet Pilgrim Hat brads and a few Grumplings.


Don't the cow and the bear look like they're ready for a Thanksgiving feast ... the chicken looks like she might by trying to head to safety.


Hope your Thanksgiving is filled with love & laughter.

Products Used:

Have you followed Eyelet Outlet on Twitter yet?  How about Facebook?


You can visit me in blogland at Ingenious Inkling


Friday, November 18, 2016

Give Thanks

Next Thursday we will celebrate Thanksgiving here in the United States. Some of the things for which I (Lauren) am particularly grateful for this year are good health, a happy family, and being part of a wonderful creative team here on the Eyelet Outlet blog! So here's a seasonal card I had a lot of fun making, inspired by these gorgeous Eyelet Outlet Leaf Brads:


To create the background, I used my newest favorite technique, in which you apply drops of water to your paper, add a tiny bit of color to each one, (I've used my favorite watercolor pigment powders, but regular watercolor paint or ink would also work) then *SMOOSH* the dots of color and let them appear as random splotches on your paper. For best results, you'll definitely want to use colors that look well if they blend together a bit; and using a clear sandwich bag or some deli paper is helpful if you'd like to see the shapes you're making as you smoosh the droplets. For a less blended effect, apply the colors one by one, letting them dry in between.


I chose my shades of pigment based on the gorgeous autumn shades of those fabulous Leaf Brads. I also painted a few small leaves diecut from vintage text paper and sheet music. To add even more texture to my card, I only applied adhesive to the centers of my diecut leaves, and I curled the loose edges so they'd look more like real leaves.


Since wet media often warps one's paper a bit, my favorite way to attach a watercolor panel is with my sewing machine. Finally I added my sentiment using a combination of stamps and diecut chipboard letters.


Something else for which I am thankful is the amazing community of artists I've met online! I wish you all a very Happy Thanksgiving, and hope you will spend the day surrounded by your friends and family! ♥

Lauren Bergold blogs at 
and would love for you to visit her there!

Thursday, November 17, 2016

Always in season!


Birthdays are always in season.
Designer Stephanie has come up with a playful card with a great layout idea that you
will want to CASE soon!


Supplies:


Be sure to tag us when you upload your birthday cards!
We'd love to see how you use our brads, washi tape, bling, or flowers!!


Wednesday, November 16, 2016

Metallic Pendants by Erin Reed

I have the itch make make some pendants for a while, and the Eyelet Outlet stickyback gems are a perfect way to make an amazing and inexpensive jewelry piece.  They can be used as an embellishments, worn as a pendant for a necklace, added to a top of a bookmark, really the possibilities are endless.
Here is the full video tutorial on how I made these fun pieces.
The little pearls an gems really make these fun pendants pop.  For a couple I added the pearls around the edges of the flower parts and also in the centers.  I also took one of the stickeyback gems that are in a line around the edge of the pendant.  Take a close look at them.
Using some left over bits of scrapbook and card supplies, metal fobs, metallic papers, and Eyelet Outlet pearls and gems the resin really turned these into special pendants.
Supplies Used
Metal Fobs - Prima
Beads/Glitter/Glass - Prima & Floracraft & American Crafts
Punches - McGill & EK Success & Marvy
Charms - various 
Buttons - Various
Resin - Amazing Castings


Erin Reed - Designer & Artist
Blog
YouTube
ETSY
Instagram