Saturday, December 31, 2016

Breath of Fresh Air!

On this New Years Eve Day,
here is a breathe of fresh air.
We have new opportunities, new adventures, new craft products,
new brads..all in store for 2017.

With Valentine's Day right around the corner, 
you will want to start using hearts, bling and butterflies on your creations!

Here is a shabby chic collage card. 
I cut down a gold foil doily for a little repeat of gold that you see in the Glitter Washi Tape.
The Gold Pearl Swirl Bling keep your eye moving around the card.
I love that you can use this bling in small areas to create interest...
and that also stretches your package!


The Coloring Book Butterflies are really trendy right now.
Be sure to add a couple of packages to your cart.

Whatever you are doing tonight and tomorrow,
please be safe.
May you find joy and love...a whole lot of Eyelet Outlet... in 2017!


Dawn Mercedes, of Sunnyside Up

Friday, December 30, 2016

Easy Thank You Cards

What comes after Christmas Cards ... why Thank You Cards of course.

I found this package of textured thank you cards with a simple copper embossed sentiment in the $1.50 bin at Michael's, and I knew I could use Eyelet Outlet products to make them special.


I started by adding a single brad ... that's all it takes to make a simple card special.  How fun is this cute little Gnome Brad standing on top of the *k*.


This adorable little Bear Brad wearing a cute winter hat makes for a fun thank you as well.


Or maybe you have a few leftover Christmas Brads like this lovely Poinsettia, which are the perfect embellishment for Christmas Gift Thank You Cards.


I really love how the shape of the Holly Brad wraps around the sentiment.


Since the sentiment is copper embossed, I used some gorgeous Copper Dots Foil Washi Tape, which coordinated perfectly (it's kind of hard to photograph with all of that metallic shine).


If a single brad is great ... than a pair of Holiday Mitten Brads is even better.


Or how about some elegant golden Bell Brads.


And the final card is super-fancy with a little champagne bling swirl.


And remember, you don't have to score a set of thank you cards from the bargain bin to make this idea work ... stamping a simple sentiment or even using a sticker on a plain card base because extra special when you add embellishments.

Products used:

Have you followed Eyelet Outlet on Twitter yet?  How about Facebook?


You can visit me in blogland at Ingenious Inkling


Thursday, December 29, 2016

Be an Eyelet Outlet Designer!!


Eyelet Outlet Design Team Call 2017

Come start the New Year off with a crafty group of designers!  Eyelet Outlet is looking for new designers to promote and encourage others using decorative brads, washi tape, paper flowers and bling!


Requirements:

*The design team term is from February 1st- July 31, 2017. There is a possibility of extending your term.
*Post project, using good photography skills, on the company blog about once a week, in rotation with the rest of the designers.  Your projects should have a focus on Eyelet Outlet product.
*Post projects on social media such as: your own blog, online galleries, FB, Instagram, Pinterest, etc.
*Have an upbeat, encouraging attitude with fellow designers in the closed Facebook group as well as in the written posts on social media that promote Eyelet Outlet.

Benefits:

*A generous supply for Eyelet Outlet product
*50% off discount during your term for addition product
*Projects may be purchased from time to time for the display boards at Scrapbooking Conventions throughout the year. Compensation disclosed upon joining the team.
*Your name/blog will be linked to Eyelet Outlet sites.

How to apply:
Send an email to eyeletoutlet@gmail.com with:
*Links to your blog, online galleries, and other social media outlets where you post your projects.
*A short paragraph introducing yourself, explaining why you want to promote Eyelet Outlet.

Feel free to email with questions as well!

Deadline is January 12th, 2017 at 9pm EST. 

Wednesday, December 28, 2016

Thank You BEAR-y Much

Hi guys, it's Lauren here, with a fun idea inspired by these adorable Eyelet Outlet Winter Animal Brads. I'm planning to use this as a thank you note for some cool holiday gifts I received, but it would work for any wintery occasion.


I love that each packet of Winter Animal Brads contains white bears, brown bears and super-cute penguins!


For this card, I've made two of the white bears adornments for a pair of mittens I've constructed from a bit of plaid paper I hand-painted using my favorite watercolor pigment powders. I used a piece of clipart for the shape, and cut the two mittens back-to-back with scissors so that i'd have a right and left hand to use on my card. I added White Glitter Enamel Dots to the cuffs and a piece of yarn to bump up the texture factor.


A computer generated sentiment and a few white Heart Brads finish off the design. And now I'll just wish you a BEAR-y Happy New Year... see you in 2017! ♥♥♥

Lauren Bergold's blog is called,
and she'd love for you to visit her there!

Tuesday, December 27, 2016

Winter Washi Card w/ Video

Forgot to send Christmas cards but still want to?  Check out this fun and fast card using washi tape form Eyelet Outlet to make a winter greetings card!!


Here is a video filled of fun card ideas including the little tutorial for making the snowflake card.


It is never too late in the winter season to send out those winter card to friends and family!!

Supplies Used
Card - Canvas Corp
Washi Tape - Eyelet Outlet
Foil - Rinea
Punch - Fiskars
Stamps - Paper Wings Productions
Ink - Brutus Monroe
Adhesive - Xyron

Erin Reed - Designer & Artist
Blog
YouTube
ETSY
Instagram

Monday, December 26, 2016

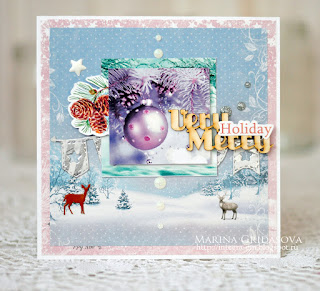
Very Merry Holiday card by Marina Gridasova

Hello ladies and gents! It's Marina here with you and firstly I want to widh all of you a very Merry Christmas and Happy New Year!
And  secondly want to share with you holiday card
Very Merry Holiday card by Marina Gridasova @akonitt #card #by_marina_gridasova #eyeletoutlet #enameldots #holidaycard #washitape #brad
 details:


As in my previous prject I used my fav tip with washi and made banner die-cut with silver stripes and also deer brad to create a pair of them with the one on the paper))))

Here I used:

    Hope you will like my card ))))


 Marina

Sunday, December 25, 2016

Wishing You Peace!


Blessings and Peace to you on this Christmas Day, and the beginning of Hannukah!  The Felts family is celebrating the 12 days of Christmas as we count down to Epiphany and the beginning of the Mardi Gras season.  I usually bake a King Cake for my girlfriends on the first Wednesday of the year, and we share in the colors and symbolism of 12th night/Epiphany/Little Christmas (January 6th) in accordance with my Southwest Louisiana Christian heritage and tradition.  

And so, my card for today combines the crown of the kings and the newborn baby King they worshiped, with the colors of faith (green), justice (purple) and power (gold).   The crown is embossed with gold, embellished with tiny purple pearls and sparkling green jewels, which were exactly the size of the gold baubles of the stamped image underneath.  I love it when that happens!


May your holidays be filled with light, joy and peace!

Saturday, December 24, 2016

Life is a party!

Can you believe it is almost 2017?  With New Years Eve just a week away and lots and lots of parties planned to ring in the new year, I created a card with this in mind.  I have this stamp set from Stampin up, that I colored with my Copic markers and then framed it using hounds tooth designer paper and glitter red washi tape.


Across the top I used the hanger brads and cut off some individuals jewels from a long strand of red  jewel strip sticky back bling which I thought almost resembles jeweled confetti!


I found the Audrey Hepburn quote from a google search and my card was complete.  I hope you like my "New Years Eve" inspired card.  At the start of this new year, allow me to take this time to say "May your new year be one that is full of love, laughter and ample time to be crafty".  See you all next year!  Barry - The Prince of Paper.

Black and Gold


Christmas was so hectic with travel, illness, last minute gifts...
well...here we are (finally)...

Supplies:

And lots of New Year's wishes from me to you!
Dawn Mercedes, of Sunnyside Up!


Thursday, December 22, 2016

Christmas Funny Money!

If you are getting a bit of crafty funny money,
take a looksie at the Eyelet Outlet Site.
It's your one stop place for embellishments!

If you haven't seen our latest release,
come on over and check it out!


Wednesday, December 21, 2016

Washi Washi Wonderful

If you have some Eyelet Outlet Washi Tape, you're just minutes away from making your own custom background papers.


I start with scraps of paper (in this case, ivory cardstock) and cover it with rows of washi (vertical, horizontal, diagonal ... your choice) starting in the middle and moving outward alternating sides.  

I use my non-stick sheet and extend the tape beyond the scrap so I can trim the sides to get a nice even finish.

For the first card I used this adorable Cat Love Washi Tape that has a vertical design.
The tape coordinates perfectly with the Kitty Brads.  


My layout features this week's CAS(E) this Sketch together with a Paper Smooches Charmed Cat Two sentiment.

The next one used Awesome Washi Tape paired with a new Water Bottle Brad.


Layout is from Can You CASE it? and stamps are from Simon Says Stamp Running with Your Heart.

And the final card features the fabulous Book Washi Tape.  When I finished covering the paper, it felt like a Harry Potter Library ... so that is the theme I used.


I cut my tape-covered paper into three equal panels using a sketch from Try Stampin' - or Not - on Tuesday.  


I added a Sketched Owl Brad & Compass Brad and computer generated my sentiment.  I think it will be a great graduation card.

Products used:

Have you followed Eyelet Outlet on Twitter yet?  How about Facebook?


You can visit me in blogland at Ingenious Inkling


Tuesday, December 20, 2016

Deck the Halls

Warm winter greetings, Eyelet Outlet fans, it's Lauren here with a super-fast project that would make a great last minute holiday gift OR maybe a bit of decor for your own home?


When I found these triangular balsa wood trees in the clearance section of a big box crafting store, I immediately pictured them covered in Eyelet Outlet Paper FlowersSwirl Bling and Bumpy Heart Bling, and I seriously could not get them into my cart fast enough! Of course, if you have the tools, they'd be easy to create from scrap wood. For that matter, a few pieces of nice thick cardboard cut into triangles would work equally well; you could even draw some triangular shapes on a card or canvas and make the surrounding areas "background"! Whatever materials you choose, the method will be the same:


Cover your triangles with torn scraps of sheet music, text paper, old dictionary pages, etc. Use a high quality gluestick to get thorough, edge-to-edge coverage on your papers, and if you're working with 3D wooden shapes, a little coat of gluestick on the wood, as well, gives you extra adherence. Wrap the papers around the sides, the back, and onto the base, smoothing out any bubbles or wrinkles as you go. When your trees are covered, decide where you'd like to place your embellished Paper Flower stacks. This will help determine where your doilies should go... if you're using doilies, that is! To adhere doilies or any lacy, fragile items, use the gluestick again, but apply with an up and down "dabbing" motion, since sliding the gluestick can result in tearing the paper. Add the paper flowers strategically, so they will become the focal point of each tree. Since each Eyelet Outlet Solid Color Paper Flower Pack has forty flowers, in three graduated sizes, you'll be able to make each stack multi-layered. Place a Bumpy Heart Jewel in the center of each stack. Finally, add Clear Swirl Bling around the flowers for maximum drama. I love that these come on a clear plastic backing sheet, which makes it easy for me to move them around before deciding exactly where they should go. Feel free to trim or rearrange bits of the flourishes to fit your design better!

Not a big fan of collage? Cover your trees with patterned paper, giftwrap, paint or Holiday Washi Tape! Then fancy them up with flowersbling, pearls, brads or... well, whatever Eyelet Outlet embellishments you love most!


Whether you are celebrating Christmas, Hanukkah, Solstice or Festivus, I wish you a wonderful weekend full of family, friends and maybe even a handmade gift or two! ♥♥♥

Lauren Bergold's husband is lobbying strongly to keep these embellished trees at their house... 
and she's pretty sure he will be successful in this! :)

Monday, December 19, 2016

Decorated Jam Jars w/ video

I wanted to give some gifts to our neighbors for Christmas, so I made some homemade jam and decorated up the jars to pass out to everyone this season.


I stared with the plain filled and sealed jars, placed the label on the back, added a little flower on the top, bling along the lid, and them tied a sting with the label along the rim.  Here is a video on how I made this cute little decorated jam jar.


I used the white flowers, bling brads, and red bling strips from Eyelet Outlet to make make these jars look that much cuter.


Supplies Used
Computer Printed Labels
Flowers - Eyelet Outlet
Brad - Eyelet Outlet
Bling - Eyelet Outlet
Foil Paper - Rinea
Twine - Canvas Corp Brands
Tags - Canvas Corp Brands
Punch - EK Success
Sticker Maker - Xyron
Glue - Beacon Adhesives

Erin Reed - Designer & Artist
Blog
YouTube
ETSY
Instagram

Sunday, December 18, 2016

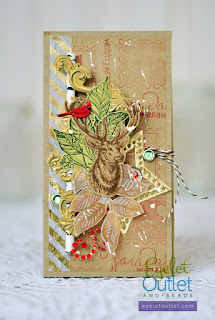
holiday chocolate box by Marina Gridasova

Hello ladies! Marina here today and I want to share  chocolate box with gorgeous Eyelet Outlet products. I used some new items and some old )))
Let's have a look?
holiday chocolate box by Marina Gridasova @akonitt #chocolatebox #brads #washitape #by_marina_gridasova #eyeletoutlet #stickybling #holidaybox
 a few details:


I adore combo of kraft, white, red and gold - think it's a classic colors for any festive project ))))) Here I also used my favourite tip - add gold washi tape on the cardstock and then used star die. Looks like gold cardstock but cheaper and you always can make any accent you need with this technique ))))
Here is the full list of products:
Cardinal Brads
6MM Jewel Brads - Silver Edge - Green
12mm Jewel Bling - Clear Edge
Foil Washi Tape - Gold
Foil Washi Tape - Gold Stripe
Swirl Bling - Jewel Red 
     
Hope you will like my project ))))


 Marina