Wednesday, January 31, 2018

Let's Pretend It's Spring For a Minute, Ok?

I (Lauren) realize that compared to the winters in, say, Canada or even New England, we have it pretty easy here in Central New Jersey. Nevertheless, there is always a point towards the end of January or the beginning of February, where I feel like I just cannot stand one more day of cold, grey, overcast weather. Luckily I have Eyelet Outlet Wide Flower Washi Tape and Bright Dragonfly Brads, so I can make myself a little bit of Spring, in card form:


I love that this Wide Flower Washi alternates about a four inch repeat of the same pattern in blue and pink. Of course you can use the tape in long strips that feature both colors, but sometimes I like to separate the two and use them individually, which is what I've done here. Because this tape has a design that's more straight and solid at its bottom edge than its top, I thought it might make sort of a cool border, with the bottom edge towards the center. For the smaller card, I cut one complete repeat of pink flowers from the roll of tape, then snipped it in half. I applied one 2" section along the side of a 3.5" square of plain white cardstock, just following the edge of the paper with the edge of the tape; then I affixed the other 2" section to the opposite side of my square. Since I needed a second run of pink flowers, I cut the intervening strip of blue flowers off the roll and stuck the whole thing along the edge of a separate 5" square of white cardstock. Then I came back to the pink flowers and cut another run, snipped it in half, and applied it to the other two sides of my square.


In the center of the design, I was left a little blank window of about 1.5" that I could use to frame a sentiment, a photo, a stamped image or, in this case, a little snippet of Thai book paper, with a couple of pink pretties from the Bright Dragonfly Brad set, which i bent very gently at the centers, so their wings would stick up a tiny bit, as if they just alighted on my card. Something I love about this brad set is that you get purple, pink and yellow Dragonfly Brads, all together in the same packet. Something else I love is that these guys are the current special deal in the Eyelet Outlet Store, so for a limited time, they are only 99c!!!


Since I had started the blue square, I had to finish it, so I cut off 3 more segments... (yes, you'll be seeing something made from "extra" pink flowers sometime, lol!) ...and this time, I let the repeats overlap at the outer edges, which gives a really pretty soft effect that I love. This time the framed area in the center was just a smidge bigger than 3" square. Coincidentally, I had just found some very pretty small Buddha drawings in an Indian travel book, so I fussycut one of them, added a purple waterlily from the Frog Set to match my handsome pair of purple Dragonfly Brads, backed the panel with  pretty Hindi script, and finished off the card with a mat of soft purple paper.


I hope you'll be inspired to look through your Eyelet Outlet goodies, and create your own tiny world that is the color, season, and temperature you're in the mood for right now! ♥

is really really in the mood for Spring!

Tuesday, January 30, 2018

Eyelet Outlet Wrap-Up

Today is my final post as a member of the Eyelet Outlet Design Team ... and it's been a blast.

I am so grateful for the opportunity to design with these fabulous products, so I thought as a final post I would share some of my favorite projects with you (many of which were only shared on my blog).

I have had so much fun stretching the boundaries of my Washi Tape creativity.

Eyelet Outlet Glitter Washi Tape is truly 'da bomb ... all the glitter sparkle with no glitter mess.


I also used the same Glitter Washi Tape for this fun holiday tree.


Creating Washi Tape Backgrounds became another favorite technique ... I loved creating this Harry Potter Library.


Washi Tape is fun for crafting too ... like these decked-out Light Switch Covers.


I also loved combining the fantastic paper flowers with lots of bling to make a wedding cake.


And of course, using Swirl Bling to decorate Christmas Trees (with square bling for a star) is another favorite way to use Eyelet Outlet products.


Swirl Bling can also pair perfectly with a recycled Kleenex Box, Paper Flowers & New York Washi Tape for an awesome Birthday Card.


I loved creating with the fun Flatback Resin.  This Super Hero Card combining the Super Hero Shield Resin with Super Hero Saying Brads was my favorite.


And a few Cardinal Brads and some Matte Enamel Dots were the perfect embellishments to take this die cut sympathy card to the next level.


Brads can be super-fun and cute, like these fantastic Emotion Brads combined with Party Hat Brads.


I also loved using Brads and Enamel Dots to decorate stamped images like this fun hipster holiday animals.


I hope you enjoyed this walk down Memory Lane with me ... it's been awesome sharing my designs with you.

Eyelet Outlet Products Used:


Did you know we have a Flickr Gallery to showcase Eyelet Outlet Design Team Creations?


You can visit me in blogland at Ingenious Inkling,
and you can find Lauren & I making holiday cards
all year long at Jingle Belles

Monday, January 29, 2018

A little sweetness


Eyelet Outlet has something for every one and every hobby!
Do you have a friend who likes to bake or cook?
Check out our Food/Drink/Cooking brads for a fun selection of products!


Brads: Baking brads and egg brads.

Have a sweet day!

Dawn Mercedes, of Sunnyside Up


Saturday, January 27, 2018

Perfect Pair

Hi everyone!  It's Kim from Katydid Cards with you today.

Those of you who follow this blog already know that, in addition to eyelets and brads, Eyelet Outlet has a large selection of washi tapes ranging from patterned, glittered, foil and holiday/seasonal.

For me, the hardest part about using Washi is deciding which of the many there are I should work with first.

Today I'm working with the Glitter Black Washi Tape and I used it in various ways.  I'll show you my card first and then talk a bit about what I did and how.


The card's focal image is the Penny Black Perfect Pair stamp set.  It's a jumble of birds flying...but in the midst of all that confusion, two birds manage to find each other.  The image was stamped with Tsukineko VersaFine Onyx Black Ink and then heat embossed with Clear Embossing Powder.  I got a tip from the Internet that it's much better to stamp in black and emboss with clear embossing than stamping with VersaMark and using black embossing powder as it tends to be messy.

The stamp set comes with the greeting as well.  I used only a portion of the stamp for the front with the balance inside the card.

But let's talk about the star of the show, the Glitter Washi.  I stamped the two birds with StazOn on the washi using the MISTI to get accurate placement (I attached the washi to scrap card stock first to give it stability and make it easier to cut).  Then I fussy cut them and attached them to the front with glue dots.

I used the Word Window punch on the greeting.  For the mat behind it, I lined up two pieces of Glitter Washi on scrap card stock and punched it with the Modern Label punch.


Next, I cut a mat 1/4" larger than the image and placed Washi around all four sides, mitering the edges.

On another panel of 4" x 5 1/4", I stamped My Favorite Things Lots of Dots Background Stamp using the same method as the birds.  I picked this background as there are dots in the focal image and thought it would coordinate nicely.

Another frame of Washi on the base of the card to frame this piece.  Before adding it to the back, I wrapped one final piece of Washi across the bottom.

Inside, I used the second part of the greeting with the two birds stamped. I could have run another strip of Washi tape across this panel, too.  That would have looked nice...next time!


I can't wait to work with Washi tape again...and to share my projects with you.


Who provided the inspiration for these cards?  Katy did!

Friday, January 26, 2018

Yello!


Make a splash with a funny Emotion Brad.
Glitter Washi tape gives color and texture to your paper crafting project!
Who can make a card without Eyelet Outlet bling?
Apparently, not me!


Have a sunshiney day!  
Dawn Mercedes, of Sunnyside Up


Thursday, January 25, 2018

Clean Forgot!

Every once in a while we all forget a special person's birthday, so I try to keep a belated birthday card in my stash. This one turned out so cute that it's left me wondering if it would be wrong of me to forgot someone's birthday on purpose, just so I can send this card!


I started out with this "Bath Time Girl" image from the Cricut Baby Steps Cartridge.  I wanted to use the faucet brad from Eyelet Outlet's Pipe Brad Set as well as this cute Rubber Duck Brad from Eyelet Outlet. so a few modifications were needed to the original image.  I flipped it horizontally to accommodate the direction of the faucet and sliced off the existing duck from the image.  I added my sentiment to the bottom layer of the bathtub with Cricut's "Fonstastic Font DJ Terrific," and then flattened it to use Print-Then-Cut.  I also used one of the adorable digital face stamps available from Peachy Keen Stamps.  

This was such a fun card to create!  I just love the way Eyelet Outlet brads add so much dimension and interest to my projects!

Thanks for stopping!  See these awesome brads and so much more at EyeletOutlet.com!


Wednesday, January 24, 2018

Black and White (Again!)

I (Lauren) really thought I was done making Valentines. In fact, I had a totally different plan for this week. And then I sat down with my Eyelet Outlet Tapes and Brads and it turned out I had two more ideas, lol!


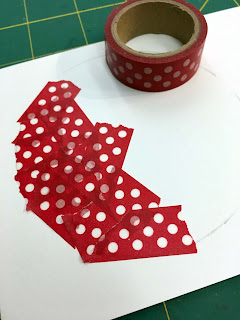
My first card features a heart covered with Red Dot Tape, inspired by something I saw on Instagram, in which the artist covered a shape not with neat strips of washi, but little randomly torn segments. It gives a totally different, much more casual look, that I really like. For this method instead of cutting the shape from white cardstock and then covering it with tape, I covered an area of cardstock slightly larger than the heart template I wanted to use, and then traced and cut out the shape after all the tape was applied.


When I had my heart all set to go, I added a glittery "XO" in letter stickers, and made a background using a sort of gridded patterned paper, with strips of Love TapeMusic Tape and Music Note Washi. I don't actually need to mass-produce cards for anything just now, but the next time I do, I want to remember this method because it was easy and fun!


For my second card, I went back to lining the tape up neatly. In this case it's the gorgeous wide Butterfly Music Washi, and instead of placing the strips of tape right next to each other, I left a gap between each segment about the same size as the gap between the lines of notes on the tape itself. For my sentiment I found the perfect pre-made journaling card, which I trimmed down a tiny bit, because I didn't want to cover more of the pretty background than I had to, lol! I placed a pink Heart Brad directly over a pink heart that was part of the card's design, then added a Butterfly Brad and a Butterfly Profile for even more texture and interest.


I hope you'll be inspired to look at your tapes differently and try something new! For even more inspiration --up close and personal-- be sure to check out our newly published 2018 Trade Show Schedule on the sidebar to see when Eyelet Outlet will be coming to a town near YOU! ♥


can be found here every Wednesday, 
at Jingle Belles on Fridays,
and on her own blog the rest of the week!

Tuesday, January 23, 2018

Washi Tape Collage Alphabet

For this week's card, I had fun exploring a Washi Tape Collage Technique.  I started with a scrap of white cardstock and then randomly began applying washi tape to the background.


I kept going to fill-up my background, incorporating lots of different designs.  I kept my tape vertical, horizontal or diagonal.


Then, to help bring all of the patterns together, I used several washi tapes in muted colors for the top layer.

Next I die cut lots of letters from my background and made two cards.  The first one uses the big PEACE Die Cut from Simon Says Stamp ... I love how the bits of flowers peek through in the design.


Next I die cut the entire alphabet using Lawn Fawn Cole's Alphabet Dies (with a few extra letters from the spaces I had left) and created this birthday card.


It was so much fun to put my alphabet background puzzle together.   I started from the middle and worked my way to the edges, keeping all of my letters vertical or horizontal to the cardstock square.  When I was done I trimmed the edges and finished with my Happy Birthday sentiment.

I hope this gives you ideas for ways to use your Eyelet Outlet Washi Tape stash.

Eyelet Outlet Products Used:


Did you know we have a Flickr Gallery to showcase Eyelet Outlet Design Team Creations?


You can visit me in blogland at Ingenious Inkling,
and you can find Lauren & I making holiday cards
all year long at Jingle Belles


Monday, January 22, 2018

Foil Washi Tape!

Eyelet Outlet is well known for its wide variety of washi tape.  
New styles are added regularly in the store. The basic styles are: decorative, foil, glitter, and sometimes thin.


A few strips of washi tape...bling and butterflies and you can create a shimmery note card.
What is your favorite type of Washi Tape?

Also featured on this card:


Dawn Mercedes, of Sunnyside Up

Saturday, January 20, 2018

Release Your Inner Kitten

Hi folks.  It's Kim from Katydid Cards; happy to be with you today.

The Knitting Brads at Eyelet Outlet are adorable and I really like the colors of the yarn.


I was eager to use them, so I made a card based on my last experience with yarn...and my cat!  It was when I decided I wanted to learn how to knit, so I was working on my project with the yarn on the floor in a basket.  Suddenly, there was a tug and off went my yarn in the cat's mouth.


It's a spinner card, which was pretty easy to make in my Silhouette.  But you could do this with circle dies as well.  I have a template for you on the Freebies page if you'd like it.  Here's a video (as best as I could provide with one hand on the camera and the other on the card) of the blissful kitty as he rolls around with his yarn.


I picked my cardstock to match the yarn.  The patterned paper is digital from a kit called New Found Happiness.  I recolored the dots, though.  Believe it or not, I scanned the balls of yarn so I had an exact color match.

The kitty was made from a cut file I purchased in the Silhouette store, but I doctored him so he could hold a ball of yarn in his paws.  The remaining yarn and a pair of knitting needles sit nearby in a basket made using the Basket Builder Framelits.  There are two layers to the basket...the open weave top layer in Crumb Cake and the solid back layer in Early Espresso.


And here's a close-up on the kitty.  I added some embroidery floss to make it look like the yarn is trailing.


The sentiment inside plays off the greeting and another ball of yarn and knitting needles finish it off perfectly.


I enjoyed sharing my card and my story about my little cat, Pumpkin, with you.  She passed away some years ago now but the great memories she gave me still make me smile.


Kim from Katydid Cards
Who provided the inspiration for these cards?  Katy did!