Showing posts with label love. Show all posts

Monday, January 23, 2023

Mice in Love


Time is approaching for Valentine's Day. I have made sure to 
be ready with some sweet cards adorned with Eyelet Outlet
embellishments. 

This card features an image of cute mice by Hetty Claire.
I colored the image with Copic Markers then came the 
fun part of adding the embellishments. The first was the
love washi tape from Eyelet Outlet which is so cute and can be
used for other cards like Mother's Day.

I added the pearl hearts at the bottom and small enamel
dots at the top of the card and around the ring box. 
Now it is ready to send out to that special someone.

Shopping List for Eyelet Outlet
Love Washi Tape
Heart Pearls (sticky back) 
Enamel Dots (light pink)


Elizabeth - Blog

Tuesday, July 2, 2019

Ewe Moooove Me

Hello folks!  It's Kim from Katydid Cards sharing a sliding pop-up card using Eyelet Outlet's Cow and Sheep Brads.  Also included in these collections are the Pig and Goat.  A Heart Pearl adorns the barn.

Here's a picture of the card folded flat for mailing.


But here's what happens when you tug on the ribbon at the top.  I just love this card style!


When you open the card, here's the sentiment.

And I hope you enjoy your day as you're udderly delightful, too!


Kim from Katydid Cards
Who provided the inspiration for these cards?  Katy did!

Tuesday, September 4, 2018

Chicken and Waffles

Hi there!  It's Kim from Katydid Cards.

One of the new releases at Eyelet Outlet is the Chicken & Waffle Brads.  I'd never heard of this combination before...guess I'm living in the wrong part of the country to be aware of its popularity.  But the brads are sure popular with me!  Here's a card I made using just the waffles.


I used a card base I found in the Silhouette store and am very happy with the way it showcases the waffles and the fork from the Utensils Brads.  The greeting was created to compliment the waffles.  I filled the letters in the word WAFFLE with a waffle pattern.

The bottom of the card was embossed with a heart pattern...that open space definitely needed some additional interest and this embossing folder did the trick.

Inside, I decided to add a little syrup to the waffles.  The font is supposed to simulate snow, but I think it looks enough like syrup!


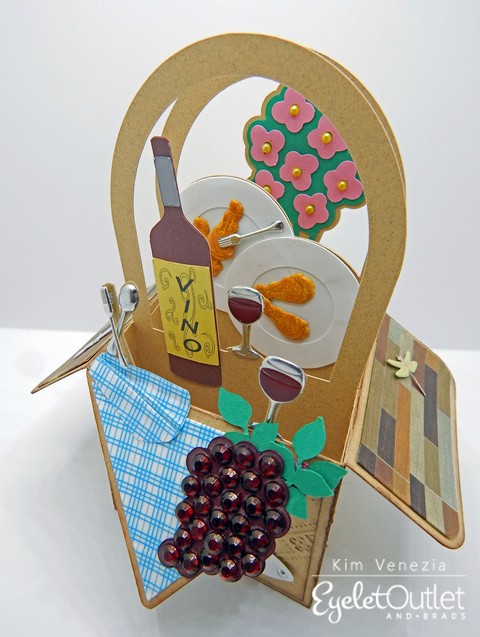
I didn't forget about the Chicken Brads!  Here's a redux of a picnic themed box card using those yummy chicken legs and more!


In addition to the chicken, I used the Silverware, Cocktail, and Dragonfly Brads.  In addition, I used the Hardwood and Blue Patterned Washi Tapes and large Jewel Bling as well as Pearl Bling (both colored with Copic markers).

The card base was made using a Summer Box Card cut file by SVGCuts.


 Kim from Katydid Cards
Who provided the inspiration for these cards?  Katy did!

Tuesday, April 3, 2018

You're a Catch

Hello everyone!  It's Kim from Katydid Cards with you today.

The Brown Teddy Bear Brads offered at Eyelet Outlet are just plain adorable!  The package comes with both sitting and standing bears.  And there's also Pink & Blue Teddy Bears, perfect for a baby themed card or layout.

I knew exactly what I wanted to do with my Teddy Bears when I got this, "You're Clawsome", stamp set.  Does this claw machine bring back memories for you?  It does for me!  I used to love playing this (and many other) games in the arcade when I was young.


I stamped the image and scanned it into the computer as I wanted to make several layers with different apertures.

For the top layer, I cut around the perimeter of the claw machine on a panel which is 4" x 5 1/4".  I placed Confetti Washi Tape on the wall and Hardwood Washi Tape on the floor.  The opening I cut allowed me to wrap the washi around it so it's nice and secure.

The second layer has the stamped image, colored with Copic markers.  I cut a rectangle around the inside of the claw machine.  I attached a piece of acetate directly to the back of this layer and then adhered it to the bottom layer after coloring and attaching the brads.

So, the bottom layer shows the complete image minus the teddy bears included on the stamped image as I didn't want them to peek out from behind the brads.  Since I scanned this into my computer, I was able to erase the teddy bears with ease.  I colored the shute and claw.  Here's a closer look at the brads behind the acetate.


Inside, the sentiment plays off the Teddy Bears with another little bear brad to accent.  I cut the panel a bit smaller so I had room to border it with some additional Confetti Washi Tape.


I'd like to make another one of these with a combination of brads as I think that would look awesome and is a fantastic way to combine brads leftover from previous projects.

Thanks for visiting!  I'll see you next week with another project!


Kim from Katydid Cards
Who provided the inspiration for these cards?  Katy did!

Saturday, January 27, 2018

Perfect Pair

Hi everyone!  It's Kim from Katydid Cards with you today.

Those of you who follow this blog already know that, in addition to eyelets and brads, Eyelet Outlet has a large selection of washi tapes ranging from patterned, glittered, foil and holiday/seasonal.

For me, the hardest part about using Washi is deciding which of the many there are I should work with first.

Today I'm working with the Glitter Black Washi Tape and I used it in various ways.  I'll show you my card first and then talk a bit about what I did and how.


The card's focal image is the Penny Black Perfect Pair stamp set.  It's a jumble of birds flying...but in the midst of all that confusion, two birds manage to find each other.  The image was stamped with Tsukineko VersaFine Onyx Black Ink and then heat embossed with Clear Embossing Powder.  I got a tip from the Internet that it's much better to stamp in black and emboss with clear embossing than stamping with VersaMark and using black embossing powder as it tends to be messy.

The stamp set comes with the greeting as well.  I used only a portion of the stamp for the front with the balance inside the card.

But let's talk about the star of the show, the Glitter Washi.  I stamped the two birds with StazOn on the washi using the MISTI to get accurate placement (I attached the washi to scrap card stock first to give it stability and make it easier to cut).  Then I fussy cut them and attached them to the front with glue dots.

I used the Word Window punch on the greeting.  For the mat behind it, I lined up two pieces of Glitter Washi on scrap card stock and punched it with the Modern Label punch.


Next, I cut a mat 1/4" larger than the image and placed Washi around all four sides, mitering the edges.

On another panel of 4" x 5 1/4", I stamped My Favorite Things Lots of Dots Background Stamp using the same method as the birds.  I picked this background as there are dots in the focal image and thought it would coordinate nicely.

Another frame of Washi on the base of the card to frame this piece.  Before adding it to the back, I wrapped one final piece of Washi across the bottom.

Inside, I used the second part of the greeting with the two birds stamped. I could have run another strip of Washi tape across this panel, too.  That would have looked nice...next time!


I can't wait to work with Washi tape again...and to share my projects with you.


Who provided the inspiration for these cards?  Katy did!

Saturday, January 13, 2018

A Thousand Miles

Hi!  It's Kim from Katydid Cards with you today.

Last week I posted a collection of cards using Eyelet Outlet's Sneaker and Water Bottle Brads.  I have one more sneaker themed card to share and, in my opinion, I saved the best for last.


It features the sneakers making their way down the street to the finish line past a quaint row of houses from the In the City Stamp Set by Stampin' Up.  I stamped the buildings and then scanned them into the computer to color and trace them in my Silhouette.  I attached them to a 4 1/4" x 5 1/2" rectangle of Soft Sky which I embossed with the Cloudy Day embossing folder.  Across the bottom is the first half of the greeting.  As a finishing touch, I coated the windows and clock with Glossy Accents.

Here's the star of the show, a pair of sneakers...ready to go!


And here's the destination:


Just pull the tab and you get to watch the sneakers make their way to the finish line.


 And reveal the second half of the greeting.


 And here's the sentiment inside:


I made another version of this exchanging the word "run" for "walk" for Suzanne, the owner of Eyelet Outlet.  She is quite an accomplished runner so the card with that revision would be perfect for her to give to a loved one.  I forgot to take a picture of it, but it was exactly the same, save for the word.


Kim from Katydid Cards
Who provided the inspiration for these cards?  Katy did!

Saturday, January 6, 2018

Ode to the Humble Sneaker

It's Kim from Katydid Cards and today I'm sharing several cards as an ode to the humble sneaker using the adorable Sneaker & Water Bottle Brads from Eyelet Outlet.  My plan was to make a single card, but I had so many ideas I had to just keep going!

Sneakers have come a long way since I wore Keds as a child.  I don't even recall owning any color but white.  Today there are so many choices it can make your head spin, but that's because we ask so much more of sneakers than we did years ago.  On second thought, maybe the sneaker isn't so humble!

A Great Pair


For lack of a better name, I'm calling this card fold a Flap Over.  The patterned paper is cut 1/2" longer than the card, scored and folded over the back.  The circle cut in the front allows for the sneakers and greeting to peek-a-boo from inside.  I just love the bright colors on this card.

And here's the inside:


Next up:

Challenge

I've seen this quote several times and always thought of it as powerful advice.  I think the first time I saw it was in a Nike ad, so I'll credit them as the originator.


The digital patterned paper is from the Half Marathon kit by Pink Rainbow Design.  I love the combination of yellow, black and white, so it was just great luck the water bottle brad matched perfectly.  Creating a text to path in my Silhouette allowed me to curve the greeting to the band across the front.  I created a mat for it and for under the patterned paper.  Before attaching the band with foam adhesive strips, I attached the water bottles and sneakers.  Inside is blank so this can be used as a note card.
Then there's:

Listen

This is my favorite of the cards today, I think.  I love the combination of papers, accentuated by the black mats.  Another quote I found, this time by Dr. Margaret, helps to create the centerpiece.   The digital patterned paper is from the Running Princess kit by Just for You.  Intending this as a note card, I left the inside blank.
 
 And finally:

Conspiracy Theory


I had a little fun with this card, borrowing the idea from the movie, "Conspiracy Theory" with Mel Gibson.  Turns out he wasn't a total nut, after all.  So maybe...just maybe there's some truth to this theory as well.  Next time you see a pair of sneakers hanging from a power line, you may look at it in a new way...and smile as it says inside the card.  Here's a look at that:


Let these humble sneaker cards remind us to resolve to "get moving" in 2018.

I made one more sneaker card which I'll be sharing next week so stay tuned!


Kim from Katydid Cards
Who provided the inspiration for these cards?  Katy did!

Saturday, December 2, 2017

Explosive News!

Hi!  It's Kim from Katydid Cards!

I have to admit, when I first joined the EO Design Team, working with washi tape was outside my comfort zone.  But now I find myself having a lot of fun incorporating it in my projects.

It's all due to the fact that Eyelet Outlet has SO many washi tapes available...there's something for everyone!  That and all the great inspiration from my Design Team Sisters...did you know we have the Washi Queen on our team?  Yes, we do!

I used the Colored Math Washi Tape today and it provided the perfect background (and gave me my color cues, too).


I paired this with the Great Chemistry stamp set.  It was purchased as a required stamp set for a Copic coloring class.  I never used it and figured I never would.  Thank goodness for this washi tape as it caused me to dust it off.  Here are the results:


I thought a split-front card would be a great way to showcase both the image and the sentiment inside.  It was a good choice.  This sort of card is easy to make and you can adjust the upper and lower panels to any size you need to accommodate your focal image and sentiment.  I have a template for this layout on the Freebies page if you'd like it.

I used several other EO products on my card:


I colored this mad scientist with Copic markers and then added the glasses.  His eyes were calling out for a pair of black pearls which I dotted with white gel pen to give them a highlight.  I pieced his bow tie with Green Glitter Washi and I "filled" the vial with Red Glitter Washi, but I colored it with a Copic marker for a custom color.  Of course his formula has to be bubbling, so I colored the Swirl Jewel Bling in various sizes.  Here's a closer look at all that:


I used another image from the stamp set for the area below him and the bling worked perfectly for that as well.  But I wasn't done with the bling quite yet.  I added it to the greeting, which was calling out for embellishment.


This is such a fun card!  I really enjoyed making it.


Kim from Katydid Cards
Who provided the inspiration for these cards?  Katy did!