Showing posts with label Emotion Brads. Show all posts

Thursday, March 7, 2024

Tissues for your Issues

You never know what issues people are dealing with, but if your issue is the desire to collect adorable paper crafting embellishments, we've got tissues!  


Today I've paired the awesome tissue box brad from the Toilet Paper & Tissue brad set with a couple of our Emotion brads. I added a few tears near the sad face and an enamel heart sends a caring message. 

Thanks for stopping by today. Check out our tradeshow schedule for a town near you if you'd like to come by and see us in person!


Wednesday, August 23, 2023

Happy, Happy Birthday

Tags are a fun alternative... or addition to... the traditional birthday card, and Eyelet Outlet has all the birthday-themed embellishments you could wish for! This coordinated set features Balloon Brads (the Pastel set is on sale!); Birthday Candles; Banner Brads (both Brights and Pastels are on sale!); and an Emotion Brad wearing a Party Hat. A sprinkling of silver Star Sequins adds a little extra magic to the mix.


New Jersey crafters, if you're attending the Stamp and Scrapbook Expo in Edison this week, be sure to stop by the Eyelet Outlet Booth and say hi! Non-New Jersians, check out our complete Tradeshow Schedule to see when we'll be visiting YOUR town.

is looking forward to Expo!

Wednesday, January 4, 2023

Birthday Balloons

Nothing says "Happy Birthday" quite as well as a big bouquet of balloons, does it? In real life, you couldn't actually adorn the balloons with Eyelet Outlet brads, but in card form you can, and thus, these diecut balloons are decorated with Lollipop Brads (they're on sale!), Birthday Candles, Unicorn and Rainbow Brads, an Emotion Brad, a Cupcake Brad (also on sale!), on a background of Happy Birthday Washi, matted with Orange Fan Tape.

Of course balloons are awesome for plenty of other festivities besides birthdays and the Eyelet Outlet Store has brads, tape and bling that will enhance any occasion!

loves making birthday cards!
Blog * Instagram * Facebook  


Thursday, August 13, 2020

Shining a Light on our Light Bulb Brads

Next time you're shopping the Eyelet Outlet store, don't forget to check out our clearance section before you check out!  You never know what kind of goodies you'll find there!  Today I've got 3 card ideas for you using our light bulb brads from the clearance section.


First up a fun thank you card with a little play on words.  I've used two of the yellow bulbs from the set suspended from a thin line and added some of our stick on bling to give the bulbs some shine.  I've also added a strip of our beautiful star glitter washi tape and a strip of skinny yellow washi tape.  


Here's a cute way to check in on a friend and ask "Watt's Up"!  For this card, I wanted some patterned paper and actually made my own.  I used a light bulb image from Cricut's School Time Doodles image set.  I randomly placed them on the my rectangle card base used print then cut to create my patterned paper background.  I like the way the yellow bulb popped against the black and white color scheme.


This sentiment, from Cricut's Rad & Happy image set really made me laugh because it's totally ME when I'm making a card!  Sometimes I overthink projects to death!  Here I've used the white light bulb from the set and some clear stick on bling.  I also used one of Eyelet Outlet's emotion brads.  This one looked like he was really thinking things over!  Some black and white stripe skinny washi tape added a little frame around the card.  


Stay well, keep crafting, and enjoy the day, friends!


Tuesday, March 5, 2019

Concentration Card Kit

Hi!  It's Kim from Katydid Cards and today I'm sharing the final card kit being offered by Eyelet Outlet at trade shows.  This kit is a humorous adaptation of that old TV game show, "Concentration".   Here's a look at each of the cards provided in the kit.


Here's a more in-depth version of the tutorial with step by step pictures just in case you had any additional questions

First, you'll cover the nine white squares with your favorite Washi Tape.


Fold the excess washi over the edges of the square or trim it off scissors.  Note:  If you find it easier, you can use a small circle punch to trim the notch.


To ensure good adhesion, burnish the washi tape with a bone folder or your thumb.


Attach the washi covered squares to the card flaps. Align the tops with the score lines on the flaps, being sure the notch is to the bottom.  After you attach each one, check to be sure the flap opens properly.  If not, carefully remove it and reapply.


Attach the white panel with the emotion words to the reverse of the card front. There are faint lines on the panel to help you with placement.  We applied adhesive to the front edges of the white panel and to the back of the card front around the flaps to make sure it’s attached well.


Insert the Emotion Brads on the white panel, making sure they coincide with the words. Note:  We use a paper piercer to make the hole and then insert the brad.


After it’s inserted, we flip to the back of the panel to flatten the prongs.


Attach the rectangle that matches the color of the card base over the back of the panel to hide the prongs.


Next, attach the yellow mats to the front of the card. On our card, we attached the large bottom mat directly to the card front and the small top mat with pop dots.  The mats can be attached either way, it’s your personal preference.


Attach the printed greetings, centered on the yellow mats. On our card, we attached the large bottom greeting with pop dots and the small top greeting directly on the mat.  As with the mats, the sentiments can be attached either way.


Decorate the white sentiment panel with washi tape and attach to the inside of the card.


With your left-over Washi Tape, why not take a minute to decorate the envelope flap.
And finally, here's a picture of each card individually.


I hope you enjoyed seeing how these kits go together and are inspired to get some for yourself at the trade show you visit.


Kim from Katydid Cards
Who provided the inspiration for these cards?  Katy did!

Wednesday, August 8, 2018

It's Five O'Clock Somewhere!

That being the case, this is the perfect time to celebrate with a bit of a cocktail, in card form! Hi folks, it's Lauren here to remind you that Eyelet Outlet has many styles of adult beverage brads, from Beer to Champagne to Wine and Cocktails, there is something to suit every taste! I've made a few variations, because it's no fun to drink *alone* right?!


Lately I love to make altered rolodex cards, and I've been lucky enough to get into a fun swap group, which is helping to grow my collection. For this set of Cocktail Cards, I diecut the rolodex card shape from various bright patterned papers, added strips of Washi Tape and affixed my various Beverage Brads on little tags. For my sentiments, I printed most of the text in a typewriter font, then chose to highlight a word or two by spelling it out in letter stickers. I used neutral stickers in the same font as my bright colors, to create a sort of drop shadow effect, which made them show up even better!


For my first sentiment, "It's Five O'Clock Somewhere" I wanted a party atmosphere, so I chose to combine a few different brad styles, including a mug from the Beer Brads set, a glass of white wine and a margarita from the Cocktails set, and some Colorful Sunglass Brads to add to the tropical vibe.


For "Why Limit Happy..." I used both the mug and one of the bottles from the Beer Brads, as well as an appropriately festive Emotion Brad. I've set off the sentiment with some Blue Dots tape and a Skinny Yellow tape.


On the "Cheers My Deers" card I used two champagne flutes from the Wedding Brads set, with some tiny gems snipped from a Fancy Long Bling strip, rising up from the glasses. I've drawn attention to the little tag by adding strips of bubbly-looking Pink Dots and Blue Dots washi.


To illustrate "When Life Gives You Lemons..." I used one of each shade of margarita from the Cocktail set, adorning one of them with a Beach Umbrella that is cleverly multitasking, lol.


I hope you'll be inspired to serve Eyelet Outlet Beverage Brads at your next papercrafting party! ♥

can be found here each Wednesday, 
and on her own blog the rest of the week!

Saturday, July 28, 2018

Turn That Frown

Happy Saturday! And welcome to anyone visiting us at CKC - Lancaster this weekend!
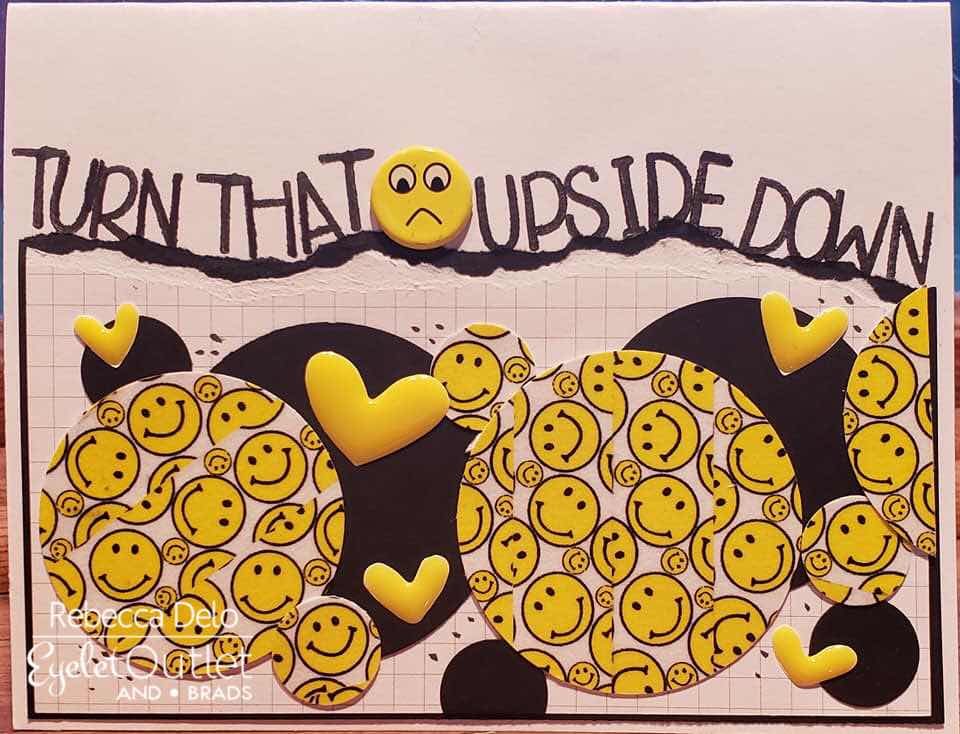
This is Rebecca, and today I’m coming to you from the road. I had the chance to get away and spend the weekend with family in my hometown, so we’re enjoying some R&R on the farm. Anyone else finding the summer is just flying by at too fast of a pace?! I need these couple of days in the country to sloooooow down.

I had to finish my card here on location, so I thought I’d take the picture with my favorite view :). You can’t frown on a night like this!


Eyelet Outlet Items Used 


A Pink & Main alphabet set was used for the sentiment stamping.


Wherever you are, have a great weekend, and no frowns allowed!


Thursday, May 10, 2018

It Happens

This past week a very unfortunate thing happened to me.  While out shopping, I visited the ladies room.  Just as I flushed the commode, my brand new prescription sunglasses slipped off the neck of my shirt where I had hung them and into the water! Immediately they vanished out of sight!

My first thought was how glad it wasn't my new iPhone I've had for a week!  Several friends have shared their own experiences with me about loosing gloves, glasses and phones, so clearly, IT HAPPENS!  Today's creation is for all of you who've have had a similar experience!  Eyelet Outlet has you covered with Phone Brads, Sunglasses BradsMitten Brads, and even Purse Brads!  Don't forget the Sad Face Brads!  The toilet on my card comes from Cricut's Chore Chart cartridge. 


Thanks for stopping in today and be careful out there ladies!!  


Saturday, May 5, 2018

Sending Smiles

Happy Saturday! This is Rebecca, back for the start of another weekend. But it’s not just any weekend......

First, it’s a Scrapbook Expo weekend. Anyone visiting Eyelet Outlet in Milwaukee? Stop by and say hello!


Second, it’s interNational Scrapbooking Day! Celebrate by playing with pretty paper, making a pretty page or card, or making memories with friends and family. 

And third, it’s not too late to run through our Instagram Hop with Pink and Main. Check out some stamps, brads, washi and bling in action, and maybe win a sweet prize! You can start from out Insta at: 
https://www.instagram.com/eyeletoutlet/


You’ll see this card in the hop, and I thought I’d show a couple of details here today.


I wrapped twine a few times so I could make the banner appear multi layered. Washi is perfect for wrapping around the twine. The silver houndstooth washi made a great base pattern for the background, too.


I used the Pink and Main Banner Alpha stamp set. First I heat embossed the letters with silver embossing powder and then stamped the banner shapes with yellow ink. A quick cut, and each letter was ready for the banner. Full disclosure.....I was going to stamp “sending,” too, but I LOST THE G!!! It’s somewhere on my desk or attached to something, but I had to give up and move on to plan B.


I had to alter the emoji brads a bit to make them grin. A slick writer did the trick.

Eyelet Outlet Items Used


Wednesday, April 25, 2018

A Banner Day

It's always a banner day when I (Lauren) get to make some "just because" cards with my Eyelet Outlet goodies!


One of my friends sent me a photo of some amazing stitched circle garland last week, and it made me start thinking about different types of bunting and banners... and the fact that they would probably look even cooler on cards... with some EO brads on them, o'course!


My first card features typical triangular pennant-shaped flags, which go really nicely with our Banner Brads. I made them by neatly applying several strips of Feather Washi on a piece of plain white cardstock... (I *love it* when tapes can be lined up horizontally to make a bigger pattern; it doesn't work on EVERY tape; but I can never resist testing each one to see if it will!) ...then trimming them down into neat triangles. By the way, the Banner Brads come in Brights and Pastels, but it turns out my favorite way to use them is to mix both sets and combine ALL the colors! :)


For my second card, I broke out some of my older, smaller punches to make shaped garlands I could adorn with Emotion Brads and with Hearts. I added the banners to both cards in the same way: I lightly tacked the paper shapes to the card panels with minimal adhesive, then sewed across all of the shapes to both fasten them. (At the same time this adds the detail of the string that holds the banners together.) Then I set the brads neatly in their places on top of the sewn banners. Finally, at the very end, I affixed the decorated panels to 6" square white cards, and sewed neatly around the edges. The last step is optional, of course, but it adds a little extra texture AND makes sure the panels stay really flat, without being able to see the reverse side of the brad inside the card.


I have a few more ideas for garlands... and new ways to use them... so this might be a bit of a "recurring feature" lol; stay tuned! ♥

will take any excuse to play 
with paper, tape, brads and bling!