Showing posts with label 3-D project. Show all posts

Friday, March 3, 2023

Dreaming of Sand and Surf!

Happy Friday, Eyelet Outlet fans!  I don't know about you, but I am so over winter and I am dreaming of warm beachy days!  I hope they come soon! 

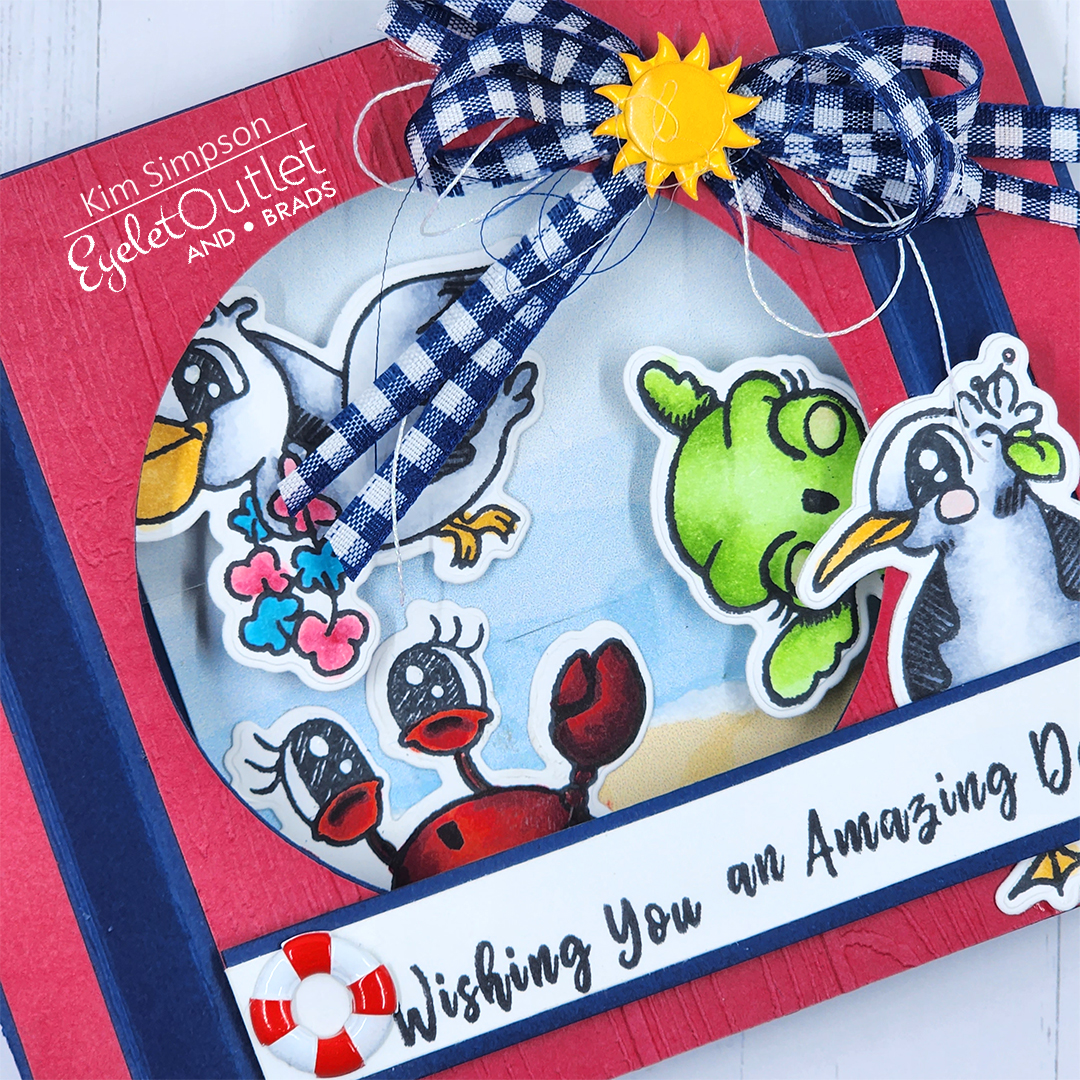
When I saw the new Cruise Ship Brads, I knew that I had the perfect stamp set to pair them with!  I created a fun pop up shadow-box card with a beachy theme!


I created the background by tearing some digital papers that represent the sand, water and sky.  I adhered the images to acetate and added them in various places to add depth to the card. 
Lastly, I created a bow and added the sun brad to the center of it and added the life preserver brad to the sentiment strip.  The card stands on its own and is the cutest little 3-D scene.


I hope you are inspired to get crafty!

Shopping List: 

Thank you so much for hanging out with me! 

Xoxo, Kim


Wednesday, April 20, 2022

BIG Initials!

One of the easiest ways that I (Lauren) have found to quickly customize a plain store-bought gift bag is with giant initials, covered in Eyelet Outlet Washi Tape of which... fortunately... I happen to have quite a bit! I've also got some fun Enamel Hearts and Stars, which I've scattered around the bags for even more texture and interest.


It seems counter-intuitive to start with the tape rather than the initial, but in fact, that's sort of what I did. I did size and print my initials on plain white cardstock first, but... I didn't cut them out. Instead, I took my 4x6" outline letters (the font is called Storybook) and stapled them to 5x7" pieces of cardstock covered in neat strips of washi. Then, I cut them out!


Between my three initials, I've used about three dozen different tape styles, and I'll name and link a bunch of those in a minute, but really... this idea will work with ANY combination of tapes you like! You can organize them by color, as I have here; or by theme, or in rainbow order, or create patterns with the tape or... well, this is quite a flexible method and thus perfect for making the initials as unique as their recipients! I adhered my finished initials to some solid cardstock to create a skinny outline, then added some of the same tapes to each bag to complete the design.


And now here's a fairly thorough list of the tapes I used, from top to bottom, for each letter!

Letter K: Flower WashiPink Foiled RoseSkinny Calendar TapeUnicorn WashiZigzagPink CheckedMacaron, more Skinny Calendar (the set has three different styles), wide Funky Bird TapeHeart Tape from the Valentine set, Tiny Hearts, the third of the Skinny Calendar Tapes and Pink + White Dots.

Letter R: Star TapeOwl WashiScript TapeSkinny XO Foil Tape, XO Washi which is sadly out of print, Foiled Silver DotsAntique Car TapeTire TracksRoad TapeWood WashiMusic Keyboard Tape and a repeat of XO, Script and Stars.

Letter S: Cloud WashiSkinny TapePurple ZigzagRainbow TapePurple CheckedSkinny Calendar Tape, Purple Gingham Check and Purple/Green Stripe Tape have, alas, gone; Llama Washi, More Clouds, Foiled Flower Tape and finally Purple Dots and Japanese Tape are also out of print, but... You can see the entire (huuuuuuuuuuuuuuuge!) selection of Eyelet Outlet Washi, just by clicking this link!

has quiiiiiite a bit of
EO Tape!!! 

Wednesday, May 9, 2018

A Bouquet That Lasts Forever

Hi folks, it's Lauren here again. Mother's Day here in the US is this Sunday, May 13th, but you still have plenty of time to make your mom a beautiful bouquet that will look equally nice next Mother's Day! All you need are some Eyelet Outlet paper flowersbradsbling and washi tape, plus a strong, fast-drying adhesive, some wooden skewers ...or popsicle sticks if you're crafting with kiddos... and a small jar to hold your finished bouquet.


Start by making flower stacks: it's good to combine sizes, shapes, and colors. Luckily all of our EO flowers come in sets with small, medium and large flowers, and there are loads of styles! In this bouquet I used purple, white and green Solid Color Flowers, plus Butterfly and Red Dot Flowers. My stacks range from just two flowers glued back-to-back, to stacks with three layers on each side. (I wanted the bouquet to look nice from every direction, so I made all of my flower stems double-sided.)


For the flowers with Pearl Brad centers, all I had to do was assemble my stack, hold them together with a brad, and then glue one flower to the back, in order to cover the brad prongs. For the blooms with Enamel DotHeart Pearl and Flower Jewel centers, I used dry adhesive to layer the flowers. Once I had a nice mix of flowers, I added the stems --which are bamboo skewers from the grocery store. I used a small amount of hot glue to attach the pointy end of the skewer firmly between the flower layers, but if you're crafting with kids, a strong adhesive like Aileen's Fast Grab Tacky Glue or Beaon's 3-in-1 adhesive also works well.


Once all my flowers had stems, I added leaves. I made them by cutting large Green Paper Flowers in half, applying a tiny amount of hot glue to the "stem" and then folding the flower halves around the stem. Then I used my spring-loaded wire snips to trim some of the bamboo skewers to different lengths, so that my bouquet would have a more interesting shape. Strong craft scissors or a utility tool would also work.


Now I just needed a vase. I chose a small glass bottle, but really any small container would work, since you won't be needing to add water! I recommend a vessel with a narrow opening, though, because it makes the bouquet stay together more neatly. If you use something with a wider neck, you might like to use some washi tape or a ribbon to keep the flowers from shifting around. I dressed up my clear glass bottle with a strip of Wide Flower Washi and then used bits of white Pearl Bling Strips to make it even fancier.


If this isn't enough inspiration for your Mother's Day crafting, check out the 30+ new styles of Washi Tape just added in the Eyelet Outlet store! (The City Washi miiiiiiiiight be my favorite... what's yours?) ♥

Lauren Bergold
gave this bouquet to her mother-in-law at an 
early Mother's Day celebration this weekend, 
and it was a big hit!

Wednesday, April 11, 2018

Gift Wrapping Is My Bag, Baby!

I (Lauren) may have mentioned that before. But I never get tired of making extra-fancy presents for my friends and family. Especially (...but not limited to...) the kiddos. It's amazing how quick and easy it is to make a plain boring giftbag from the big box store into something infinitely more colorful and fun... with Eyelet Outlet Washi Tape!


You've seen me make washi tape into patterned paper before, just by applying tape in neat strips on plain white cardstock. And that's what I did this time to make the star bag, but instead of choosing one pattern of tape, I made a washi rainbow! I used a homemade star template from my computer to trace the star and cut it out with scissors. Then I matted the whole thing onto a scrap of glossy black cardstock and cut it out again. For the heart bag I used a store-bought stencil for the shape, and this time I applied the tape in a sort of plaid pattern, alternating between placing the tapes horizontally and vertically, so it would be more interesting. I matted that one on a coordinating shade of purple. I machine-stitched around the edges of both shapes to add a little extra texture.


I affixed both shapes to their bags using a few pieces of foam tape. But first I wanted to add a little more color to the bags. The nice thing about washi tape is that it comes in lonnnnnnnnnnng rolls... so you never have to worry about how wide or tall your project is. I marked an even point on the right and left sides of the front and back of each bag. Then I applied my tapes carefully, one at a time, in long strips that went alllllllllllllllll the way around the bag! By starting inside the fold at the side of each bag (and working neatly) I was able to hide the place where each strip of tape overlaps at the end of its run. I love how it looks seamless, and I can tell you that when non-papercrafters see something like this, they have NO IDEA how you've done it! (So when you make your own version, if you want to tell them it was *MAGIC* your secret will be safe with me!) ;)


On the star bag, I used: Red Dot TapeBlue Stars and a couple of Skinny Print Tapes for variety; the star itself has: Heart WashiOrange StarsCrayon TapeBlue StarsPurple CheckedSkinny Yellow DotsSkinny Green Stripes and Confetti Tape.


On the heart I added a stack of Paper Flowers with an Enamel Dot center, and these tapes: Pink CheckedPurple ZigzagPink DotsSkinny Pink Dots and Skinny Pink Checks plus Heart Tape; with Wide Star Washi and Skinny Glitter Tape on the bag. But really... both of these designs would work with literally ANY combination you'd like to use! You could work in a specific color group--either the recipient's favorite combination, or to commemorate a school or team. Or use the entire rainbow--either randomly or in the ROYGBIV spectrum. You could even combine tapes thematically, for an occasion like a birthday or holiday. The only limit to the variation is your own imagination!


Need even more great ideas for using Eyelet Outlet Washi TapeBrads or Bling? Follow us on Facebook and Instagram to see all the latest makes from our amazing design team! ♥

Lauren Bergold's favorite color 
is RAINBOW!!!
♥♥♥

Wednesday, September 6, 2017

Give Me an "L"! Give Me an "M"!

No, I (Lauren) am not leading a cheer squad, just fancying up some plain monogram letters with Eyelet Outlet Washi Tape, Bling and Brads for my niece, Lindsay, and my nephew, Matthew, who both have birthdays coming up.


I started with plain, kraft-colored, papier mache letters from the big box store, that are approximately 8" tall. Thanks to my colorful stash of washi tape, I had a plan that did not involve any tracing, cutting, painting, or even inking of edges! I began with the "L" since it had the more straightforward shape, and wrapped tape, in more or less spectrum order, from the top to the bottom. Since all the planes are square, this just meant lining the layers up neatly and overlapping the patterns at the back of the letter.


The only tricky bit was the tippy-top of the letter and the top and bottom of the horizontal stroke at the bottom of the "L", which I covered in neat strips of whatever tape I planned to use next on the front of the letter, in this case the Red Dots Tape and Orange Fans . In addition to those, I also used: Heart TapeAdmit One TicketsTape MeasureCooking TapeSkinny Green Stripe (two strips for a chunkier look)Blue/White DotsSkinny BlueBlue Check (again two strips)CupcakesPurple Zig ZagRainbow ChevronLoveSmiley Face, and Crayons.


Once the entire letter was covered, I broke out the bling to add a little bit of sparkle! I love the brand new Fancy Long Bling Strips, they come in several styles and they're not just great looking, they stick on really well AND are flexible enough to wrap around the letter! Before I started attaching them, though, I laid out the styles I thought I wanted to use, and moved them about a bit, until I got the perfect mix. Then I cut each of the strips just slightly larger than I needed, and, with the backing still on, checked my potential placement a second time, to make sure that I would not wind up with a big, un-bend-able stone right on a corner that would not be able to lay flat. Then, I peeled and stuck on the bling strips, from front to back, trimming any overlapping stones and getting them to line up as neatly as possible at the back. The designs I used include two types of Fancy Long BlingGreen Pearl Strips and Purple Jewel Strips.


After I had the strips in place, I added some individual gems, including Blue Flower Jewels, the brand new Heart Jewel Bling and Red Heart Pearls.

The slanting lines in the center of the "M" made it a little more challenging, but not overwhelmingly so. I elected to just wind the tape around in strips, the same way I did with the "L". This means there's a little "jog" at the back of the letter where the two ends of each tape meet up, but I trimmed them neatly, in the same way each time, and decided to call it a "Design Decision"! I've got a bit of a transportation theme going on for Matthew's initial, so I incorporated multiple strips of Road Tape and Map Tape into my design. In addition I used: Blue CheckSkinny BlueRed DotsHeart TapeSmiley FacesAdmit OneDotsSkinny Green Stripe and Tape MeasureOnce my background was completed, I started adding vehicles to the design. I've got: a Work Truck, a Bicycle and one the brand new adorable Pickup Truck Brads that are coming to the store very very soon! Not to mention a Cupcake, some Sun and Cloud Brads and an Airplane from the Travel set. I've also got some fun sentiment Arrows from the Road Sign Set and the Bicycle Set.


You may be wondering how I got those to stay on, seeing as how I could not reach the backs to open the prongs? Since I knew the "M" was hollow, I just made a hole with my paper piercer like I would for any other project, but coated the prongs of each brad with a little bit of 3-In-1 Glue before poking the prongs into the letter. For the larger brads, I added a little more glue to the back surface of design for additional sticking power. (I should mention that all of my nieces and nephews are well above toddler age and unlikely to attempt putting monogram letters into their mouths!)

I hope you'll be inspired to try your favorite Eyelet Outlet embellishments on your next 3-D project! ♥

Lauren Bergold loves making gifts 
for nieces and nephews more than 
every other type of project COMBINED! 
♥♥♥