Showing posts with label solid color paper flowers. Show all posts

Wednesday, September 23, 2020

No Time Like the Presents

 I (Lauren) only buy plain, undecorated, giftbags at the big box store. Because I know I can make them unique and fancy with my Eyelet Outlet Goodies! I made this set for my mom's birthday. She loves backyard birdwatching, her beautiful garden, and she's very fond of bling!


I added strips of Bird Tape alternating with Peonies Shimmer Tape, Bird and Flower Tape, accented with Skinny Pink Glitter Tape. I ran each strip neatly around to the side and tucked it into the fold; although a nice thing about rolls of washi tape is that you can actually run your tape all the way around the bag and make a continuous design. (It's still a good idea to start and end in the side fold, however!) I added white Paper Flowers with Pearl Brad and Jewel Brad centers and snipped apart some green Paper Flowers to serve as leaves. Finally I scattered a few hot pink Sequins around for extra sparkle.


If you're going to make a giftbag as fancy as this, you really need to go all the way and make a matching card, right? I used all of the same tapes and embellies as on the bag; just simplified them a bit to fit a smaller, 6" square shape. I did add a sweet bird from our Bluebird and Robin set to the center of my flower stack, too.


I hope you'll be inspired to use your Eyelet Outlet Embellishments to make your own custom gift bags; I know your recipients will love the results!

loooooooves to embellish!

Wednesday, May 8, 2019

Perk Up!

It's time for the Spring/Summer edition of the Coffee Loving Cardmakers' Blog Hop, so of course I (Lauren) couldn't resist showing off my Eyelet Outlet Coffee Brads. Plus a bit of Floral Washi Tape and some fun Paper Flowers, as well! I had been planning to also use my EO Coffee Stamps, but the other day my husband mentioned how happy he was that our lawn and shrubs had "perked up" this spring, and i thought, "Aha! Card sentiment!" 


I always try to incorporate the seasonal aspect of the blog hop, but frankly, sometimes I do better at that than others. This time I think I did pretty well with the Spring theme, though! I started right off with my carryout coffee cup. I wanted it to be flowery, so of course I could've used patterned paper, but I had this new Flower Washi I'm in love with and I couldn't resist! I applied it neatly in strips on a scrap of plain white cardstock, burnished it really well, then diecut the cup in the ordinary way.


Once I had the cup, I chose all of my papers based on the flower colors in the tape. I matted my label shape and the background for my A7 card, then added a little bit of decorative machine stitching. I made my sentiment flags using a nice petite size of foam alphabet letters, and then it was time for my favorite part: EMBELLISHING!


I added some Fresh Flower Brads and Mini Stitched Flowers to the cup itself and a few more to the label shape. I nestled the cup between the layers of several sizes of Solid Color Paper Flowers, held together with a Coffee Bean Brad and made leaves by snipping apart a large green flower. Then I assembles all the bits and finally scattered a few pale pink Heart Enamels at the very end.


I hope you'll check out all of the fab brads, stamps, tapes, enamels and flowers in the Eyelet Outlet Store, then come join the fun at the Coffee Lovers' Blog Hop which runs through this Friday, May 10th! ♥

has been known to enjoy a 
delicious caffeinated beverage or two! :)

Wednesday, December 5, 2018

Death Before Decaf!

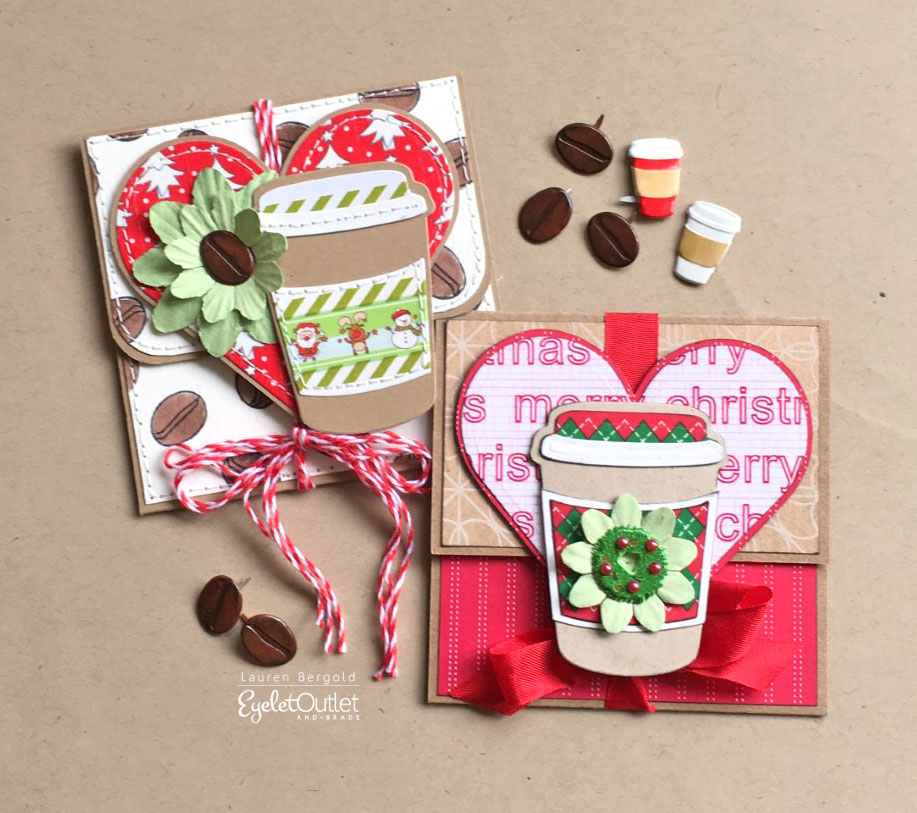
It's that wonderful time of year once again: by which I (Lauren) mean both the holiday season AND the winter Coffee Lovers' Blog Hop! Thus I decided to make some giftcard holders that combine my love of coffee, holiday cardmaking and Eyelet Outlet Coffee Brads and Coffee Stamps!


I made a very simple folder; it's just a piece of 3.5 x 8.5" kraft cardstock scored at the 2.5 and 6.5" point, to create a little pocket inside which can hold a giftcard OR a check, money, a little note, even some small photos. You could make these out of double sided patterned paper to save having to trim little panels to decorate the outside, but I always seem to have loads of little patterned paper off-cuts and this is a great way to use them up! 


Once I'd covered the pocket, top flap and back panel with cardstock, it was time for the fun part: decorating! I covered a small scrap of white cardstock with Eyelet Outlet Merry Christmas Tape and diecut it into a heart which is slightly narrower than the top flap, but hangs down a bit over the pocket area. This hides the place where I secured seambinding to the front, but still leaves room for the bow that literally ties the whole thing together. I used my Stephanie Barnard dies to create the coffee cup out of lighter kraft and the lid and front panel from this fun argyle-inspired Christmas Pattern Washi. I added a green Paper Flower, anchored with a Wreath Brad, decorated with some tiny red Pearl Bling berries.


In the second version, I decided to get a bit more coffee-centric, so I stamped the coffee bean from our Coffee Stamp Set in an all-over pattern and used a brown Tombow with a water brush to add color. This time my diecut heart has vertical-oriented Red Tree Washi and the cup is adorned with Santa Tape flanked by Skinny Stripes. And to hold on the flowers, one those awesome beans from the Coffee Brad Set which also contains both red and white coffee cups!


Be sure to hop over and see all the amazing cards at the Coffee Lovers' Blog Hop, and leave a little love for Amy Tsuruta and the other Coffee Elves who are working so hard behind the scenes at these events! ♥♥♥

Lauren Bergold 
would not *literally* prefer death to decaf... 
especially late in the day!

Wednesday, November 28, 2018

Holly, Poinsettia and Pinecones

There is no possible combination of holiday foliage that I (Lauren) do not love; especially if we're talking about Eyelet Outlet Holly, Poinsettia and Pinecone Brads! See?


Here's a shocking true confession for you: I own probably 15 sets of foliage dies and at least 7 or 8 of them are holiday foliage! But I use *all* of them --separately or together-- pretty much every year. In this case I've pulled out some medium sized pine branches and some smaller holly clusters, but really this idea would work with any foliage you like... you could even stamp rather than diecut, for that matter. I've used the same basic sketch for all three cards, just changed up the specific shapes and products. This is a great way to make a bunch of cards quickly, without having to mass-produce in the traditional way. For my first card I added the foliage to a matted star diecut, anchored the fronds with a trio of Poinsettia Brads and grounded the whole thing with some argyle-inspired Christmas Pattern Washi.


My second card is landscape rather than portrait, and I've used a nice big label shape, so that I could scatter a bunch of the gorgeous new Pinecone Brads around a Bling-bedecked Paper Flower stack. A double strip of Pine Tree Washi frames the whole thing quite nicely.


My third card features an ancient 3-layer heart die and a cluster of Holly Brads with red Jewel centers against a background of sheet music adorned with Holly Tape. This illustrates one of my *favorite* things about washi tapes that have a lot of "white" in them... they are almost always translucent, so that you can apply them over different colors of cardstock or patterned paper and get different effects!


Of course, there is a nearly unlimited amount of beautiful combinations you could make with just a few EO Holiday Brads and tapes, so let your imagination go wild! ♥

realizes that her holiday cardmaking duties would 
be easier if she made 50 of one design... :)

Wednesday, August 1, 2018

Giftwrapping, In the Bag!

Here's a shocking true confession: I (Lauren) hate buying gift bags! They're so expensive, and often not very good quality. The good news is, I have Eyelet Outlet washi tape and embellies, so instead of buying pre-made gift bags, I buy inexpensive plain bags in bulk and personalize them! 


This bag was made for my sister, Amie's, birthday gift. And I confess it was made a bit last minute, so I needed a few Ninja tricks to speed up the process. Trick #1: Washi tape covers a lot of ground quickly. Standard sized (5/8") tape is great, but at almost 1.25" our many beautiful EO Wide Washi Tapes are even better, and the Wide Lines Washi I've paired my butterlies with is 1.75". The latter has so many colors and patterns, it matches nearly every tape in my collection! Trick #2: Use a shoebox to hold the gift bag open. This will make it much easier to apply the tape, since the empty bag will want to keep folding up on you. You really needn't cover the entire bag; a few strips around the top of the bag add loads of interest. You don't have to take the tape 360 degrees, either, but the nice thing about tape is, it's one lonnnnnnnng piece that already has adhesive! So if you decide you do want to go all the way around the bag, it's easy! However much or little tape you decide to use, you'll want to start and end in the "folds" at the side of the bag, so you never see the ends of the tape. Apply one strip at a time, and if you're not confident enough to "eyeball" a straight line, a tiny pencil mark at each edge will keep you on track!


Trick #3: An oversized monogram is a really fast way to personalize your bag. My giant letter A is almost 5 x 8" and I printed it as an outline, on plain white cardstock, using a free font called "Storybook". I applied the same tapes I used on the bag, but you could use a coordinating-- or even a contrasting-- design to get different looks. Trick #4: Since most washi tape is translucent, you don't need to pre-cut-out a monogram to use as template! In this case, I just applied the tape right over the outline, and as you can see, it was still perfectly visible for me to trim up afterward. I use an Xacto knife for interior cuts (like the triangle at the top of the A) and regular scissors for the rest.
 

Trick #5: A coordinating mat makes your monogram stand out even more. Having said that, the "ghost effect" of the un-matted dimensional letter gives a totally different, but equally cool look. In this case, though, I did use a mat, which I chose to go with the Solid Color Paper Flowers I added for a little more color and interest. Since they come in nine colors, it's not hard to find a shade that will match perfectly! Trick #6: Green flowers are an awesome addition to your collection, because you can snip the petals apart and make them into leaves, as well, like I've done here. 


Again, this is hard to beat for speed and ease: I attached the flowers to the monogram with some beautiful oversized Pearl Brads and affixed the monogram to the bag with a few strips of foam tape, for extra dimension. Finally, I applied a strip of extra tape to a scrap of cardstock and fussycut a few extra butterflies to perch on the flowers.


With hundreds of varieties of washi tape in the Eyelet Outlet Store, I'm confident you can find LOTS of designs you'll love... and lots of ways to use them! ♥

really, reallllllly loves
wrapping presents!

Wednesday, July 11, 2018

What's Better...

...than that first cup of coffee in the morning? Hi folks it’s Lauren here, and actually that’s a trick question, because there’s really NOTHING better than that, is there? But cards made with Eyelet Outlet Coffee Stamps and Coffee Brads come pretty close. See?


I love that our stamp sets were created especially to work with our brads, but they also have brilliant sentiments that stand alone AND some fun images as well. For this card I used the little coffee bean stamp to create my own custom patterned paper, then used a brown Tombow Dualbrush pen and a waterbrush to color them in a watercolory style. Then I used some clever dies from Stephanie Barnard to construct the coffee cup, whose carrier band is made from our gorgeous henna-inspired Wide Flower Washi. I embellished with a few Paper Flowers, added my favorite sentiment in the Coffee Stamps set, and called it good to go!


I hope you'll be inspired to think about making your own patterned paper with your favorite EO Clearstamps. But first... why not help yourself to just one more cup of coffee... :)


has never really seen the point 
of decaf coffee during the day!

Thursday, May 17, 2018

New Dress Brads!

Gals, who doesn't love getting a new dress in your wardrobe?!  Wait until you see the cute new dresses Eyelet Outlet has!


This little dress comes in a package of several colors.  Today I'm paring the purple dress with an Eyelet Outlet Purple Paper Flower with Pearl Brad, some Purple Swirl Bling and a touch of Purple Skinny Washi Tape.  The dress form I used comes from Cricut's Formal Occassion Cartridge and rather than cut it out, I used my Cricut Explore to draw the dress form onto the card stock.  The patterned frame is from Cricut's Frame of Mind cartridge and it's particularly fun because it gives the illusion that the Purple Skinny Washi Tape is woven into the frame.  

Eyelet Outlet's brand new Dress Brads are available at the vendor booth this weekend, May 19-20, in Syracuse, New York at the "Too Much Fun Rubber Stamp Show" and very soon will be available at Eyelet Outlet.com  

Thanks for stopping by today and come back soon for more of Eyelet Outlet's brand new brad line!


Wednesday, May 9, 2018

A Bouquet That Lasts Forever

Hi folks, it's Lauren here again. Mother's Day here in the US is this Sunday, May 13th, but you still have plenty of time to make your mom a beautiful bouquet that will look equally nice next Mother's Day! All you need are some Eyelet Outlet paper flowers, brads, bling and washi tape, plus a strong, fast-drying adhesive, some wooden skewers ...or popsicle sticks if you're crafting with kiddos... and a small jar to hold your finished bouquet.


Start by making flower stacks: it's good to combine sizes, shapes, and colors. Luckily all of our EO flowers come in sets with small, medium and large flowers, and there are loads of styles! In this bouquet I used purple, white and green Solid Color Flowers, plus Butterfly and Red Dot Flowers. My stacks range from just two flowers glued back-to-back, to stacks with three layers on each side. (I wanted the bouquet to look nice from every direction, so I made all of my flower stems double-sided.)


For the flowers with Pearl Brad centers, all I had to do was assemble my stack, hold them together with a brad, and then glue one flower to the back, in order to cover the brad prongs. For the blooms with Enamel Dot, Heart Pearl and Flower Jewel centers, I used dry adhesive to layer the flowers. Once I had a nice mix of flowers, I added the stems --which are bamboo skewers from the grocery store. I used a small amount of hot glue to attach the pointy end of the skewer firmly between the flower layers, but if you're crafting with kids, a strong adhesive like Aileen's Fast Grab Tacky Glue or Beaon's 3-in-1 adhesive also works well.


Once all my flowers had stems, I added leaves. I made them by cutting large Green Paper Flowers in half, applying a tiny amount of hot glue to the "stem" and then folding the flower halves around the stem. Then I used my spring-loaded wire snips to trim some of the bamboo skewers to different lengths, so that my bouquet would have a more interesting shape. Strong craft scissors or a utility tool would also work.


Now I just needed a vase. I chose a small glass bottle, but really any small container would work, since you won't be needing to add water! I recommend a vessel with a narrow opening, though, because it makes the bouquet stay together more neatly. If you use something with a wider neck, you might like to use some washi tape or a ribbon to keep the flowers from shifting around. I dressed up my clear glass bottle with a strip of Wide Flower Washi and then used bits of white Pearl Bling Strips to make it even fancier.


If this isn't enough inspiration for your Mother's Day crafting, check out the 30+ new styles of Washi Tape just added in the Eyelet Outlet store! (The City Washi miiiiiiiiight be my favorite... what's yours?) ♥

Lauren Bergold
gave this bouquet to her mother-in-law at an 
early Mother's Day celebration this weekend, 
and it was a big hit!

Wednesday, May 2, 2018

Not To Be All Braggy...

...but I (Lauren) really love my card this week, so I'm going to just get right to showing it!


As a bonus, this baby features something from all four of my favorite Eyelet Outlet embellishment categories! From the Brads department we have the beautiful Dragonflies (which are currently a 99c special!); representing Washi Tape we have three strips of gorgeous wide Clock Face Tape; it's a two-fer on Bling with Bumpy Hearts and a Clear Swirl; and finally, from the Paper Flowers section I've got a stack of Solid Color Flowers in white.


I didn't intentionally set out to use a little bit of everything. In fact I confess that, unusually for me, I actually didn't have much of a plan at all, so that's probably why I got out a bunch of different products and just sat and played with them for a while. Who knew that would turn out to be a greatcardmaking strategy, eh?


Why not grab a few of *YOUR* favorite Eyelet Outlet goodies and see what happens when you start combining them without a plan? ♥

loves making cards,
especially with Eyelet Outlet embellies!

Wednesday, April 11, 2018

Gift Wrapping Is My Bag, Baby!

I (Lauren) may have mentioned that before. But I never get tired of making extra-fancy presents for my friends and family. Especially (...but not limited to...) the kiddos. It's amazing how quick and easy it is to make a plain boring giftbag from the big box store into something infinitely more colorful and fun... with Eyelet Outlet Washi Tape!


You've seen me make washi tape into patterned paper before, just by applying tape in neat strips on plain white cardstock. And that's what I did this time to make the star bag, but instead of choosing one pattern of tape, I made a washi rainbow! I used a homemade star template from my computer to trace the star and cut it out with scissors. Then I matted the whole thing onto a scrap of glossy black cardstock and cut it out again. For the heart bag I used a store-bought stencil for the shape, and this time I applied the tape in a sort of plaid pattern, alternating between placing the tapes horizontally and vertically, so it would be more interesting. I matted that one on a coordinating shade of purple. I machine-stitched around the edges of both shapes to add a little extra texture.


I affixed both shapes to their bags using a few pieces of foam tape. But first I wanted to add a little more color to the bags. The nice thing about washi tape is that it comes in lonnnnnnnnnnng rolls... so you never have to worry about how wide or tall your project is. I marked an even point on the right and left sides of the front and back of each bag. Then I applied my tapes carefully, one at a time, in long strips that went alllllllllllllllll the way around the bag! By starting inside the fold at the side of each bag (and working neatly) I was able to hide the place where each strip of tape overlaps at the end of its run. I love how it looks seamless, and I can tell you that when non-papercrafters see something like this, they have NO IDEA how you've done it! (So when you make your own version, if you want to tell them it was *MAGIC* your secret will be safe with me!) ;)


On the star bag, I used: Red Dot Tape, Blue Stars and a couple of Skinny Print Tapes for variety; the star itself has: Heart Washi, Orange Stars, Crayon Tape, Blue Stars, Purple Checked, Skinny Yellow Dots, Skinny Green Stripes and Confetti Tape.


On the heart I added a stack of Paper Flowers with an Enamel Dot center, and these tapes: Pink Checked, Purple Zigzag, Pink Dots, Skinny Pink Dots and Skinny Pink Checks plus Heart Tape; with Wide Star Washi and Skinny Glitter Tape on the bag. But really... both of these designs would work with literally ANY combination you'd like to use! You could work in a specific color group--either the recipient's favorite combination, or to commemorate a school or team. Or use the entire rainbow--either randomly or in the ROYGBIV spectrum. You could even combine tapes thematically, for an occasion like a birthday or holiday. The only limit to the variation is your own imagination!


Need even more great ideas for using Eyelet Outlet Washi Tape, Brads or Bling? Follow us on Facebook and Instagram to see all the latest makes from our amazing design team! ♥

Lauren Bergold's favorite color 
is RAINBOW!!!
♥♥♥

Tuesday, March 6, 2018

Busy, Make that Buzzy Bees

Kim from Katydid Cards with you today.   I'm sharing two cards with a bee theme.

The Eyelet Outlet store has a number of bee brads and I've been drawn to them like, well, like a bee to honey.  Sorry, I just couldn't help myself.

For my first card, a Center Easel, I used the Mini Bee, Bee, and Stitched Flower-Bright Brads.


In addition, I used a Penny Black Stamp, "Bee-have".   The name of the stamp works really well for the greeting, too!  I created my own version of the Center Easel card with honeycomb side panels.
Here's another view from the side so you can see how the easel props up on the sentiment panels.


The card folds flat for mailing.


Next up, is a beehive-shaped card using the Bumble Bee Brads and Purple Paper Flowers accented with Gold Edged Jewel Brads in Purple.


Inside, I created the sentiment using the text to path option in my Silhouette design screen.


I'll see you next week with a new project.  In the meantime, "bee" well!


 Kim from Katydid Cards
Who provided the inspiration for these cards?  Katy did!