Showing posts with label Flower Wide Washi. Show all posts

Saturday, January 13, 2024

The New Eyelet Outlet Spring Jewelry Collection!

We all know that Eyelet Outlet has tons of brads, bling and embellishments that help us jazz up our cards and paper crafts, but did you know that you could also use their pretties to make unique one-of-a-kind pieces of jewelry to go with literally any occasion or theme? When it comes to creating something, I seem to think outside the box quite a bit and this is a perfect example.

I decided to try and make some jewelry pieces that I can wear throughout the year using Eyelet Outlet washi tapes, bling, as well as brads.

Introducing Eyelet Outlets Jewelry Collection (not really – but fun to say 😊).

 ❅❅❅ The Snowflake Set ❅❅❅
The first set I made is a winter inspired pendant with matching wintery earrings.

 The pendant is made from three Snowflake Brads, and two clear Jewel Bling. I put them all in a pendant tray and layered some jewelry glaze/glue on top and then sprinkled glitter to give extra sparkle and shine. 


The matching earrings are also made with Snowflake Brads which are also covered with the jewelry glaze. I will be able to wear these throughout the winter season and I the best part is I know that no one else will have these because they are one-of-a-kind.


🥀🥀🥀 The Spring Flower Set ðŸ¥€ðŸ¥€ðŸ¥€
With spring coming up soon, I wanted to make a few pieces that I will be able to wear once the weather starts to warm up. I ended up making three spring inspired sets for the season.


The first spring set are the Spring Flower pieces. I made the pendant using a silver pendant tray and cut out a beautiful flower from the Flower Washi Tape – which I just noticed is out of stock but there are so many other beautiful options available. I placed my cutout from the washi tape into the pendant tray, layered a small amount of jewelry glaze on top and then placed a clear glass cabochon to finish off the pendant.


The matching spring earrings are made using the Colored Daisy Brads.  I removed the clasps and added flat back earring posts onto the back of the brad. I then added different gems and a Clear Jewel Bling to add a bit more color and movement to the earrings. I love these and cannot wait to wear them!


🦋🦋🦋 The Butterfly Set  ðŸ¦‹ðŸ¦‹ðŸ¦‹
One of my favorite parts of spring are all the amazing butterflies that come to visit. This next set was made with them in mind.

 I made the pendant the same way I made the spring flower pendant but instead of a flower, I cut out a beautiful butterfly from the Butterfly Washi Tape.


 The earrings are made very similar to the earrings made for the spring flower set except I used the Butterfly Brads as the base. I removed the prongs and glued flat back earring posts to the butterflies. Turned out super cute and very unique!


🦋🦋🦋 The Tulip Set  ðŸ¦‹ðŸ¦‹ðŸ¦‹
My all-time favorite flower is the tulip so of course I needed to make a set that featured them. 


The pendant is made the same way as the two others above except I cut of the tulips from the Floral Square Washi Tape.


For the earrings, I wanted to keep them simple and cute, so I took two of the Leaf Brads, removed their prongs and glued on flat back posts to the back and now I have the perfect matching earrings for my tulip pendant.


💮💮💮 The Blue Hydrangea Set  ðŸ’®ðŸ’®ðŸ’® 
Last but definitely not least and probably my favorite set is the Blue Hydrangea set. I can almost smell them just but looking at these pictures.


 I selected my favorite hydrangea from the Flower Washi Tape-Wide and created the pendant the same way as the others.


 The earrings turned out extra awesome – IMO.  I had several earring bases in my jewelry making supplies and the Bumpy Jewel Heart Bling fit absolutely perfect into the heart shaped base! Like they were meant to be together. I glued them into the earring base and set them aside to dry.


I wore these yesterday to the grocery and got several compliments on both pieces. Ladies were asking me where I purchased them. I was beyond excited to tell them that I made them myself and explained how easy the process was to make them. They were shocked and excited to try it out themselves.

So, now you know you can always use your Eyelet Outlet products for your usual crafting fun but if you want to try something a bit different, just think outside the box just a little and the sky is the limit on what to create with little imagination and Eyelet Outlet embellishments.

Shopping List

Have a wonderful week and always be STRATE-UP CRAFTY!

💗Stacy


Thursday, January 27, 2022

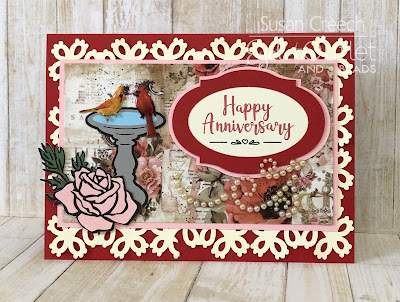
Happy Anniversary

I've heard it said that North American Cardinals mate for life, so our lovely and popular cardinal brads seemed a perfect choice for the anniversary card I made recently.


In addition to using both the male and female cardinal brads, I used some of our gorgeous wide washi tape for the background.  This one is called Flowers Vintage.  I also embellished the card with some pearl swirl bling.  

Enjoy the day and happy crafting!


Thursday, June 13, 2019

Sunflower Box Card

Good morning, crafters!  Today I have another box card for you featuring Eyelet Outlet's new sunflower brads which I just love!  I've paired them with some greenery found in the Cricut image library.  


Around the base of my card I added a beautiful wide glitter washi tape.  Eyelet Outlet has dozens of gorgeous floral washi tapes to choose from!  Did you notice to little Eyelet Outlet garden rake leaned against the wheelbarrow?  And of course, to top things off, I added a little cloud and sunshine brad in the sky.


I hope you are having a sunny day!  Thanks for stopping in and be sure to follow us on Instagram, too! 


Wednesday, November 21, 2018

Happy (Almost) Thanksgiving!

Hi folks, Lauren here. Tomorrow is Thanksgiving in the US, so this seems like a good time for a couple of especially autumnal cards featuring Eyelet Outlet Leaf Brads and a few other goodies.


If you have Leaf Brads and a sentiment, you don't really need a whole lot more. In this case I've trimmed the sentiment down from a journal card, matted it with some wide Flower Washi Tape and  Skinny Glitter Tape and then set the leaves in a sort of cascade, as if they were falling from their trees. I added some Mini Leaf Brads as well, for more variety.


I fell in love with this pickup truck sticker partly because I figured it would mix really well with our Pumpkin Brads and I stand by that decision. Since my pumpkins are stored with my Halloween brads, I found a black Kitten at the same time and thought it would be a fun combination. I made a little scene for the truck using Brick Washi, punched grass, and a few Mini Leaf Brads on the ground... because there is not a patch of grass anywhere near where I live in New Jersey that doesn't have some leaves scattered around on it right now! Finally I added a sticker sentiment which had some leaves printed on it, but I decided that dimensional ones, in Leaf Brad form would be even better.


If you are celebrating tomorrow I wish you a very Happy Thanksgiving! ♥

likes everything about Thanksgiving
...except cleaning the turkey pan!

Tuesday, September 18, 2018

Dinner and Cocktails

It's Kim from Katydid Cards today!

It's been a while since I've worked with the Chicken Brads so I just had to make another card using them.  I call this card, "Dinner Invitation" and you can see why.  These two chickens have been invited to join their neighbor for dinner.  Here they are at the front door.


And here they are inside.  What's that on the menu??  Uh Oh!  I used the Cooking, Baking, and Mixer Brads as well as Brick, Color Wheel, and Flower Washi Tape. The door handles are Black Enamel Dots.

If you're interested in recreating this card you will find the card base, kitchen, and cleaver in the Silhouette store.    The chef is from My Favorite Thing's Recipe for Happiness.  The chalkboard is free clip art I imported into the Silhouette and typed what's on the menu...inspired by my DT Sister, Susan's, Wednesday meal postings.


Here's a closer look at the brads and washi.


Winner, winner chicken dinner!

No dinner would complete with cocktails, so I'm sharing another card adding the Rooster brad.  I showcased him in a shadowbox card.  Each layer uses a different digital paper from the Cocktail Party collection by JazzyPatterns.  I also used the Cocktail brads on either side of the greeting.


On the reverse of the card are my favorite chicken brads again!


I'll see you next week with another card...there's no shortage of ideas what with all the brads, bling and washi in the Eyelet Outlet store.


Kim from Katydid Cards
Who provided the inspiration for these cards?  Katy did!

Wednesday, January 31, 2018

Let's Pretend It's Spring For a Minute, Ok?

I (Lauren) realize that compared to the winters in, say, Canada or even New England, we have it pretty easy here in Central New Jersey. Nevertheless, there is always a point towards the end of January or the beginning of February, where I feel like I just cannot stand one more day of cold, grey, overcast weather. Luckily I have Eyelet Outlet Wide Flower Washi Tape and Bright Dragonfly Brads, so I can make myself a little bit of Spring, in card form:


I love that this Wide Flower Washi alternates about a four inch repeat of the same pattern in blue and pink. Of course you can use the tape in long strips that feature both colors, but sometimes I like to separate the two and use them individually, which is what I've done here. Because this tape has a design that's more straight and solid at its bottom edge than its top, I thought it might make sort of a cool border, with the bottom edge towards the center. For the smaller card, I cut one complete repeat of pink flowers from the roll of tape, then snipped it in half. I applied one 2" section along the side of a 3.5" square of plain white cardstock, just following the edge of the paper with the edge of the tape; then I affixed the other 2" section to the opposite side of my square. Since I needed a second run of pink flowers, I cut the intervening strip of blue flowers off the roll and stuck the whole thing along the edge of a separate 5" square of white cardstock. Then I came back to the pink flowers and cut another run, snipped it in half, and applied it to the other two sides of my square.


In the center of the design, I was left a little blank window of about 1.5" that I could use to frame a sentiment, a photo, a stamped image or, in this case, a little snippet of Thai book paper, with a couple of pink pretties from the Bright Dragonfly Brad set, which i bent very gently at the centers, so their wings would stick up a tiny bit, as if they just alighted on my card. Something I love about this brad set is that you get purple, pink and yellow Dragonfly Brads, all together in the same packet. Something else I love is that these guys are the current special deal in the Eyelet Outlet Store, so for a limited time, they are only 99c!!!


Since I had started the blue square, I had to finish it, so I cut off 3 more segments... (yes, you'll be seeing something made from "extra" pink flowers sometime, lol!) ...and this time, I let the repeats overlap at the outer edges, which gives a really pretty soft effect that I love. This time the framed area in the center was just a smidge bigger than 3" square. Coincidentally, I had just found some very pretty small Buddha drawings in an Indian travel book, so I fussycut one of them, added a purple waterlily from the Frog Set to match my handsome pair of purple Dragonfly Brads, backed the panel with  pretty Hindi script, and finished off the card with a mat of soft purple paper.


I hope you'll be inspired to look through your Eyelet Outlet goodies, and create your own tiny world that is the color, season, and temperature you're in the mood for right now! ♥

is really really in the mood for Spring!

Wednesday, June 28, 2017

Summer Lovin'

If I (Lauren) had to sum up everything I love about summer in just *ONE* card, this might be the card I'd choose. Because it has sunshinebeach vibes, super-cool flamingos, my favorite color (PINK!) and of course let's not forget a sweet treat, lol! To top it all off, I've managed to express almost all of these loves using Eyelet Outlet Brads! ♥


I've always enjoyed participating in the Coffee Loving Cardmakers' seasonal bloghops, but I confess it's even more fun more now that I make a point of keeping Eyelet Outlet Coffee Brads and Doughnut Brads on hand, and you can see I've given them a starring role in my card. I've also got Sun and Cloud Brads, a Sandcastle Brad, a Tall Palm Tree Brad, and I've arranged them all as three loving couples against some little diecut hearts. To set off the whole group, I popped the hearts up a bit on a little foam tape, so we could better see that strip of beautiful Flamingo Washi Tape, accented with just the tiniest peep of Glitter Gold Tape. I hand-stamped "Summer Lovin'"with a favorite cursive font and called it done!


While I was feeling "in the pink" I made a second card, using one of the beautiful wide watercolor tapes we had this spring, which also happens to feature flamingos. This particular tape sold out fast (well just look at it!) but this simple idea would work equally well with the Flamingo Washi I used above, or with this other fab Flamingo Tape. You could also rock this with Watercolor Flowers,(I've fussy-cut one of them, to be my flower center!) ButterfliesBirds, or even these beautiful Sewing Machines


There are so many good tapes... you should probably browse the category while you're there! Be sure to grab some Paper Flowers and Jewel Bling Strips, too-- they go with EVERYTHING! And finally, it's gonna be a long, hot summer: you're bound to need Summer Vacation Brads! ♥

does not actually have a pet flamingo... yet!

Wednesday, June 7, 2017

Under the Strawberry Moon

This Friday, the ninth, will be the full moon for June of 2017, and thus it is known as the Strawberry Moon. I (Lauren) am planning to celebrate by eating as many delicious strawberries as possible... and of course... I've made a card! It features some beautiful Eyelet Outlet Strawberry Brads, and a few varieties of the gorgeous new Wide Washi Tape!


Have you seen the new tapes? They're at the top of the Washi section in the Eyelet Outlet store... the new ones all have an asterisk before their name, to make them easy to find. There are loads of styles, of course, but the ones that look like Watercolors are some of my favorites. I've mentioned before that I really love Wide Washi and Skinny Washi; when you mix them together with standard-width washi, it just makes any design more dynamic and interesting. But also --in the case of Butterfly Wide Washi and Flower Wide Washi --they are just so very beautiful! You probably know that my lovely design team sister Stephanie is known as the "Washi Queen" in these parts, and the way she is always devising new ways to use her tapes inspires ALL of us in the DT to try to do the same.


In this case, I thought I'd choose to highlight just the pink sections of the Flower Tape design, so I cut those bits from the main roll of tape, measured and marked very lightly where I wanted them to go, then applied them in two neat rows, about half an inch apart, on my card's background panel. I trimmed the edges with Skinny Pastel Pink Tape for a more polished look. I added my focal point, the Paper Flower stacks with Strawberry Brad centers, then adhered a strip of Butterfly Washi to a scrap of white cardstock so that I could fussy-cut the pink butterflies and use them as stickers!


I hope you'll be inspired to find new ways of using your Eyelet Outlet Tapes! If you need more inspiration, be sure to check out Stephanie's amazing creations (don't miss the light switch covers!!!) Then scroll down and see what my Wednesday partner Carri has been up to!

prefers the title "Washi Enthusiast" 
rather than "Crazy Tape Lady"
(...but technically both are true...)