Showing posts with label pearl bling multi size. Show all posts

Sunday, May 17, 2026

Floral Reverse Double Z Card


Welcome to a card that can't help you feel like a warm summer afternoon. This is a reverse double-z card. The card style features a horizontal strip of cardstock that spans across the card when it's open. The strip was a perfect place to add a strip of pink Fancy Long Bling from the store. I layered three paper flowers in white red and yellow and used a clear Bumpy Bling as the center.


I placed a centered strip of Fancy Strip Bling across the entire strip. I used the flower as the focal point by gluing it to the middle of the strip on top of the bling. Then I added a Bee Brad on the strip and also on the right side of the card. I used Pearl Strip Bling to create bee trails. Finally I added three Mini Butterfly Brads on the left side of the card.

I loved how this card turned out. EO products made it easy to make this card special. The products I used are below.

SHOPPING LIST:
Bumble Bee Brads

Thanks for stopping by today. Please make a visit to the Eyelet Outlet store to stock up on your brads, bling, washi tape, and paper flowers.

Happy Creating!


Sunday, April 21, 2024

Peaceful Butterfly


Hello EO fans! I hope you've had a great weekend so far! Recently, I saw a die that cut a butterfly into card front. While I don't have that die, I do have a Cricut machine and I found a butterfly pattern which I used to create a card pattern that very much mimicked the die I was admiring. 

The front of this card is a big window with the butterfly wings connected to the edges of the window only. On top of it, I attached another butterfly connected to the butterfly cut in the card base only on the body. This makes the attached butterfly wings open almost as if it's flying. It's quite a nice effect! Behind the window, I applied a background made of Wide Sky Washi Tape. I used purple Jewel Strip Bling to border the window on the front. I used orange Jewel Strip Bling on the butterfly body and added an orange Pearl Bling to its head. I also added Butterfly Brads to the front around the sentiment which I also cut in Cricut Design Space.

SHOPPING LIST:

Thanks for joining me here today at the EO blog. Please visit the store for all your brads, washi tape, bling and paper flowers!

Happy Creating!


Janet YouTube - Blog - Facebook - Instagram - Pinterest  

Saturday, February 10, 2024

You Are Enough

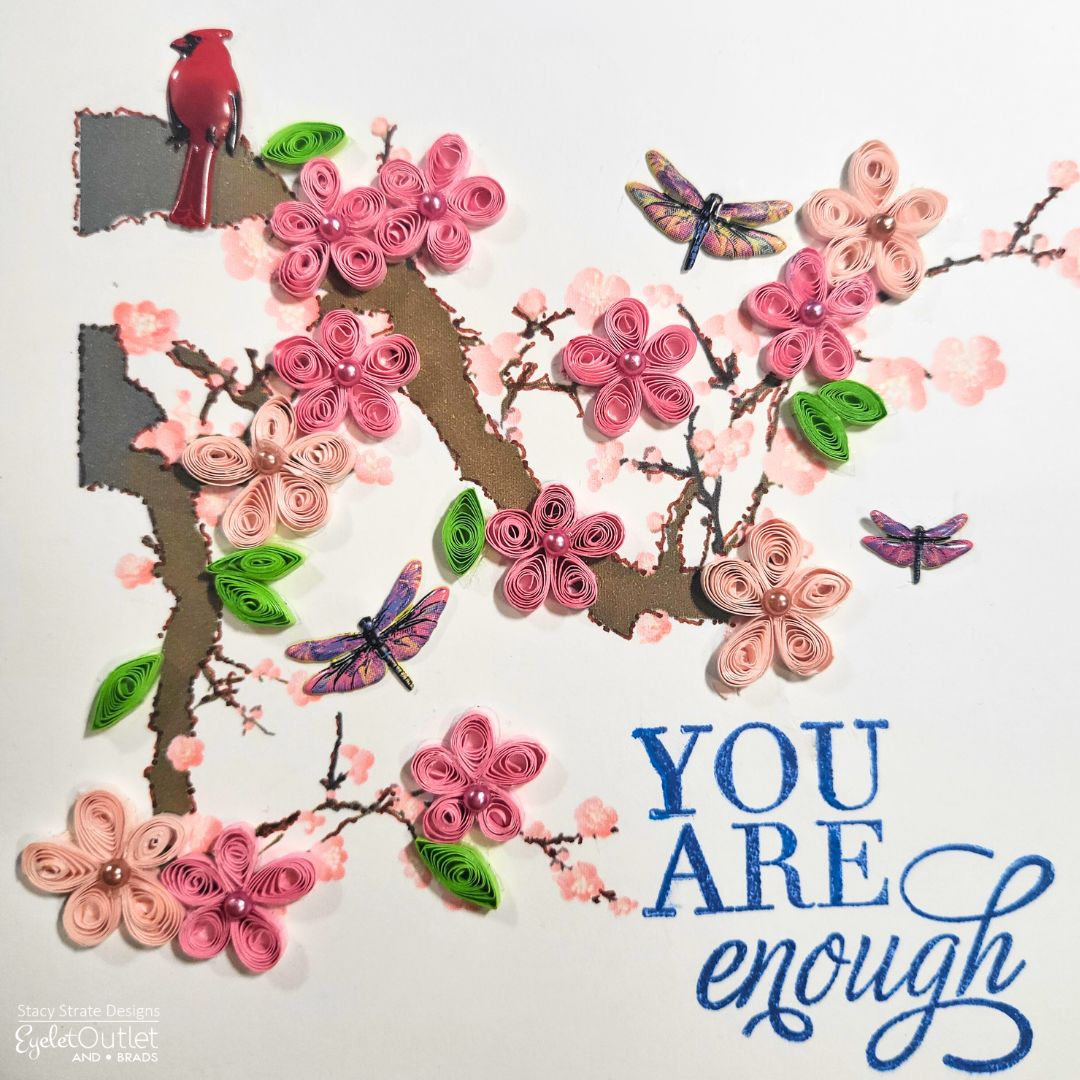
Sometimes you just need to be reminded that You Are Enough. Making a simple card with some thought out well wishes could be just the perfect thing that somebody needs to read that day. I created this card with that thought in mind, hoping it will remind you that ‘You Are Enough’.


I used a method called quilling to create the cherry blossom petals. Quilling takes time and patience, and many (like me) find it extremely relaxing and cathartic.  You take tiny strips of paper and roll them into circles and form them into a shape. 

As you can see, each one of the blooms have five individually quilled petals formed in a teardrop shape with an Eyelet Outlet Pearl from the Multi-Sized Bling Sheets in light pink and pink adorning the center of each. Cherry blossoms always seem to attract the most beautiful flying creatures, so I added three fluttering dragonflies from the Dragonfly Brads

And perching on the top of the cherry blossom tree is a beautiful cardinal from the Cardinal Profile Brads reminding you that you are never alone and that ‘You Are Enough’.

Shopping List
Multi-Sized Bling Sheets
Dragonfly Brads
Cardinal Profile Brads

Have a wonderful week and always be STRATE-UP CRAFTY!

💗Stacy

Saturday, July 29, 2023

You Are Gorgeous!


Today I have made a card that's perfect for a teenager or college student who enjoys being girly and needs a reminder that they are gorgeous. The card is almost entirely made of die cuts. I cut the dress out of a coordinating cardstock pad to make sure the colors and patterns wouldn't clash. I love using all these patterns together. I added a piece of Glitter Skinny Washi Tape for a wide belt and a Pearl Bling piece from the Pearl Multi-Pack to accent it. I purposely put the belt a bit lower on the waist to make the dress more curvy and less Barbie-perfect. I like the way it makes the waist and hips more full and realistic for real people sizes! Last I used a black pen to draw a necklace and a piece of Clear Tear Drop Bling to create a totally mod necklace.

I cut the scrolled piece behind the dress from silver mirror cardstock. It reminded me of a mirror but it also really allows the dress to stand out. I also cut the Gorgeous phrase 4 times and stacked them up together. Then I cut another silver mirror cardstock phrase and offset it at the back to help help the phrase stand out and add a bit more glamour. I stamped and cut out the You Are phrase and applied all the pieces on a dark navy decorative mat. After that, it was ready to take it up a level with three brad sets. I used two Rose Brads, the button and phone from the Selfie Brads, and a bag and shoe from the Shoe & Bag Brads. I think this card is a fun reminder to a teen that they really are gorgeous.  

Shopping List:

Thanks for stopping by today. Please visit the store for all your brads, washi tape, bling and paper flowers!

Happy Creating Everyone!


Janet YouTube - Blog - Facebook - Instagram - Pinterest  

Saturday, June 24, 2023

You Make Me Happy

Happy Saturday Everyone!! I was feeling quite adventurous this week, so I decided to try a new card making technique for this week’s project.  This 6x6” front folding card was made by strategically cutting strips of cardstock and layering them to make a beautiful background.  And, the best part, I love how it turned out!  Not only do the 3-D pieces add dimension, but the serene color palate calms me and the inspirational sayings on each of the four tags make me smile…because YOU MAKE ME HAPPY.

 The gorgeous rhinestone and pearl bling on the top and bottom of the card is called Fancy Long Bling – Pearls and Jewels from Eyelet Outlet, of course! My go-to for all things embellishment!! These add just the perfect amount of sparkle and sophistication the card needed.

Each one of the four inspirational tags have a different colored eyelet from the Brown Eyelet Mix punched into it to hold a ribbon along with Matte Pink Enamel Dots and White Pearl Bling in multiple sizes.

 To finish the card off and keep with the serene theme, I decided to use a one-word embellishment which I cut into a flag end.

This is definitely one of my favorites so far! What do you think???

 Hope you enjoy!!

 SHOPPING LIST


Have a wonderful week and always be STRATE UP CRAFTY!

💗Stacy 


Sunday, May 8, 2022

Happy Washi Tape Birthday Treat


Hi friends! It's Janet here with a happy card you can make in a jiffy! You just need a border punch, a bunch of your favorite washi tapes, pearl bling and a brad or two. I made my letters by layering 4 separate letter cuts. You could also do this with chipboard letters or with stickers. Either method works well.

There are 8 washi tapes in this card so if you like these, follow the links in the shopping list to pick them up. Note: I substituted a few that are out of stock with some other options.  


Thanks for stopping by today. Please visit the store for all your brad, washi tape, bling and paper flowers!

Happy Creating Everyone!


Janet YouTube - Blog - Facebook - Instagram - Pinterest