Showing posts with label bicycle brads. Show all posts

Saturday, August 26, 2023

It’s the Most Wonderful Time of the Year - Part 2

The Studious Owl Note Pad holder is the perfect gift for your favorite teachers. 

Her entire body is made from layering the Brown Glitter Washi Tape which gives her a perfect amount of owl sparkle. Her pupils are two black Bumpy Bling jewels and the jewel on her tassel is a Silver Edged Stippled Brad. 

To make sure she can read every word in her Explore book from the Bicycle Brads, she is wearing her ever-so-fashionable reading glasses from the Eyeglasses Brads.

Lift up her head and you will find a special pocket that fits note pads or sticky notes. Oh, and if you need a ruler, this owl has you covered!  The inside is trimmed with the Tape Measure Washi Tape.  HOW CUTE IS THAT?!?!

Our last but definitely not least piece is for that very special bus driver. 

 Unfortunately, they sometimes bus drivers get overlooked so we need to try to always recognize what they do and how we appreciate them.  Imagine their face as your little hands them this card shaped like their school bus!

The two children on the bus are so excited to get to school because the bus driver makes it a fun ride.  The two Bumpy Bling headlights are leading them safely to school.

 I loved making this Back to School/Teacher Gift collection as it reminded me of when my babies were still in school and all the fun we had!

 I hope these inspired you to create something special for the teacher and bus driver in your life.  There’s nothing better than bringing a smile to someone’s face and with a little help from Eyelet Outlet, you can do just that. 😊


Have a wonderful week and always be STRATE UP CRAFTY!

💗Stacy


Monday, July 1, 2019

What's your mode?

The air is fine
and who needs a car?  Get out in the fresh air with nautical and outdoor brads 

If you are a boater, we have oodles of brads to suit you: anchors, seagulls, ships wheels, fish...
just to name a few!


But, if you are a pedestrian by nature,


Thanks for joining me on this walkabout!
Dawn Mercedes, of Sunnyside Up


Thursday, March 28, 2019

Mother's Day Gift Box

Spring is in the air here in Central Texas and Mother's Day will soon be here!  Today I've got a little gift box for you that will be the perfect way to tell your mom how much you appreciate all she's done for you!


I've really been in to making boxes with my Cricut these days and after seeing some cute designs for gable boxes on Pinterest, I decided to try my hand at one featuring some Eyelet Outlet products.

I started with a gable box from the Cricut Tiny Treasures cartridge.  I chose some doors and windows from other Cricut images as well as the tree with tire swing. I added a strip of Eyelet Outlet wide floral washi tape to the length of the box before folding it up and then I welded sections of this white picket fence from the First Few Years cartridge to make a continuous strip and applied it over the washi tape.  

I chose a scalloped border from the Cricut image library and made layers for my roof. Since it's Spring and trees are blooming, I added some Eyelet Outlet Mini Stitched Flowers to the trees and a small enamel dot for a door knob for some more texture.  

I love the nostalgic feeling I got about my own childhood home when I parked the Eyelet Outlet Bicycle Brad in front of the house!   

I added my sentiment to the back roof section and topped it with a bow!


Thanks for stopping in today!  If you're in the Allentown, PA area, stop by and see us in person at the Rubber Stamp & Paper Arts Festival March 29 & 30!  


Tuesday, January 15, 2019

Searching

Kim from Katydid Cards here with another Valentine's Day card.

I don't know about you, but I'm fascinated with mazes and love to challenge myself by finding my way through one.  Here's a way to cleverly incorporate a maze in this Valentine's card using the Heart Pearls and Bicycle Brads.

I cut the maze using a cut file purchased in the Silhouette store.  I placed a rectangle of brushed silver cardstock behind it.  The greeting was created in my Silhouette and matted that with the same silver.


I added two additional hearts on the greeting to accent.  I heat embossed the direction arrow from the Bicycle Brad Pack with Silver and placed that at the entrance to the maze with a third heart pearl at the center.


Inside, the sentiment which I think works well with the greeting and the maze and another heart for a perfect ending!  I matted this panel on more brushed silver.


I have another Valentine's Card to show you next week.  In case you missed the card I shared last week, here's a link to it.


Kim from Katydid Cards
Who provided the inspiration for these cards?  Katy did!

Saturday, November 3, 2018

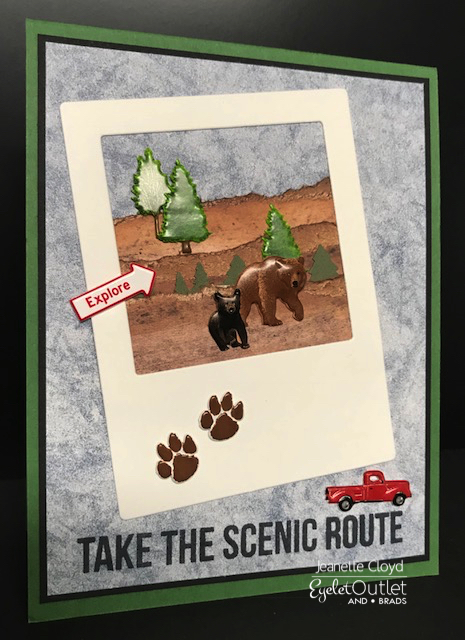
Bear Sighting

Some of my favorite memories as a child are traveling with my family - through the Rockies - looking for bears. It's funny but whenever someone saw a bear, they would stop and get out of their cars trying to get close enough to get a "good picture" but not so close as to become a bear's dinner. And of course, other travelers would come along and stop, too. Bear sightings were a big deal!

I tried to capture that memory on today's card.


Here's a closeup so you can see the details outhouse brads. 
Just look at the bear faces!


You can find these products in the Eyelet Outlet online store 
(along with so much more!)

Bicycle Brads (the Explore Sign)


Thanks for stopping by the blog today! Be sure to come back often to see what the design team is working on. Follow Eyelet Outlet on Instagram and Pinterest, too! 


Saturday, September 29, 2018

A Fall Photo Shoot

Hello, Jeanette here from the design team. For today's card I used a variety of Eyelet Outlet brads to create scenes in three polaroid-style photos: one of raked leaves (on the left), one with a bicycle (in the center), and one with a horse beside a pine tree (on the right).

I thought it made for a great photo opp type of card, so I also used a camera brad and some camera Washi Tape, as well as a few other products from Eyelet Outlet.


Eyelet Outlet products used:

Rake Brads (coming to the store soon)
Camera Washi Tape


Thanks for stopping by the blog today!


Monday, May 7, 2018

Shower that baby with Eyelet Outlet love!!

I have had several invites to baby showers recently.
Eyelet Outlet has so many great brads...that you can easily create a card that coordinates with the baby's gender, the theme of the nursery, or your gift!

Here...a baby boy card!


So many boy brads!!

And tying it all together...is a bit of washi tape in the background!

The nursery of this little one will be filled with beach colors and themes.
That is easy peasy with Tropical Fish brads, lots of washi tape in different widths..and 
pearl bling!


This weekend will be the annual


in Novi, MI.
May 10-12, 2018.

Stop by the booth!
I'll be there!

We have another Instagram Hop in partnership with The Project Bin!


Dawn Mercedes, of Sunnyside Up

Friday, April 20, 2018

Ride On

Now that Spring is here (at least by the calendar)... it's time to think about outdoor activities.


I created the scene with a variety of Eyelet Outlet Brads:


I also used some Clock Washi Tape on both the front and the inside of my card:


Wherever your springtime activities take you, I hope you'll take time to create, using some FANTASTIC Eyelet Outlet products, of course.


Tuesday, November 7, 2017

Boys and their Toys

I had fun creating a card for a little boy this week using a wide assortment of Eyelet Outlet Brads.


The toys include cars, planes, trucks, video games, army men, and a bicycle.


Can you ever have too many toys?

Eyelet Outlet Products:
Did you know we have a Flickr Gallery to showcase Eyelet Outlet Design Team Creations?


You can visit me in blogland at Ingenious Inkling,
and you can find Lauren & I making holiday cards
all year long at Jingle Belles

Wednesday, September 6, 2017

Give Me an "L"! Give Me an "M"!

No, I (Lauren) am not leading a cheer squad, just fancying up some plain monogram letters with Eyelet Outlet Washi Tape, Bling and Brads for my niece, Lindsay, and my nephew, Matthew, who both have birthdays coming up.


I started with plain, kraft-colored, papier mache letters from the big box store, that are approximately 8" tall. Thanks to my colorful stash of washi tape, I had a plan that did not involve any tracing, cutting, painting, or even inking of edges! I began with the "L" since it had the more straightforward shape, and wrapped tape, in more or less spectrum order, from the top to the bottom. Since all the planes are square, this just meant lining the layers up neatly and overlapping the patterns at the back of the letter.


The only tricky bit was the tippy-top of the letter and the top and bottom of the horizontal stroke at the bottom of the "L", which I covered in neat strips of whatever tape I planned to use next on the front of the letter, in this case the Red Dots Tape and Orange Fans . In addition to those, I also used: Heart Tape, Admit One Tickets, Tape Measure, Cooking Tape, Skinny Green Stripe (two strips for a chunkier look), Blue/White Dots, Skinny Blue, Blue Check (again two strips), Cupcakes, Purple Zig Zag, Rainbow Chevron, Love, Smiley Face, and Crayons.


Once the entire letter was covered, I broke out the bling to add a little bit of sparkle! I love the brand new Fancy Long Bling Strips, they come in several styles and they're not just great looking, they stick on really well AND are flexible enough to wrap around the letter! Before I started attaching them, though, I laid out the styles I thought I wanted to use, and moved them about a bit, until I got the perfect mix. Then I cut each of the strips just slightly larger than I needed, and, with the backing still on, checked my potential placement a second time, to make sure that I would not wind up with a big, un-bend-able stone right on a corner that would not be able to lay flat. Then, I peeled and stuck on the bling strips, from front to back, trimming any overlapping stones and getting them to line up as neatly as possible at the back. The designs I used include two types of Fancy Long Bling, Green Pearl Strips and Purple Jewel Strips.


After I had the strips in place, I added some individual gems, including Blue Flower Jewels, the brand new Heart Jewel Bling and Red Heart Pearls.

The slanting lines in the center of the "M" made it a little more challenging, but not overwhelmingly so. I elected to just wind the tape around in strips, the same way I did with the "L". This means there's a little "jog" at the back of the letter where the two ends of each tape meet up, but I trimmed them neatly, in the same way each time, and decided to call it a "Design Decision"! I've got a bit of a transportation theme going on for Matthew's initial, so I incorporated multiple strips of Road Tape and Map Tape into my design. In addition I used: Blue Check, Skinny Blue, Red Dots, Heart Tape, Smiley Faces, Admit One, Dots, Skinny Green Stripe and Tape Measure. Once my background was completed, I started adding vehicles to the design. I've got: a Work Truck, a Bicycle and one the brand new adorable Pickup Truck Brads that are coming to the store very very soon! Not to mention a Cupcake, some Sun and Cloud Brads and an Airplane from the Travel set. I've also got some fun sentiment Arrows from the Road Sign Set and the Bicycle Set.


You may be wondering how I got those to stay on, seeing as how I could not reach the backs to open the prongs? Since I knew the "M" was hollow, I just made a hole with my paper piercer like I would for any other project, but coated the prongs of each brad with a little bit of 3-In-1 Glue before poking the prongs into the letter. For the larger brads, I added a little more glue to the back surface of design for additional sticking power. (I should mention that all of my nieces and nephews are well above toddler age and unlikely to attempt putting monogram letters into their mouths!)

I hope you'll be inspired to try your favorite Eyelet Outlet embellishments on your next 3-D project! ♥

Lauren Bergold loves making gifts 
for nieces and nephews more than 
every other type of project COMBINED! 
♥♥♥

Tuesday, July 4, 2017

Abstract Washi

Usually when I create with Washi Tape, I try to be very straight and precise, lining-up up each piece next to the other.  But Washi Tape is also perfect for more random, abstract designs.

For today's cards, I started with scraps of cardstock slightly larger than what I wanted for my finished card and just started randomly attaching pieces of washi tape until it felt right.


Next I trimmed the overlapping pieces of tape and added some Yoga Cat brads and a fun Charmed Cat 2 Sentiment from Paper Smooches.  A few more layers of cardstock, and this card was done.  If you're a cat lover, Eyelet Outlet has lots of cat-themed fun.


This technique works with wide washi tape too, although the card will need to be a bit larger to get the same effect.  As you can see, the color of cardstock you use also changes the look of the design.

For this one, I finished with a single Road Side Thank You Arrow Brad and just let the Bicycles be the focus o the design.


I hope I've encouraged you to have some abstract fun with your washi tapes ... enjoy.

Products used:


You can visit me in blogland at Ingenious Inkling

Tuesday, June 20, 2017

Register's Annual Great Bicycle Ride Across Iowa (RAGBRAI)

Every year, Iowa is home to one of the largest bike-touring event in the world ... RAGBRAI (also known as the Register's Annual Great Bicycle Ride Across Iowa).  
Since several co-workers participate in this week-long event, I thought it would be fun to make them some cards to celebrate the ride.

I started with Wide America Washi Tape to cover my card bases.


For this first one, I added a single yellow bicycle brad together with the Explore arrow brad from the same set.  I finished with some red, white & blue enamel dots.


For the next one I added a red & blue bicycles with another of the sentiment arrows and more enamel dots (I thought the riders would appreciate a bit of *down-hill* so I angled my washi tape on this one).

Products used:


You can visit me in blogland at Ingenious Inkling