Today's card entitled "Party Time" is a versatile card that is full of whimsy.
This card is fun and it can be used for a party invitation or any celebration event. Put on the records, bring the wireless headphones, and the sheep are having their own kind of party! Who wouldn't love some dancing sheep---even the bird wants to get in on it!
Eyelet Outletsupplies used:
Record Brads
Bird Set Brads
Fly on over to the Eyelet Outlet site and check our record brads, bird brads, washi tape, bling and more!
Father's Day is around the corner and today I've got a couple of fun cards for you embellished with some great Eyelet Outlet products. The sentiments for both of these cards comes from LoveSVG.com. I find so many of their files work fabulously with Eyelet Outlet brads!
Eyelet Outlet brown bear brads set includes adult bears along with darling baby cubs and our pine tree brads are a perfect complement to them.
I can't resist a pun! This cute sentiment could work with more than one of our brads like one of our eyeglasses, or even our small eyeballs, but today I opted for a couple of saws brads. The screw brads also complemented this card.
This is not the first time I (Lauren) have made cards based on a t-shirt slogan, and it probably won't be the last. It is, at the moment, my favorite, though. Because the combination of a funny sentiment and Eyelet Outlet Coffee Brads is kinda hard to beat.
Before I go too far, I should mention that the Spring/Summer 2020 Coffee Lovers Hop is taking place right now and you have until Friday night to join the fun. There are literally HUNDREDS of inspiring cards linked up already, and dozens of very cool prizes for lucky random coffee cardmakers to win. A slight change is that the seasonal thematic requirement has been suspended; so this time you don't need to make a summery card, just a coffee (or tea, or cocoa, or boba or matcha) card! If you visit the Coffee Lovers on FaceBook, be sure to say hi to my amazing friend Amy Tsuruta, who not only does a huge amount of the admin on these occasions, she (and quite a few of the other organizers) also comments on every single card. No kidding. EVERY card!!! She is my idol! ♥
On to my cards. Technically, I've really only designed ONE card, but I've made two versions. This is one of my strategies for avoiding decision paralysis, and I highly recommend it. Instead of trying to decide whether to choose one washi tape background over another, or how to arrange the Coffee Brads, I just work on both options, simultaneously. I realize it seems like that would take longer, but generally, it speeds up my process! For the first card, I neatly lined up strips of this fun new Cat Face Tape on plain white cardstock, printed my sentiment on a subtly patterned paper, and added one white cup from the Coffee Brads set in a little circle icon, plus three beans from the same set underneath.
For the second card, I used Eye Washi for the background (a tape which embodies the phrase, "death before decaf" imo!!!) and alternated white cups and beans from Coffee Brads up top, with a pattern of green Enamel Dots below.
Just in case anyone else is as silly as I am, I made the sentiment into a jpg that you can download here, or find on the Freebies Page of the Eyelet Outlet Blog.
For some reason I'm longing for another cup of coffee, so I bid you farewell for now! ♥
Eyelet Outlet is extending the holiday weekend with a 2 DAY SALE that starts today!!
Use code: enamel20 for 20% off all our enamel dots and shapes. We have a variety of colors, shapes and finishes: matt, gloss, glitter ,arrows, hearts, stars.
With 50% off stamps that coordinate with fan favorite brads..be sure to grab a couple of stamp sets. (Now just $2.99) With that price, be sure to add the coordinating brads & washi tape to your cart!
Check out all our bling, washi tape brads and paper flowers at https://www.eyeletoutlet.com/
Looking for a quick and simple card design? I've got one here for you today that lets Washi Tape do all the hard work. Don't have Washi Tape or want a new design or two? We have hundreds of designs to choose from at our STORE. You're sure to find designs that you'd love to own.
This is a great way to personalize a card for the recipient's hobbies or interests. It can instantly make a card feminine, masculine, whimsical, serious, juvenile or adult. Best of all, it's a quick but great card you can make when time is tight.
Here's a close-up of the bee card.
Let's take a peak inside the map card to show how I put another piece of white card stock inside with a strip of matching Washi Tape at the bottom. I sometimes also put a brad in the inside to accent the Washi Tape like here where I used the Anchor Brad in antique bronze. There are two other finished in this charming pack including shiny silver and pewter.
I like using Washi Tape on envelopes because it ties the whole look together and makes a great presentation when it's delivered to the recipient. I put it on the closer flap of each envelope and turn the excess Washi Tape to the back of it.
Stop by our YouTube Channel to see close ups of the cards and a tutorial with all the measurements. While you're there, like it and subscribe so you don't miss any new content. Click on the photo below to see the video or you can use this link: https://youtu.be/FC6ogdBv4uY
Are you inspired to try some of these yourself? Let me know what you think!
Today's card entitled "Miss You" is a box card. It's delicate, sweet, and a card that can remain open and be enjoyed for weeks and months to come! The box card is a great card for shut-ins, hospitals, and nursing homes.
Eyelet Outlet'sBrads, Bling, and Washi Tape are perfect for constructing box cards. The Large Flower on the back is easy to attach and the Flower Bling is attached to a piece of clear acetate then attached to the box insert. The remaining four flowers are Glitter Rose Washi Tape and Hearts Washi Tape adhered to white paper then die cut. Eyelet Outlet Sequins are used inside the flower shaker. Large Heart Bling adorns the side flaps.
Although the box card looks full of flowers and things, the side view shows that it is the multiple layers creating that effect (there's only six flowers). There's a white strip on the back to write a sentiment and sign the card. Once you have completed a box card, you'll find it to be addicting!
Time to start thinking about your Father's Day cards and Eyelet Outlet has you covered!
It's hard for me to pass up puns and plays on words, so when I saw this sentiment at LoveSVG.com, I knew I had to add some Eyelet Outlet Grape brads to it!
These grapes, like all of our fruit themed brads, look soooo real and there's three colors in each package of 12.
Be sure and check back next week for some more Father's Day card ideas and if you're not following us on Instagram, Facebook, and Pinterest, please do! You'll find tons of ideas for all kinds of paper crafting projects!
...since I (Lauren) have made a scrapbook layout! But my niece Maddie turned sixteen last week, and since a party (or any other social activity) was obviously out of the question, my sister came up with the idea of compiling a surprise scrapbook. She sent blank pages, a few supplies and postage-paid return envelopes to family and friends, and got back unbelievably beautiful and touching results. I was surprised, not only how many ideas I had... but how many of my ideas involved Eyelet Outlet Brads! Here's maybe my favorite of the pages I made:
I love using brads as a frame on cards, but it turns out they're even cooler around a photo! I took this picture of Maddie and her Nana (who also happens to be my mom!) in 2004,when Maddie was one day old, and it is still a favorite. To surround it, I chose brads and bling that either had a baby theme, or were pink, or both. I've got Heart Brads, Teddy Bears, Safety Pins, Ducks, a Colorful Lady Bug, a Butterfly, Flower Jewels, Heart Pearls, and tiny Pearl Bling.
One of the great things about making a scrapbook for an older kid in the year 2020 is that they (and their parents) have their own social media feeds, full of pictures you know they like. So it's possible to do a bit of lurking and photo-stealing, to get shots you might not have thought to take! This beautiful selfie records the day that Madeline got her braces off. As soon as I saw that smile --and the white space above her head-- I started thinking "thought bubble". I used a combination of stickers and brads to make a little collage of a few happy things I thought she might be thinking about, like school, treats, the beach, etc. I scattered a Computer Brad, Spring Bubble, Selfie Brad, Light Bulb, Scissors, Sunand some Mini Emotion Brads around my sticker sentiment, #Sixteen.
Whether you make layouts or cards, Eyelet Outlet has the perfect embellishments for all of your projects. Check out the huge selection of Brads, Bling, Sequins, Washi Tape and more!
Do you like pirates? My husband loves the pirate theme so I decided to make him a card fit for the best pirate I know! Arghh!
I'll admit, this took some time because of the stamping and coloring but I know he'll love it so it's all good! The fancy fold base card is not hard and very quick to make so you can always simplify it and still get a great card.
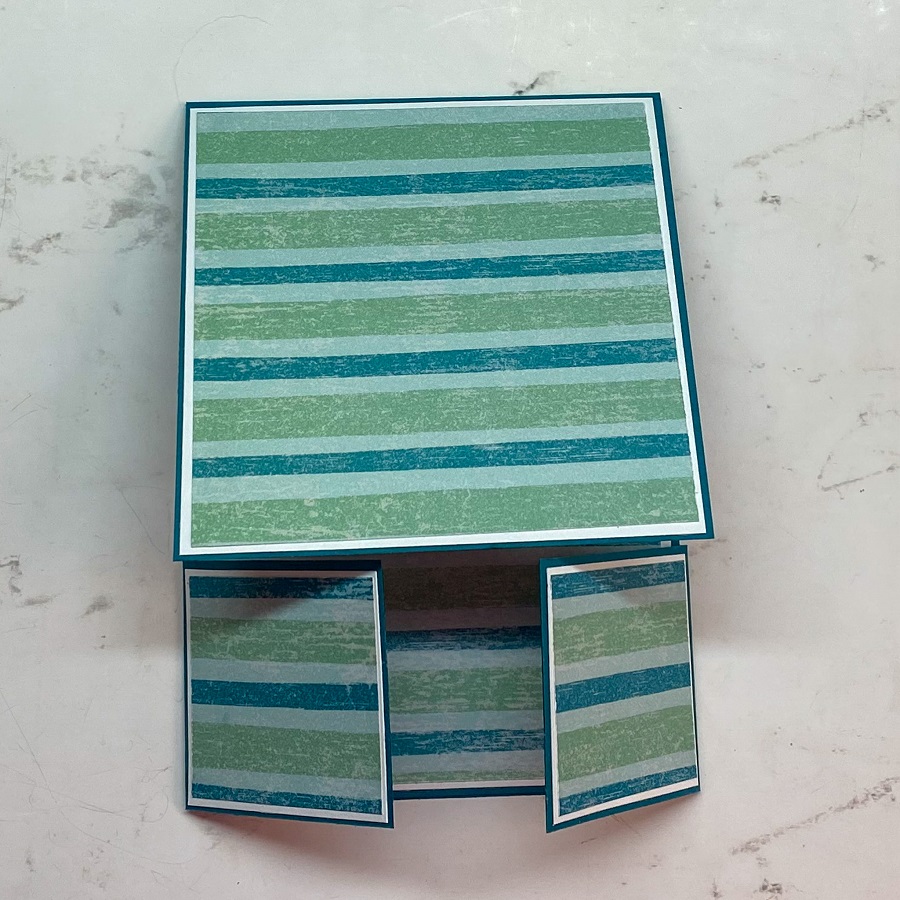
The card base is a fancy fold style called Dutch Door because of the two flaps at the bottom that meet in the middle and the flap for the top section. When displayed, the card front rests on the flaps and it turns into a sweet easel card. This is digressing a little but I was a child in the 70's and I thought Dutch doors were the bomb back then! It was fun to think of that while I was making this one.
I used three brad sets in this card. They were perfect pieces to enhance and make this card extra special!
The base of my card is made with teal card stock. You can't go wrong with teal for a nautical card because navy, gold, brown, pink and coral looks great with it and they happen to be common colors for nautical images.
The pieces needed for these cards are:
Solid Card Stock:
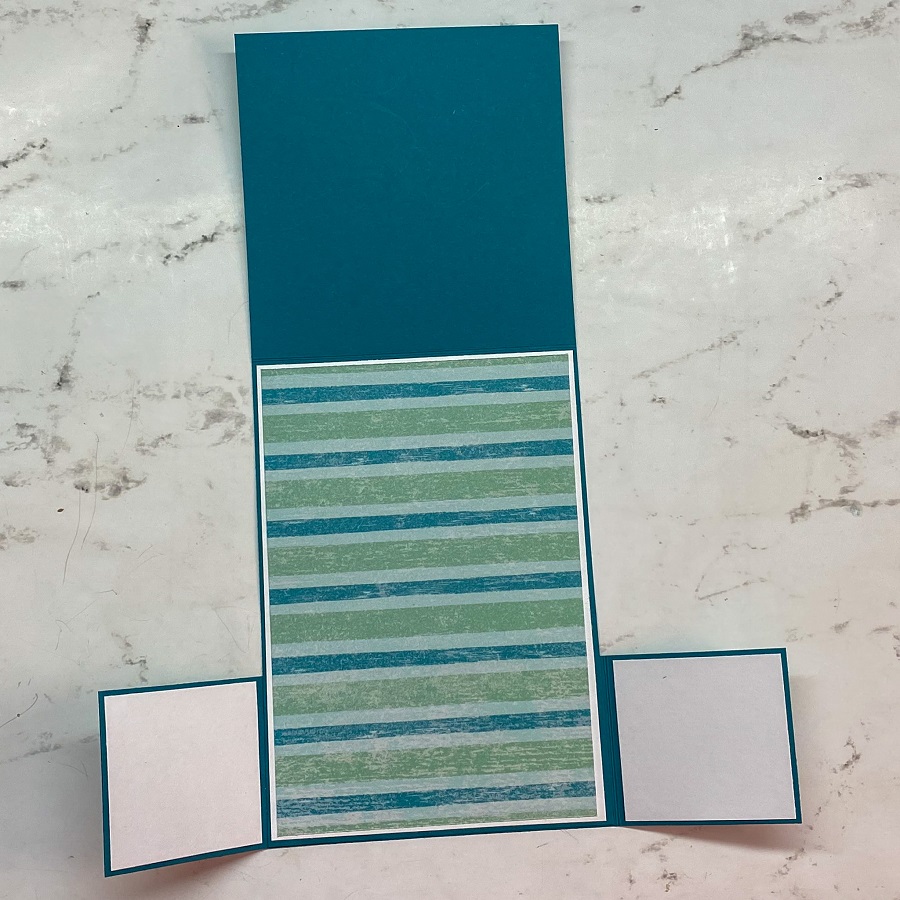
Main card base - 4 1/8" x 10" Score at 5 7/8"
Flap for the doors - 2" x 8 1/2" Score on each end 2 1/8"
Designer Paper: Front Flap - 3 7/8" x 3 7/8" Inside of Card - 5 5/8" x 3 7/8" 2 pieces for the door fronts - 1 3/4" x 1 7/8"
You'll also need several pieces of white card stock for mats.
Front flap mat - 4" x 4"
Inside mat - 5 3/4" x 4"
For outside and inside door mats: 1 7/8" x 2"
Front image and sentiment - approximately 2 1/4" x 3 1/2" (cut with a steel stitched rectangle die) Inside image and sentiment - approximate 2 1/4" x 3 1/2" (cut with a steel stitched rectangle die)
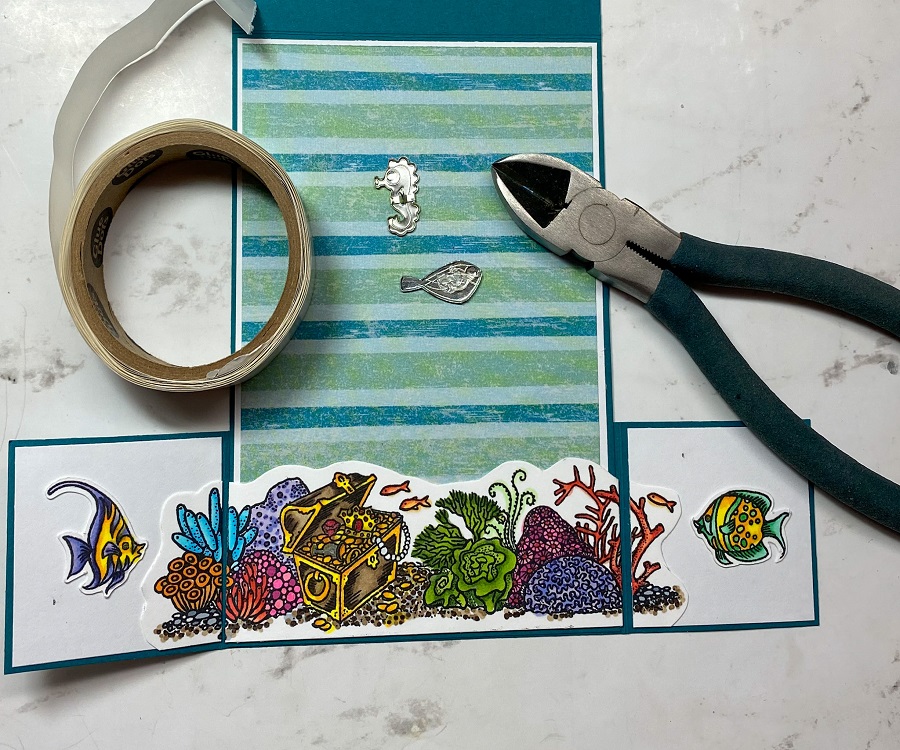
Attach the smaller teal card stock piece to the back of the larger piece with glue so you can close the door flaps at the bottom of the card. Glue the mats and designer paper to the outside and the inside of the card. Next I stamped and colored me matey, his fish and the treasure chest sea bottom image. You'll see in the photos that I used yellow initially to make the sentiment glow but I didn't like it. Shall we say it reminded me of small children in a pool doing what kids do in a pool? Not good! I used a light turquoise marker and went over it. That's why the finished pictures show turquoise around the sentiment instead. The yellow was light so it was no problem going over it. I cut the fish out using my Brother ScanNCut and trimmed the chest scene with my scissors. You can easily fussy cut all the pieces but I'm lazy! Haha! I glued these to the inside of the card and prepared the Funky Fish Brads to go into the scene. I was so busy constructing the card, I forgot to put the brads in before I glued the mats down. Since I didn't want the brad prongs to show, I just cut off the prongs and used glue dots to adhere the decorative part of the brad to the card. Problem solved!Then I stamped and colored the interior lady pirate and stamped the Father's Day message. I adhered everything inside the card and also added a strip of Fancy Pearl and Jewels Bling in blue from the store. It reminded me of air bubbles and was a perfect touch the vibe I was going for! Here you can see how I placed the Funky Fish in the watery scene.
To finish the front of the card, I attached the male pirate image to a gold mat cut from fine gold glitter card stock at approximately 3" x 4 1/4". I embellished the mat with a Compass Brad. I think you'll agree that gold on the mat and the brad is gorgeous on teal! The matted image was then glued so the bottom is about an 3/4" below the flap. This creates the notch that holds the doors open when you display it. The front flaps are decorated with sand dollars and starfish from the Sea Shore Brad Set. The pirate stamps are from Jessica Lynn Originals called Pirate Brentwood Owl. The fish & treasure chest scene is from a Stampendous set called Nautical Treasure.
As you can see, this card folds flat for mailing or giving. I found the brads were perfect to tuck the flap shut before mailing and it makes a pretty presentation before they open the flap and get the full effect of the design.
This card can be adapted to any occasion, season or reason! Use your imagination, grab your nautical themed stamps and brads and get creative! Thanks for stopping by.
Today's card isn't a card! It's a project that's fun to make, it lets creativity shine and it's useful! Today, it's all about the Eyelet Outlet Washi Tape, Brads, and bookmarks.
This is a fun technique of blending two coordinating (or not) Eyelet Outlet Washi Tapes and making a bookmark. It requires a bit of creativity, a bit of measuring, and lot of fun!
In the picture above, the unicorn bookmark was made using the Eyelet OutletUnicorn Washi Tape and the SkinnyDotted Silver Washi Tape. Here's how it's done:
Cut a bookmark base at 2" x 5.25"
Measure down on the left side .75" and place a light pencil mark. Do the same for the right side.
At the top, measure in .75" from each side
Create the bookmark angles. On the left side of the bookmark cut from the mark .75" down to the mark .75" across the top. Do the same on the right side.
Select a backing paper if desired and cut larger(as desired) than the bookmark base. Adhere the bookmark base to the backing paper.
Select two coordinating Eyelet Outlet Washi Tapes.
Place the first tape at the bottom of the bookmark leaving extra on both sides (this will be taken care of later) and tear off the roll.
Add the second tape above the first tape leaving no space between them and tear off the roll.
Continue steps 7 & 8 until the bookmark is covered.
Now even the edges either by cutting them off or by folding the excess tape to the back of the bookmark (folding is easier, trust me on this one)
Punch a hole at the center top of bookmark about .5" down and add string, twine or ribbon as desired.
Now decorate: add a message with lettering, stamping, or stickers. Be Creative!
Add a coordinating Eyelet Outlet Brad. Both brads in the picture above are mounted on a 1"x1" square edged with one of the Eyelet Outlet Washi Tapes. It is mounted on the bookmark with foam squares.
This is a great project for kids 8+. These bookmarks can be made to keep, trade with friends, or given as gifts. Please note: supervision is a good thing to ensure safety with the scissors and/or paper trimmer with younger children. You may want to create the bookmark bases ahead of time and have them begin with Step 6.
I'm excited to show you a project today that features Eyelet Outlet's newest brad! We now have records in the Eyelet Outlet store - both LP's and 45's, so let's get ready to ROCK!
My Cricut machine was instrumental in creating this card. I started out with two sound wave image from Cricut's Sound Wave image set and two 5" x 3 1/2" rectangles on my design canvas. First, I centered then sliced a sound wave image into one of the rectangles. I added my sentiment to this rectangle, omitting the "O" in "Rock," since my record brad was going to serve that purpose. On the second rectangle, I centered and attached the sound wave image, setting the image to draw rather than cut, ending up with two rectangles looking like this:
Next it was time for the skinny washi tape! Eyelet Outlet has oodles of colors and patterns, but I stuck to the solids in a rainbow of colors.
Using the drawn lines of the sound wave, I was able to apply my washi tape exactly where it needed to be and then I adhered the two rectangles together and applied my record brad as well as some Eyelet Outlet music note brads for a finishing touch!
Thanks for stopping in and enjoy the day with those you love!
Everyone knows that I (Lauren) cannot resist a diabolical pun, so when my friend and Eyelet Outlet Design Team Alumnus Stephanie Severin showed me a fun bird illustration with the phrase "Party Like a Flock Star" of course my first thought was, that it make a great card... especially if Eyelet Outlet Flamingo Brads were the flock in question!
I had two different ideas for making this concept visual, so rather than spend time deciding between them, I just made both! For my first card, I used an ink-blended panel in bright sea and sky colors, and added a few torn strips of Glitter Gold Tape to be sand and a few torn strips of Cloud Tape up in the sky. I added a Sun and Cloud Brad, plus a Rainbow to the top right and my *flock* of Flamingo Brads at the lower left, with my sticker sentiment occupying the space between.
My second idea was much more minimal, so I even pared down the sentiment, making it into a thank you card instead of a birthday greeting. I blended a very small area of the same ink colors and used one of my nested star dies to draw a star just a bit bigger than a Flamingo Brad. Then I paired the smaller alphabet stickers with my trusty old school Dymo Labelmaker, and finally added a few Star Brads from the Red, White and Blue set.
I hope you'll fly on over to the Eyelet Outlet Store and treat yourself to some fun embellishments and then use them to make cards for your "flock" of friends! ♥