Tuesday, March 22, 2016

New York Glitter

I love Washi Tape ... some might even say I have some Washi Tape issues (is having too many crafting supplies ever really an issue?).

For this set of cards, I paired the amazing Glitter Black Washi Tape (trust me, every single bit of the glitter stays on the tape ... 100% glitter sparkle with absolutely ZERO glitter mess) with the gorgeous New York City Washi.


Layering these Washi Tapes works well because the New York is transparent while the black glitter is opaque.  I added birthday sentiment and some black opalescent sequins to finish the design.


For this one I used the tape in stripes and added one of my favorite sentiments using this week's CAS(e) this Sketch.


Here's a closer shot of that awesome glittery sparkle.


Products used:


Thanks for joining me for some glittery fun.

Hi, I'm Stephanie ... you can visit me at my blog


Monday, March 21, 2016

Take me to the Movies

Hello Eyelet Outlet fans. Today I am sharing a fun layout I created using the new movie ticket and popcorn brads. This layout is a design that can be found in the Cricut Design Space studio.

Here's a look at movie night.


Supplies:


This is my last post for Eyelet Outlet. I have enjoyed being the Design Team Coordinator since 2010. It's been so much fun and I am thankful to Suzanne for giving me the opportunity. 

Have a creative day!


Sunday, March 20, 2016

Mixed Media Canvas

Salam every one,
I am sorry, I was off schedule due to medical issues, however everything is OK now

Let me share with you what I created using EO products

I have covered a canvas with  brown ink, let it dry and added clear Gesso. I fussy cut a picture from Graphic 45 paper collection. I added one of unwanted earring to the lady. To add some interest in the border, I added washi tape http://www.eyeletoutlet.com/washitape.html. I glued a tiny bottle, I added inside it flowers and cover the bottle with blings.
I die cut gears from Tim Holtz and centered them with beautful brads http://www.eyeletoutlet.com/10mm-pearl-brads-gold.html. I added circle foam under the gears to give some dimension. Another nice touch is to use some swirl bling, http://www.eyeletoutlet.com/swirl-bling-purple1.html. In the end I added some word stickers and mounted them with 3D foam tape.


I hope you like and see you soon
Salam :)


Saturday, March 19, 2016

More Easter inspiration

Hello Eyelet Outlet friends! Shemaine back again to share another card with some of our fun products.

I love our paper flowers and bling. They are a match made in heaven. 


I paired them with this super cute Easter Washi tape and an older Easter stamp in my stash. This card came together simply with three strips of washi, two of the paper flowers with bling and finished with a sentiment.


Thanks for stopping by today.


Friday, March 18, 2016

Easter Flip-It Shaker Card

Hello Eyelet Outlet fans!!
This week I went off my usual layout post path,
because I couldn't resist doing a cute card for Easter
with this cute pastel rabbit brad.
(He's also available in chocolate.)


Since this card is a flip-it style card I needed to hide the brad tabs on the other side.
So what did I do? Well use a paper flower and bling!!
I added some color wheel washi tape and oval egg bling for more interest.


Supplies

Come back next week and until then... happy crafting.


Thursday, March 17, 2016

Happy St. Patrick's Day... From the Easter Bunny!

And also from me, Lauren! As a kid, I absolutely *loved* decorating Easter eggs every year. To this day, whenever I smell warm vinegar, I'm instantly transported back to our family home, the kitchen table covered with a kid-proof vinyl tablecloth and set with a rainbow of colorful dyes! The Eyelet Outlet Easter Egg Brads totally remind me of those days, as well, so I couldn't wait to use them on an Easter card.


Of course, even the prettiest Easter eggs won't hide themselves, so I needed some adorable Rabbit Brads, too. I attached them to some oversized pastel chipboard letters and painted a little meadow for them all to inhabit. A strip of Stitched Washi Tape in the perfect shade of purple completes my Easter scene.


There are lots more Easter themed items at Eyelet Outlet, including Chocolate Bunny Brads, Happy Easter Washi Tape and Egg-Shaped Bling... why not stop over and check those out? I'd love for you to see my blog, All the Good Blog Names Were Taken as well; be sure to say "Hi" so I can visit you, too!

Wednesday, March 16, 2016

A little Sparkle is in the air...


Spring is right around the corner...
so be sure to add a little fresh air and sparkle to your paper designs.
Check out how springy this tree looks with pearls and Oval Jewels in sticky back bling
from the Eyelet Outlet...


So very sparkly!!


If the outdoors isn't your sort of thing...
check out how you can make a necklace using new Square Jewels along with the Oval Jewels 


So elegant, don't you think!

Do you see that gold peeking through?
It's Eyelet Outlet's NEW FOIL WASHI!!
It's Ahhh-mazing!


The larger sticky back bling comes in a variety of shapes and colors.
Be sure to pick up a few today!

 Feel free to check out my blog soon!


Tuesday, March 15, 2016

Easter inspiration

Hello Eyelet Outlet fans, Shemaine here today sharing a card that I made using some of our Easter themed Washi Tape, brads and bling.

I love the Easter styles of Washi Tape available in the store right now. They are easy to use on cards and other projects.


I added some of our bling strips along the border of the washi tape and then added a few Chocolate Easter bunnies. I finished my card with an Easter bubble brad.


This card was quick and easy. I'll be back with another fabulous card later this week!

Have a great day!


Monday, March 14, 2016

Diggin' in the Dirt!


Hello EO friends!

Quite a while back I got this cute little seed and shovel kit as a remembrance from a function at church.  I saved it, thinking that it would make a nice "thinking of you" gift for a friend when they're feeling down.  When I saw these adorable garden tools brads, I went digging (pun intended!) in my alterables stash for it.


I stamped a few rows for a garden, colored them with Copic markers, and used some cute coordinating Lawn Fawn papers to make a tag for the kit, and a coordinating card.  A trio of sun and cloud brads, garden tools, and a Spring rabbit bring some details to the simple garden scene.


I hope you have a fabulous Monday, and a fantastic week!

Deb


Sunday, March 13, 2016

Super Hero Card with Noe

Hi everyone!!

Noe here today,  I'm excited to share my first card I made with you.


But first I'd like to share a little bit about myself:

"My name is Noelia but I prefer being called Noe.
I'm 33 years old and I live in the north of Spain with my two children and my husband.
I studied Law and Criminology but my passion has always been crafts.
I began to practice scrapbooking when my first son was born 4 years ago and since I couldn't stop. I have known fantastic people, it's the best of this art.
Love create LO with my favourites photos and make cards for specials ocassions!! And I love create Mixed Media projects: I enjoying playing with inks, stencils, gesso ... hands dirty can be fun!!!
In July 2014 I opened my blog "El Scrap de Cris y Noe" with one of my best friend and here I am!!".

Well, I don´t mess me more and show you my first card!!


I made background of my card with funny "Circle washi tape Orange / Blue" and these are the colors chosen to keep working on my card.


I´ve used "White Paper Flowers" dyed in different colors with my Dylusions spray inks and with them I made a frame in which to place my little Superhero. 


In center of each one of the flowers I placed Glitter Enamels (blue and green) and hidden among them, these little funny monsters. 

Finally a brad in greeting and advice given by our Hero.

Supply list:
Hope you like my first card!! Make sure you share your Eyelet Outlet creations with us on our Facebook Page.

Saturday, March 12, 2016

bright black layout

Hi there! It's Marina here today and I'm happy to be a part of Eyelet Outlet DT!

Ever since I was a child I was always trying to make something with my hands - stitching, knitting, cross-stitching and several years ago I tried scrapbooking and cardmaking. This hobby is my passion, I can make anything with paper using my knowledge from other hobbies and it's really inspiring for me!
So here is my first project - a bright LO on black background.


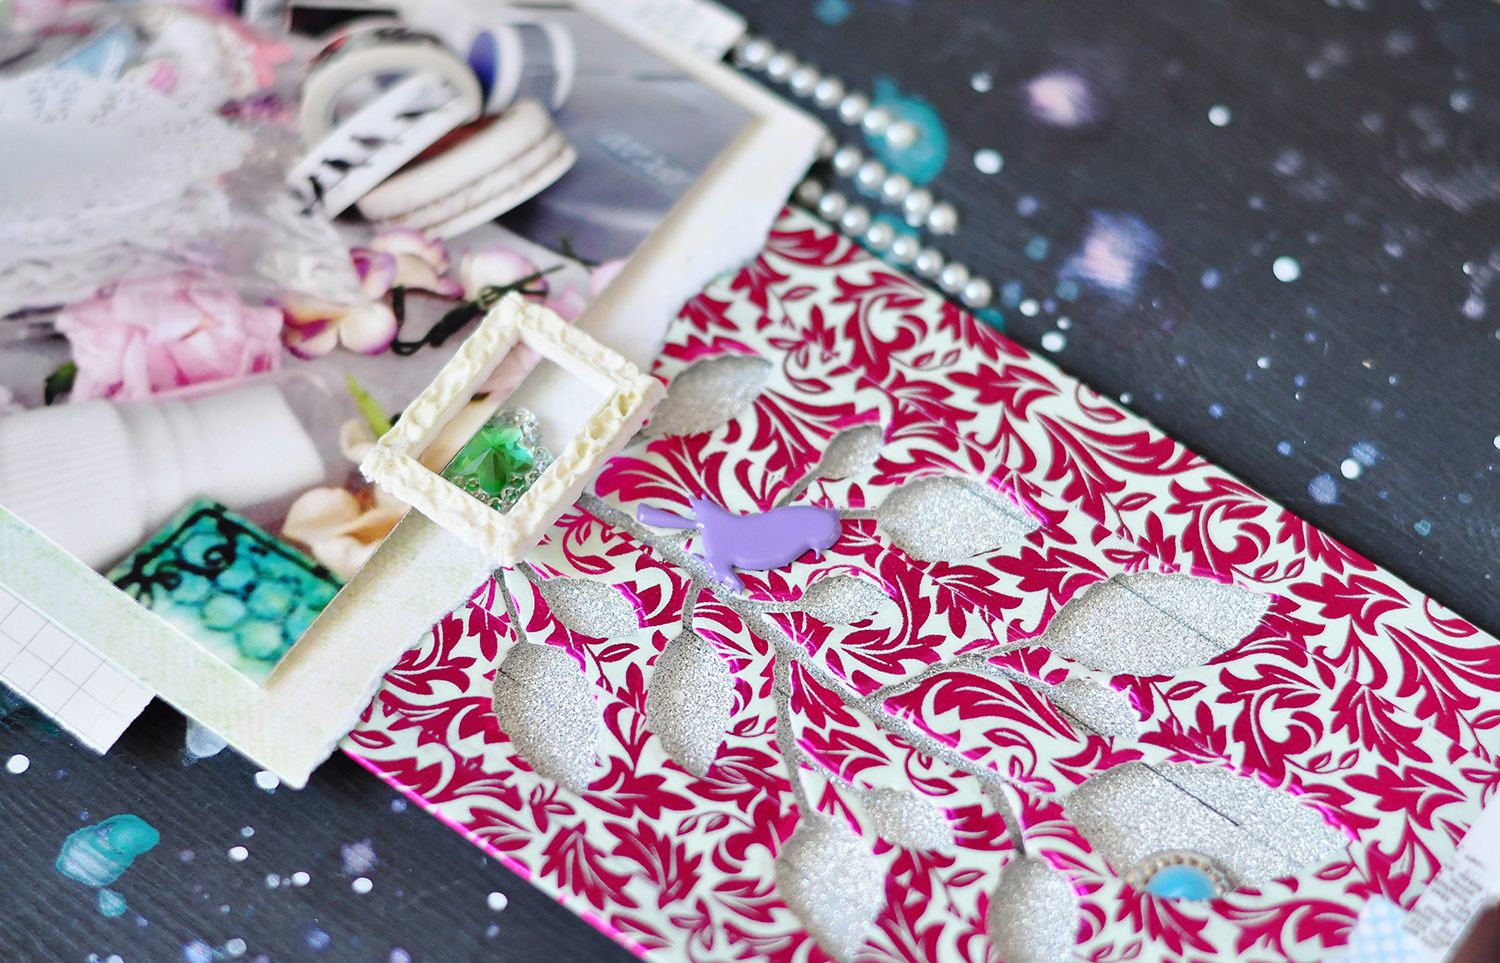
I adhered Foil washi tape - Leaf on the white cardstock and die-cut branch with leaves.
 Under this branch I adhered Glitter washi tape - Silver and added 3D foam between the layers to make my composition more interesting
Foil Washi Tape - Leaf


After I add some paper pieces, texture paste and splashes with different sprays. To make the layout more textured used different brads, enamel dots, blings and pearls. Also don't forger to add some paper flowers between layers, it's always great idea ))))
Hope you'll like my layout!


Have a great day!

here is my product list:
Paper Flowers
Foil Washi Tape - Leaf

Friday, March 11, 2016

Layouts on Friday with Rosandra

Hi Eyelet Outlet fans!!! Really am I doing this already... a summer layout?
It's hard to believe that in few short months it will be summer.


On this layout I used the new Sun & Cloud brads to accent the title.
This year I've put myself on a bit of a paper diet and I'm forcing myself to use paper I've hoarded.
That being said I've been really putting my scrap pieces to use.
When I don't have enough to mat photos or create a foundation I start layering the scraps.
Since there are a lot of patterns going on I use the pearl bling and bumpy bling to
break up the layers or accentuate it.

Supplies:

Don't forget to check out the new brads on website.
Happy crafting!


Wednesday, March 9, 2016

Know What I Love? Bling!

Hello friends! {Judy} here for my first post as a member of the Eyelet Outlet Design Team! I am thrilled to be a part of such a fantastic group of designers and a company with such awesome products!

Today I am sharing a "throw-away" watercolor card. This was a little piece of "wash my brush off" paper that I had set aside to use for that same purpose at a later date. But once it dried, I decided it would make a cool background.


So I stamped some flowers (Stampin' Up!) and blended them with my aqua brush to match the background. Then I added some bling to the centers of the purple flowers. I cut the bottom of my card in a wave pattern, and added a section of the Clear 4mm Jewel Strips to follow the pattern of the wave. It was so easy to lay it down and mold it to the shape I needed! 
Elegant but not overstated! The Jewel Strips come in several different colors too -- so there are a lot of options for your bling! Easy to use in a strip, and easy to cut individual rhinestones. 

And now a little about me:
Although we are originally from Arizona, my husband and I currently live in Central Nebraska with our water turtle (we have had him for twenty years!) and our sweet Lab/Jack Russell mix, Fiona. We have two children, who live way too far away from us - one 750 miles west, and the other 1350 miles east. Sad! We are the proud grandparents of a six-month old granddaughter, and are so thankful for Face Time!

I love going on junk jaunts, finding interesting things to photograph, and I love traveling. I also spend quite a bit of time at our Community Theatre, either as an actress or director. I am currently directing To Kill A Mockingbird, which opens in the Spring. I also work part-time as the Theatre Events Coordinator and I do freelance social media and proof reading. My kids, even grown, are my number one priority.


And of course, I love crafting! I am excited to show you more projects using all sorts of fun from Eyelet Outlet in the near future!

Tuesday, March 8, 2016

Bunny Butt Love

When I saw these fun Bunny Butt cookies by Pillsbury, I knew this would make an adorable card.


I started with 12mm Clear Bumpy Bling in circles and hearts.  Next I turned my clear bling into colored bling using Spectrum Noir BP2 Marker.

It's easy to color them on the craft sheet because the adhesive backs release when you're done.


I decided to spray on a sealant to make sure the ink stayed, but accidentally grabbed my can of glitter spray instead.  I decided to give it a try, because bling can always use a little more bling.


Next I cut out two oval dies to make my bunny feet and added the bling.  The bunny body is a large circle die cut (for the Die Cut Challenge at Challenge Up Your Life).


I layered three punched flowers to make the bunny tail and then decided the tail could use a little White Round Jewel in the center.

I die cut a circle from the front of my wood grain card base and backed it with kraft cardstock, so the bunny would have a hole to dive into.  I finished with a Tim Holtz Sentiment Sticker.


Eyelet Outlet products used:
Stephanie Severin