Showing posts with label Funky Bee. Show all posts

Sunday, December 26, 2021

Valentine Love Cards

Hi everyone! 2021 is soon one for the history books! I'm sure not going to miss much of it. Looking ahead, I'm excited to share my top three most favorite valentine and love cards. It's so much fun going back to look in my photo files to pull out these three for you today. It's also fun to see what the other designers have posted too. I hope you'll check them out!

Let's start with #3 and count up to #1. I'm a bee lover and I adore the Funky Bee Brads and Mini Bee Brads. I used both here along with Skinny Glitter Washi Tapes, Bee Washi Tape, Glitter Rainbow Washi Tape and Heart Shaped Enamels! So much fun color and shine!


Next up is a fun dinosaur inspired card. This one features the Tall Palm Tree Brads, Sun & Cloud Brads and of course the Dinosaur Brads! The Cloud Washi Tape is such a great background to the volcanos! Glitter Washi Tape - Green Pattern is also used as a wild green background to this one.

Drum roll please! My #1 card choice is this fun ice cream card. This one features our Ice Cream Brads and Heart Shaped Enamels. A few Pearls also accent this one. I cut the brown cardstock with the melty edge and used Glossy accents on the edge. The brown cardstock reflects through to make it look like it's melting. Simple but fun effect!


Thanks so much for stopping by today. I hope you enjoyed this little trip down memory lane and also got some inspiration for Valentine's Day. It'll be here before we know it!

Happy Creating Everyone!


                                     Janet - YouTube - Blog - Facebook - Instagram - Pinterest  

Wednesday, April 14, 2021

"Happiness is...

...a cup of coffee and a good book". Or, as I (Lauren) have interpreted it in this wish-fulfilling card, happiness is a pot of coffee, a room full of books and a few close friends! I made this fun scene using Eyelet Outlet Book Tape, Book Brads and Coffee Brads, and populated it with adorable characters from Waffle Flower Crafts' Books and Coffee stamp set.

I did all my stamping on watercolor paper and colored with Tombow Dualbrush Pens with Prismacolor Pencil shading. I was a little disappointed that Bear's glasses were just a tiny bit too big to work with our Eye Glass Brads; but I was able to add a Heart Brad to the cover of the bear's book, swap the large stack of books that the bird is sitting on for two colorful Book Brads, replace the potted cactus with a yellow lotus flower from the Frog Brad Set and add a Coffee Brad and Funky Bee to the foreground.

I made the "Library" by affixing strips of EO Book Tape to a panel of plain white cardstock and adding a strip of skinny tape under each to work as shelves. I made a table from Hardwood Floor Tape (it's out of stock now, but we still have some great Wood Tapes); assembled the entire thing, added the fun sentiment (framed with ancient nested dies) and matted the panel on Foil Copper Tape before adding it to the front of my white A6 card. 

Of course, you could make a room setting for pretty much any character stamp you own, with just some Washi Tape as wallpaper (we have pretty much every style you could imagine!) and Eyelet Outlet Brad accessories; I hope you'll be inspired to create your own interiors!

is still the world's 
sloooooooowest colorer...

Sunday, January 24, 2021

Sweet As Can Bee!

Bees are always a fun element to work with and Eyelet Outlet has a lot of bee related products to help you out. This is a very cheerful way to let someone know you're sweet on them.

To begin, I applied glitter tape to the outside of an A2 sized card base. I cut a middle rectangle out of a golden yellow piece of cardstock and applied it to the panel. I then applied alternating strips of glitter washi and printed washi in two patterns. I cut and colored a bee hive and a branch. I used the mini leafs and bees to decorate it. I also added the funky bee brads and a purple heart enamel dot. The shiny honey on the honey dipper is a yellow laquer from Hero Arts.  

Check out the store for the supplies I used:

* Funky Bee Brads

* Mini Leafs Brads

* Mini Bee Brads

* Glitter Thin Washi Tape - 5 rolls

* Glitter Tape - Rainbow

* Heart Washi Tape

* Bee Washi Tape

Thanks for stopping by and BEE Happy!

Sunday, August 16, 2020

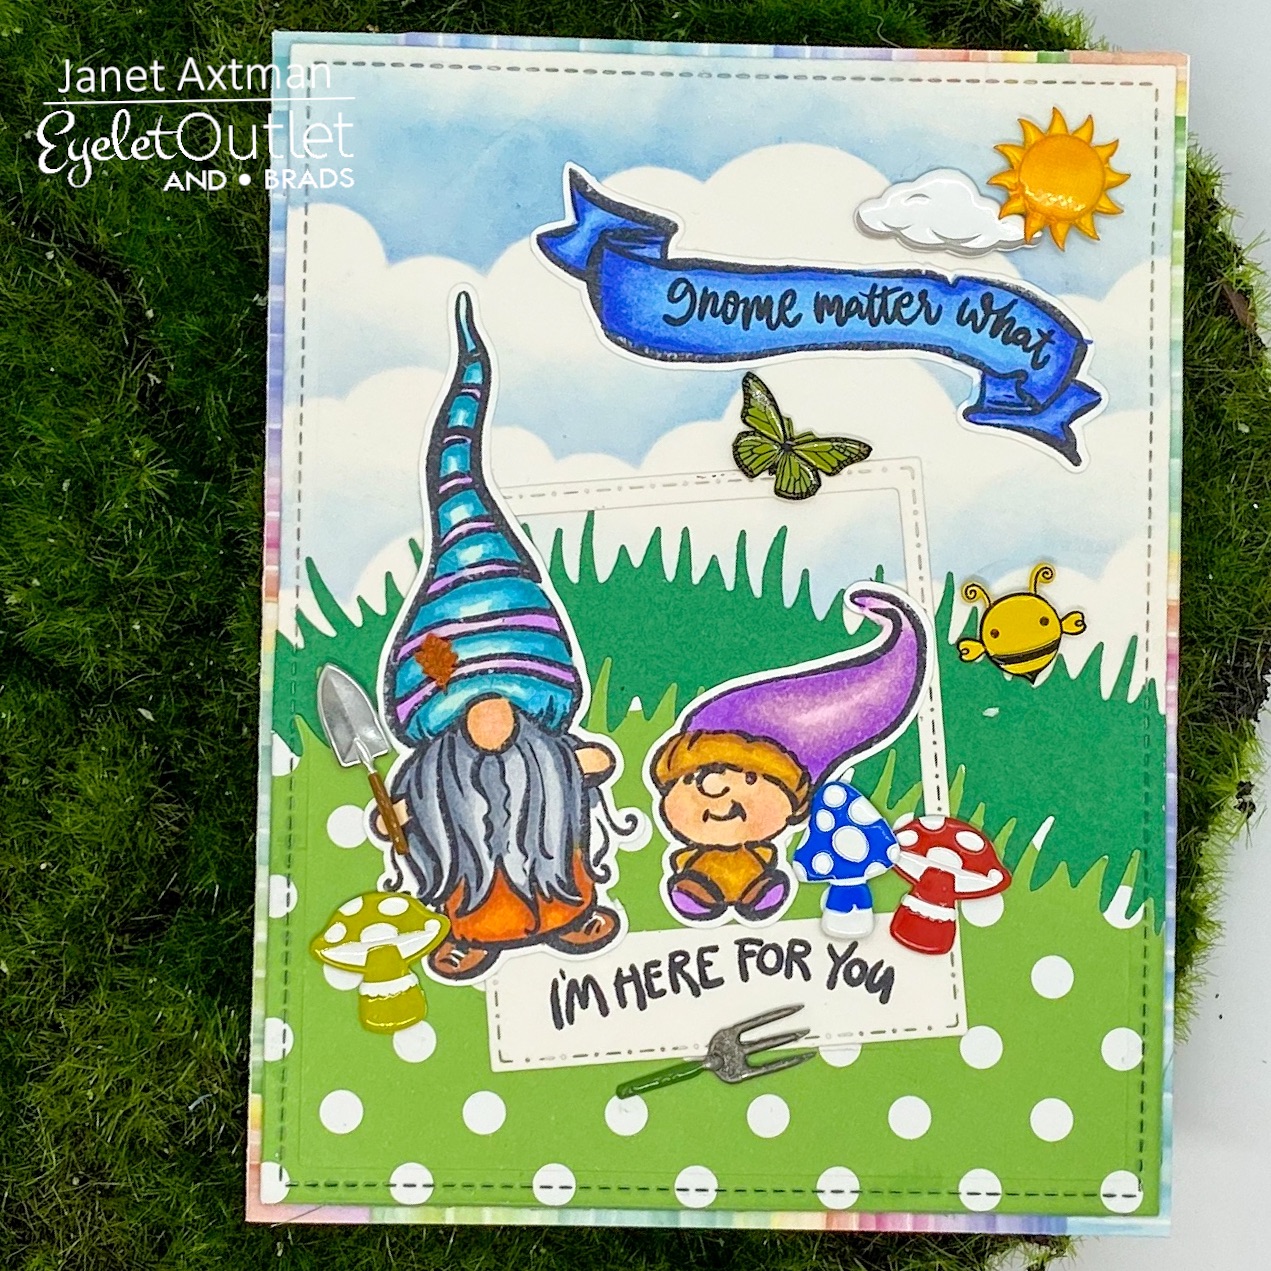
Gnome-y Business

Hello Eyelet Outlet Fans! Today, I thought I'd join in on the Gnome craze and make a card featuring Eyelet Outlet products. 

Now, we do have a Gnome Brad Set that is super cute too but I don't have them at this time. They would have been adorable as a third or fourth gnome on the card and I plan to add them to my collection for that reason. The good news is that there are so many fun brad sets that are just the right size to coordinate with the gnome character stamps out there right now. Hooray!

I created the background using a cloud stencil and Broken China Distress Oxide ink. The grass was made with a die set. Once I had the background together, I die cut it using a rectangle stitched die. I colored and cut out the two gnome characters and also cut out a polaroid die cut. I aranged these on the card and placed the gnome characters in and around the polaroid die cut. Then the fun began! I used the Garden Tool Brad Set and put the garden shovel in the gnome's hand and the garden fork below the sentiment. Mushrooms and gnomes go together so I added three of them from our Mushroom Brad Set. The Funky Bee Brads go great with this cartoonish-style card and I added a green butterfly from the Butterfly Brad Set. Finally, I used the always versatile Sun and Clouds Brad Set to add some interest in the top right corner of the card. Honestly, you really need this set because it can be used so often and it really accents a sky background so well. Can you make out the last brad set I used? Look closely. I used one orange mini leaf from the Mini Leaf Brad Set on the larger gnome's hat. I love it! One of the Mini Ladybugs would also be cute on his hat as an alternative. 

Once all the brads were in place, I put a single row of the new Color Wheel Washi Tape around all 4 edges of my white card base. This creates a rainbow border around all four corners of the card to finish it off. 

I hope you enjoyed this little voyage into gnome-ville. I know I did. They are just so darn cute! Have a great week!


Wednesday, February 13, 2019

Wholehearted

Every once in a while, I (Lauren) get an idea SO CRAZY I have to drop everything and attempt it immediately. This is one of those. The amazing thing is... it actually came out very much like the picture that was in my head. (I will leave it to you to decide if that's a good thing or not, lol.) I also think I may have set the all-time record for most Eyelet Outlet Brads used in one post. Because there are 45 brads, from 29 different style sets on these two panels which are each just a tiny smidge over A2. I've given the complete list with links below, but really, the best part about an idea like this is that you can make it work with pretty much ANY combination of brads you love!


Many of my crazy ideas just *appear* out of nowhere, but in this case, I had actually seen two different inspiration pieces recently. This heart shaped graphic and a very cool two-halved LOVE card. I saw them at different times and definitely didn't connect them immediately, but at some point they kind of joined up in my head and that's when I started working. I gathered up lots of little sticker sentiments I thought could work in a Valentine context, and pulled out a bunch of brad styles. Generally, I do a "dry fit" layout first, but in this case, I kind of just had to wing it. I found it easier to start at the bottom of each half and fit each brad on individually, as if working on a jigsaw puzzle; scattering the sentiment stickers here and there by size, theme and color as I went along. Here's a shot of my worktable when I was about half done. Minimalists: look away now!


You can see I have quite a few leftovers, but this was one of those times that it was good to have a large pool of different sizes and colors to draw from, because as I got to an edge, I sometimes had a very oddly shaped blank spot that needed... something. And honestly, I couldn't probably have guessed what that would be when I started out. The brads that made the final version of the left side are: the sun from our Sun and Clouds set, a pair of Colorful Sunglasses, Mini Ladybug, the champagne flutes and silver-colored engagement ring from the Wedding Brads set, a few Mini Bright Stitched Flowers, a Funky Bee Brad and some Mini Bees, a Peace Sign, the white cup from our Coffee Brads, a Donut, Bee Happy from the Spring Bubble Brads, Palm Tree, Flamingo, a Sandcastle Brad, a couple of Hearts and a Yoga Cat. 


On the right-side card, the brads are: one red and one green Margarita from the Cocktail Brad set (which also includes red and white wine), Love You from our Saying Bubble Brads set, a handsome green Gnome, a Mini Emotion Brad, Mini Bright Stitched Flower, a couple of Hearts, Hello Sunshine from the Spring Bubble Brads, a Brown Teddy Bear and a pink one from the Colorful Teddy Bears set, a silver Eiffel Tower, Mini Ladybug, a couple of stacks of Book Brads, a yellow Light Bulb, a green ball of yarn and the needles from our Knitting Brads, a Cute Deer, a red velvet Cupcake, and a yellow Duck Brad.


When the two heart halves were complete, I affixed them to A2-sized backgrounds using the reverse patterned paper selection, to which I had carefully lined up strips of brand new Heart Washi Tape, XO Gold Foil Tape and a fun Skinny Washi pattern. But again... you could use pretty much any combination you like, and there are some really awesome NEW tapes in the store; they're conveniently placed at the top of the tape section with an asterisk, so they're easy to find! 


Wishing everybody a very Happy Valentine's Day tomorrow! ♥♥♥

is absurdly proud every time she 
breaks her own "Most Brad Styles" record! 

Friday, October 27, 2017

Bee Happy!


For today's card I am revisiting an old favorite stamp set, accenting with some cute coordinating Eyelet Outlet brads in both funky and mini versions.  


These mini bee brads are absolutely adorable!  


The minis are the smaller version of our traditional bumble bee brads, but I love the funky bee brads version, and spring bubble brads are the perfect companions for a fun sentiment inside.  

When the days get short and gray, a happy yellow card is the perfect perk-me-up!  

Friday, July 14, 2017

It's Your Day!


I really love these box cards but until now I had never tried one!  It was really fun and easy, especially since this particular one is a set of dies so all you really have to do is  glue things together.  I love that it folds flat for mailing. These flowers were perfect for embellishing with Eyelet Outlet brads and enamel dots.  


Here's a closer shot of the flowers and their different sized enamel dots centers, which come conveniently in one package.  I used a cute little funky bee brad for one of the flower centers and backed some of the die cut flowers with scrunched up Eyelet Outlet paper flowers just to add a little variety.

Have a great weekend!  


Friday, March 10, 2017

What's all the Buzz About??

Hello Friends! Buzz Buzz! I am buzzing with excitement over these adorable bee embellishments! 


Papers from American Crafts
I used the Paper Smooches Digital Free Bee file and converted it into a SVG
Deigned the honeycomb from an free image on line into a SVG
Black burlap fabric
Hap"bee" Birthday Sentiment stamp from Stamps of Life
Pom Pom Ribbon
DoubleClick Skittles colors: Black and Bonus Yellow

the Eyelet Outlet Products:

Enamel Dots Star Enamel


Thanks for visiting with me today~ Carri!


Follow on Bloglovin 


Follow me on Instagram!
Instagram