Showing posts with label saw brads. Show all posts

Tuesday, June 13, 2023

To a "tool-riffic" Dad!

Father's Day is just around the corner! Here is a fun card for you to create!

I started with a standard size card, stamping and coloring the bottom trim and using the black glitter washi and tape measure washi to create the background. I stamped, colored, and fussy cut various tools to add dimension. I stamped my sentiment and added the tool brad embellishments.

For the inside I added a few "tool" sayings and created a border along the bottom using the tape measure washi and more stamped, colored, and fussy cut tools! I also added a black enamel dot for a nail head. As in, "you nailed it!" I hope you enjoy! 

Thanks so much for stopping by! Don't forget to shop at Eyelet Outlet for your crafting needs!

 SHOPPING LIST:

Happy Crafting!

Michelle ~ The Craft Market SC Facebook Instagram


Sunday, May 22, 2022

World's Best Handyman Dad!


Hi everyone! Father's Day is coming up and for my family this is an extra special one because it's also my son's 17th birthday! Yes, folks. He was born on Father's Day. It rarely lines up on the same day but this is one of those years and I can't wait to celebrate with both of my best Dudes!

This card was created with my Silhouette Cameo 4 machine and an oldie but goodie file from Jamie Cripps called A2 Tool Pegboard Card #60346. It's just right to hold Eyelet Outlet Tool Brads with two Heart Shaped Enamels and a single Green Enamel Dot. This is super quick to make and you can buy this file as an .svg if you'd like to try it on a different cutter. So fun and perfect for that guy that enjoys working on projects.

Shopping List:


Thanks for stopping by today. Please visit the store for all you brads, washi tape, bling and paper flowers!

Happy Creating Everyone!


Janet YouTube - Blog - Facebook - Instagram - Pinterest

Sunday, January 30, 2022

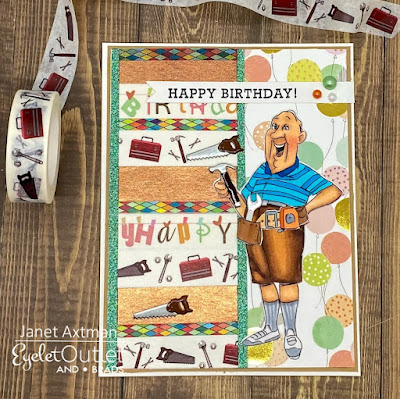
Happy Birthday to the Tool Man

Hello EO fans! Today I'm here with a fun masculine card. I've used many different washi tapes on this card. It all works together to create a happy birthday tool man theme.

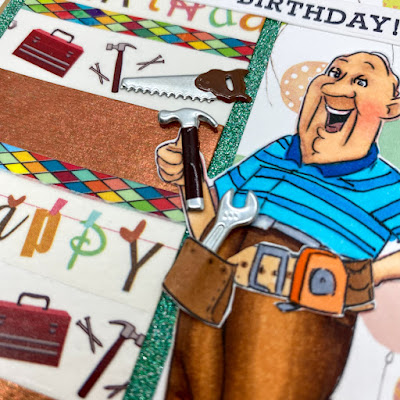
I've also added tool brads to this card. I think the wrench and hammer is perfect for this man. These are from the Tools brad set. The hand saw is from the Saw brad set. Green, orange and white pearls add just a little bit of bling. This may be a man's card but I still think the pearls add the right touch.

This card is for my husband who it a real tool man. I think he's going to get a kick out of it. I just love that no matter the theme, EO always has just the right washi tape and brads. 


Thanks for stopping by today. I hope I inspired you to do a little winter cardmaking. Have a great week!

Happy Creating Everyone!


                                     Janet YouTube - Blog - Facebook - Instagram - Pinterest  

Thursday, May 27, 2021

Best Dad I Ever SAW

Some crafters say that it's hard to create masculine cards, but Eyelet Outlet makes is so easy!  From tools, sports, beer, fishing, camping, you name it!  Whatever your guy is in to, I'm sure we have a brad for that!  


Today I'm bringing you a punny little Father's Day card using the saw brad and a couple of screw brads.  Father's Day is right around the corner, so stop by Eyelet Outlet and find just what you need to make Dad a great card!


Thursday, May 28, 2020

Happy Father's Day!

Father's Day is around the corner and today I've got a couple of fun cards for you embellished with some great Eyelet Outlet products. The sentiments for both of these cards comes from LoveSVG.com.  I find so many of their files work fabulously with Eyelet Outlet brads!


Eyelet Outlet brown bear brads set includes adult bears along with darling baby cubs and our pine tree brads are a perfect complement to them.  


I can't resist a pun!  This cute sentiment could work with more than one of our brads like one of our eyeglasses, or even our small eyeballs, but today I opted for a couple of saws brads.  The screw brads also complemented this card.  

Stay well and keep crafting, friends!


Tuesday, May 21, 2019

Terrific washi to match our classic brads!


You are probably familiar with our classic tool brads. They come in four different styles:
and 

And now...we have designed coordinating washi tape that show off all of these tool sets!  
Just in time for Father's Day.

Show your Pop how cool he is with coordinating Tool Brads and Washi tape.

Also available are washi styles for:
and Tools!


Tuesday, April 9, 2019

Honey Do List

It's Kim from Katydid Cards and today I'm pairing some of the Eyelet Outlet goodies with this Art Impressions stamp.  I was thinking of the 'Honey Do" lists women make for their husbands and how (some) husbands handle it:


I used quite a few Eyelet Outlet products on this card.  First, the Toolbox, Tools, Saw and the new Beer brads.  Next the Green Pattern, Skinny GreenWide Mountain, Wide Bird, and Wood Washi Tapes.  I finished with the Pearl Bling.

The stamp is appropriately named, Lazy Boy.  I stamped the image in scanned it into my computer and made a few altered to it.  The Eraser tool in the Silhouette design screen was used to remove the bag of chips and remote control.  After that, I printed it twice, once filled with a brown leather pattern and the other blank.  The blank image was colored and fussy cut to place on top.  The cardstock is from Stampin' Up.


Inside, I had a little fun with the sentiment.  Truth in jest!


I look forward to sharing more of my cards with you, so I hope you come back and visit me again.  In the meantime, I wanted to share the link to another card I made which shows the flip side of this lazy boy.


Kim from Katydid Cards 
Who provided the inspiration for these cards?  Katy did!

Tuesday, February 19, 2019

Tool Themed Waterfall Card Kit

Hi folks!  It's Kim from Katydid Cards sharing some news with you.

When crafters visit the Eyelet Outlet booth at craft expos, they often ask how a card was made as they want to duplicate it.  Well, we heard you.  Eyelet Outlet now has kits for selected cards!   

They will be making their debut in limited quantities at the Texas Scrapbook Show, February 22-23.

Here’s a look at the first of the three kits. Stay tuned for posts about the two additional card kits in the weeks that follow.


In addition to the kit tutorial, here's a more in-depth description with step by step pictures.

My first step was to cover the 4” x 5 ¼” white panel with washi tape.  The orientation of the card determines where the holes are; they will be at the bottom of the panel for the vertical cards and to the right for the horizontal card.  


I folded the excess washi tape over the edges of the panel or trimmed the excess off the top/bottom with scissors.  


I ran a bone folder over the front of the panel and the flaps on the back to ensure good adhesion.


I poked the tip of a stylus from the front through the two holes in the panel.  You can use the tip of a pencil or something similar.  


I attached the washi covered panel with adhesive to the card front making sure to align the holes.  You can use any sort of adhesive you prefer, liquid or tape runner. I happen to like Art Glitter Glue, a clear-drying liquid adhesive.


Next, I inserted the hammer and wrench Tool Brads, the Saw Brad and Tool Box & Nail Brads (or Band-aid Brad) on the four white 1 3/8” squares.  I used a paper piercing mat below the squares and a paper piercer to make the holes and then inserted the brad.  


After it’s inserted, I flip to the back of the square to flatten the prongs.  I use the flat end of one of my craft tools to do this.


After I attached the brads, I decided the squares would look nicer covered with washi tape, so I took them apart and covered them.  That’s how they will appear in the rest of the tutorial.
Each of the squares was then attached the 1 ½” colored cardstock mats.


Now to the waterfall mechanism.  I folded the horizontal tab portion of the mechanism (with the holes) back on itself so that it is behind the vertical portion.  Some of the folding has already been done for you.


I applied adhesive on the center back between the two to secure.  I was careful not to extend beyond that small area with my adhesive.


Each of the remaining score lines was folded in a mountain fold (upside down V like a mountain peak). 


At the top score, I folded it back against the front.  The section with the single hole will extend below and behind the horizontal portion.  Like this:


When attaching the matted squares, I started at the bottom.  I applied adhesive to the entire back of the square and aligned with the lowest scoreline.  


Next, I applied adhesive to the mechanism between the top of the first matted square and the next score line and attached the second matted square, aligned to the next score line. 


I followed this procedure for the third and fourth matted squares.  


The pull tab was attached next.  I folded on the score line and attach with a Screw Brad and inserted it through the hole on the bottom of the mechanism.  I flipped the mechanism over and flatten the prongs.  On the finished card, I wrote the word “pull” on the tab.


I attached the waterfall mechanism to the card front with ONLY the two Screw Brads, inserted through the holes in the front of the card.   You don’t want any other adhesive on this as it would impede the movement of the waterfall.   

The kits contain an assortment of large and small, flat and Phillips screw heads.  You need only to be sure to match the two brads attaching the mechanism to the card base.


As I pulled the tab on the waterfall, I felt the back section was too plain, so I added more washi tape there as well.  Here’s what it looked like before the washi.


I think it looks better with that additional bit of embellishment.


I added some washi tape to the appropriate sentiment for the card.  This dresses up the inside and ties it together nicely with the front.


With my left-over washi tape, I took a minute to decorate the envelope flap.

Here's a picture of the other two cards in the kit.  Each is slightly different for variety.

On this card, a Band-aid Brad is used in place of the toolbox.  So appropriate for a weekend warrior card, don't you think?


On this card, I cut a few images from the washi tape to embellish the four white panels.


This card was cut using a pattern purchased from Lori Whitlock. If you still have questions about how to assemble this card, you can check out her how-to video here.

I hope you like this kit. We look forward to sharing the others with you soon.

 Kim from Katydid Cards
Who provided the inspiration for these cards?  Katy did!


Saturday, December 16, 2017

Armed & Dangerous


Hi folks!  It's Kim from Katydid Cards here to share another card with you today.

Once upon a time when I was married, my husband was a real handyman.  And a very brave (or foolish) one because some of the projects he undertook were a tad risky..like removing a wall without knowing if it was weight-bearing.  This card reminds me of him.


I used a number of brad sets in the "construction" of this card; Toolbox, Tools, Saw, and Screws.  And I also used Silver Foil and Tape Measure Washi Tapes.

The image I used is The Weekend Warrior by Art Impressions.  I stamped it with VersaFine Black Ink and scanned it into my computer so I could import it into my Silhouette Design Screen.  Once there, I erased the tools so they wouldn't show from behind the brads.  I also traced him and welded his outline to the rectangle on which he sits...you can see how the sides of the rectangle accommodate his hands in motion.  Finally, I traced inside the shirt and filled it with a check pattern.  I print and cut him and then colored him with Copic markers.

The card design, a Step Panel Card, was just so perfect for this theme!  I found a tutorial for it on YouTube.  Here's a look at it from the side:


And looking down on it.  Also like my ex, he left tools sitting all over the place!


And a final picture of the back of the card with the sentiment from the set.  And another brad and some washi to accent.


The construction of this card allows you to slip a gift card inside.  Perfect for Christmas gift giving to the handyman in your life.

That's all for today.   See you soon with another project.


Kim from Katydid Cards
Who provided the inspiration for these cards?  Katy did!