Showing posts with label red tree tape. Show all posts

Wednesday, July 27, 2022

Christmas Card(inals!)

Cardinals are some of my (Lauren's) favorite birds and also some of my favorite Eyelet Outlet Brads. We have Cardinals, Female Cardinals and Cardinal Profiles and I've used the first two on this card. To make the male Cardinal's vivid feathers stand out even more, I've clustered some of my favorite holiday washi tapes: Vertical Red Tree Tape, Heart Tape, Poinsettia Tape and Red Foil Striped Washi. My sentiment is one repeat of Merry Christmas Tape, stuck to a piece of cardstock and popped up on foam for extra dimension. 

If Christmas in July isn't your thing, check out our Bluebird and Robin Brads, Seagulls, Owls, Penguins or Flamingos in the Eyelet Outlet Store!

loves to watch the backyard birds 
at her feeder and birdbath!

Wednesday, July 22, 2020

Santa's Summer Fun

Online papercrafters seem to embrace the "Christmas in July" phenomenon a little more each year, and I (Lauren) am all for it. Because let's face it, the job of making fifty or more holiday cards is just too big to do in December. Here are a few smaller cards I've created, using premade tags plus lots of adorable Eyelet Outlet goodies!


I designed this trio of cards to fit in 4-bar envelopes, so they measure just a hair under 3.5 x 5". I made the backgrounds and sentiment/accent borders by neatly lining up strips of Eyelet Outlet Washi Tape on plain white cardstock, then trimming them to size.


One of my best holiday "brad tricks" is to add majestic Antler Brads to sweet little cartoon reindeer stickers or stamps. They always look adorable and make me smile. I also added a small Snowflake Brad (the packs contain both small and large flakes) and two large ones to my background, which is made of Gingerbread Tape. The border band features one of my favorite Merry Christmas Tapes.
 

My second card has an Ornament Tape background that I especially love because it's printed so that you can line up the half ornaments at top and bottom to increase the illusion of looking at one solid sheet of patterned paper. I added a few gold Star Sequins to the star ornaments, as well as the background of the tag on which Santa and Mrs. Claus Brads are standing in front of the tag's tree. I added a Star Enamel to the top and made a band using scripty Merry Christmas Tape plus Ho Ho Ho Washi.

The last card features a tag with a super-cute Santa to whom I've given a Candy Cane Brad and a Holly Brad to decorate his hat. I added a few white Snowflake Sequins and mounted the tag on a background of fun Red Tree Tape whose pattern runs vertically. I used Christmas Tape with white, green and red lettering for a whimsical sentiment.


If you'd like more Christmas in July inspiration, please tune in to a special feature this weekend via FaceBook Live in which our own EO design team darling Janet Axtman of Sugar Shine Designs will be showing off many more beautiful cards and greetings. All the details on the Eyelet Outlet FaceBook Page!

makes holiday cards all
year long at Jingle Belles!
♥

Wednesday, December 5, 2018

Death Before Decaf!

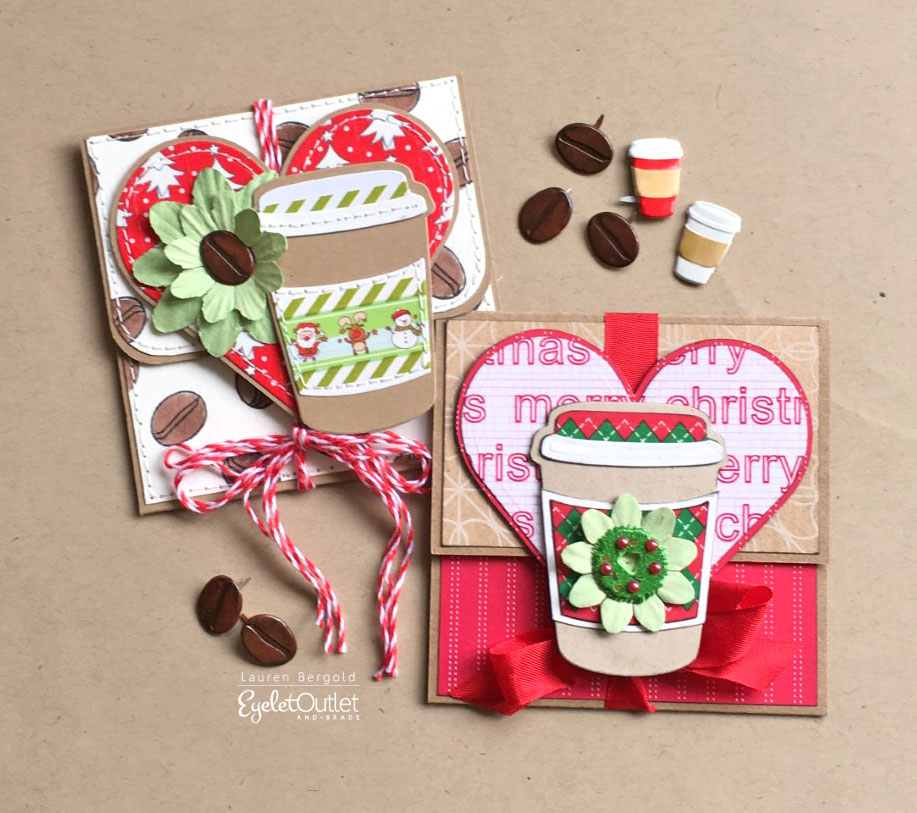
It's that wonderful time of year once again: by which I (Lauren) mean both the holiday season AND the winter Coffee Lovers' Blog Hop! Thus I decided to make some giftcard holders that combine my love of coffee, holiday cardmaking and Eyelet Outlet Coffee Brads and Coffee Stamps!


I made a very simple folder; it's just a piece of 3.5 x 8.5" kraft cardstock scored at the 2.5 and 6.5" point, to create a little pocket inside which can hold a giftcard OR a check, money, a little note, even some small photos. You could make these out of double sided patterned paper to save having to trim little panels to decorate the outside, but I always seem to have loads of little patterned paper off-cuts and this is a great way to use them up! 


Once I'd covered the pocket, top flap and back panel with cardstock, it was time for the fun part: decorating! I covered a small scrap of white cardstock with Eyelet Outlet Merry Christmas Tape and diecut it into a heart which is slightly narrower than the top flap, but hangs down a bit over the pocket area. This hides the place where I secured seambinding to the front, but still leaves room for the bow that literally ties the whole thing together. I used my Stephanie Barnard dies to create the coffee cup out of lighter kraft and the lid and front panel from this fun argyle-inspired Christmas Pattern Washi. I added a green Paper Flower, anchored with a Wreath Brad, decorated with some tiny red Pearl Bling berries.


In the second version, I decided to get a bit more coffee-centric, so I stamped the coffee bean from our Coffee Stamp Set in an all-over pattern and used a brown Tombow with a water brush to add color. This time my diecut heart has vertical-oriented Red Tree Washi and the cup is adorned with Santa Tape flanked by Skinny Stripes. And to hold on the flowers, one those awesome beans from the Coffee Brad Set which also contains both red and white coffee cups!


Be sure to hop over and see all the amazing cards at the Coffee Lovers' Blog Hop, and leave a little love for Amy Tsuruta and the other Coffee Elves who are working so hard behind the scenes at these events! ♥♥♥

Lauren Bergold 
would not *literally* prefer death to decaf... 
especially late in the day!

Wednesday, September 26, 2018

The Saint Nick Express!

The most daunting thing about Christmas cards, at least for me (Lauren), is that I need A LOT of them (60+) and obviously I need them all at the same time. For those of us who don't enjoy mass-producing cards, this can really add up to a lot of time spent. Fortunately, I've learned a few tricks. One is that I make holiday cards all year long. Another is to use pre-made products whenever possible. I love the pocket scrapbooking cards that come with so many paper collections. There are a million varieties, and give cards an automatic focal point. Oh, and did I mention that they are the perfect size to feature some of our brand new Eyelet Outlet holiday brads? When I adorn journal cards with brads and place them on top of a custom background of EO washi tape, I can make a lot of unique and individual cards, very quickly! Who doesn't like that?!


When I saw this "Ho Ho Ho" pocket card, I immediately thought of our new Santa Suit Brads which come with both coat and boots. They are exactly right with last year's Santa Hats, as well. I matted the card on some gingham paper and then popped it up on a background I made by filling a slightly smaller than A2-sized panel with Red Tree Tape.


Stickers are another great time saver. I like to look at the features and scale of the design, and think about where I could slip in a brad or two to add texture and interest. This fun holiday car just happened to have a wreath on its front grill, exactly the size of our brand new Wreath Brads! The wreath on the sticker featured a red bow which overhung slightly and looked a bit odd, so I added a Poinsettia Brad at the top to cover. Mounting them so closely, I had to turn the second brad's prongs both facing the same direction. They were pretty secure, but just to be extra safe, I added a small piece of double stick tape at the back, over the prongs. Trust me, they are not going to slip or slide anywhere! The car's headlights were just a smidge smaller than our 6mm Pearl Brads, the size and profile of which really do resemble a vintage car don't you think? Finally, there I added a Heart Brad over the one printed on the card. My background is this fun argyle Christmas Pattern tape, and I've added a few red and grey Skinny Tapes behind the car, as well.

At 4" square, the pocket card with this fun snowglobe on was just a little bit too big for a standard A2 card. I often "size up" to a five or six inch square card, but this time I wasn't crazy about the original background. So I decided to neatly trim the words and fussycut the snowglobe, whose little house was just the right size for our Santa and Mrs. Claus to stand in front of, with a couple of Snowflake Brads for authenticity. When making tape backgrounds, wide washi covers lots of area fast, and this Tree Tape is an old favorite of mine. A strip of Red Dots Tape grounds the sentiment and fills in the panel perfectly.


I bet you have LOTS of pocket cards and stickers already in your collection that you could "fancy up" with a few Eyelet Outlet brads, bling or enamel shapes to make super-fast, super-fun cards!

makes holiday cards all year long 

Wednesday, December 20, 2017

Very Merry Monograms

If you're anything like me (Lauren) the week before Christmas is all about getting those holiday presents wrapped and delivered, either in person or via the mail. Here's a fast and easy idea for personalized gift bags, and best of all, it uses something I know you already have in your crafty stash: gorgeous Eyelet Outlet Holiday Washi Tape!


Customized monograms are simple to make, thanks to the fact that our computers come loaded with beautiful fonts. Having measured the front of my plain white, medium-sized, big-box-store gift bags, I knew my oversized initials needed to be just under 8" tall, and no more than 6" wide. Since these bags are for two of my favorite kids, Carlos and Isabel, I tried a few different styles before settling on a free font called Vexler Slip. I gave the letters a medium thick outline in black, but no fill color, so that when I printed them on plain white cardstock, I could apply the washi tape directly on top of the outlines, and still see exactly where to cut out when I was done! Then came the fun part: playing with all my pretty red and green tapes!


I decided to start in the middle of each letter and work towards the top and the bottom in a sort of mirror image arrangement, but honestly there is no bad way to do this and neither precision nor a plan is needed! In fact, this would be a great project for the kiddo's to do: let them go wild adding as many (or few) different styles of tape, in whatever order or pattern they like, until the entire monogram is completely covered with washi. 


There's really only one absolutely necessary step, that comes when all of your tapes are on, but before you cut the letter out: be sure to burnish the tapes really well, to make sure every single one is firmly stuck down. You can use a bonefolder for this, or I use the hard plastic handle of my scissors. Then it's time to cut neatly around the outlines, which, as you can see, are still perfectly visible through the tape. Et voila! Fancy holiday monograms that can decorate a card, a package, or even be strung together to spell out a holiday greeting!


I've used mine, as we know, on a pair of gift bags for my young friends. You can seriously use ANY combination of tapes for a project like this, but in this case my letter C features: super-cute Green Santa Tape, Holly Tape, Skinny Merry Christmas, Solid Skinny Bright and Pastel Green; while the design behind the letter on Carlos' bag also has: Skinny Gold Dots, Red Dots, and Vertical Red Trees. 


Remember to look at all your tapes in the planning stages; I've got quite a few non-holiday reds, greens, pinks and even gold mixed in with my more specifically Christmassy patterns. Basic designs like dots, stripes and solids really do go with everything. On Isabel's initial and bag, I used: Santa Washi Tape, Red Dots, Merry Christmas, Skinny Pink Tape, Wide Tree Tape, and Season's Greetings.


Of course good design is important, but really... EVERY gift that's given with love looks beautiful under the Christmas tree, doesn't it?


Wishing the happiest and most joyful of holidays to you and your family! ♥♥♥

spends more time on her blog 
outside the holiday season, honestly!

Wednesday, November 8, 2017

One Card Three Ways: Christmas Ornament Edition

Hi folks, it's Lauren here again. I'm starting to really think about Christmas and feeling pretty excited about finishing up my cards. I know most cardmakers like to mass-produce one holiday design, but I don't enjoy that so much. Something I don't mind, though, is making a couple of different versions of the same card. So today I have a set of ornaments that represent my three favorite categories of Eyelet Outlet products: Brads, Bling and Washi Tape!


For my Bling card I used some papers I had pre-painted with ColorBurst pigment powders, and used stencils with inks and embossing paste on top. I created the bauble shapes using some hand-cut ornament templates I made for myself a few years ago, but there are plenty of beautiful dies available to shortcut that procedure for you. I wanted to work in as many bling varieties as possible, so I've got Clear Edge Jewels, Square Jewels, Single Jewels, Single Pearls, Heart Pearls and I've even used a bit of the new Fancy Long Bling on the round bauble, which I arranged as a mirror-image, then placed a few extra large Pearl Bling Jewels inside the openings created by the zig zag design. I made the tops of the ornaments from Glitter Silver Tape and constructed my own patterned paper by filling an A2-sized inset panel with Music Note Washi.


For my Brads card I pieced the ornaments from a neutral palette so the Christmas Cookies, Poinsettia and Prancing Deer would stand out really well. I made the tops of the baubles from Glitter Gold Tape this time, to fit the color scheme better.


For the Tape card I chose bright shades of traditional red and green. I covered the bauble shapes with tape, then burnished well and trimmed them neatly. I used Holly Tape (with a small Paper Flower and Enamel Dot) for the heart ornament; Red Dots with an accent of Vertical Red Tree Tape for the elongated shape and highlighted strips of Merry Christmas Tape with an accent of that cute green Santa Tape sandwiched by Skinny Stripes Tape for the round shape.


Whether you like to make your holiday cards singly, all at once, or somewhere in between, I guarantee Eyelet Outlet has all kinds of embellishments that will make your job easier... and much more fun, too! ♥

make holiday cards all year round at Jingle Belles... 
and you can, too!