Monday, January 14, 2019

Owlways a fan of Eyelet Outlet!


Here is a great way to use those patterned papers that have a scene on them...
add some of Eyelet Outlet's brads to complete the look!


This tree is bedazzled with pearls and rhinestones.
We carry all colors and sizes!  The two Sketch Owl brads nesting make this a great friendship...or Valentine...card.
Gold Glitter Washi Tape gives added interest to the layers!

Thanks for joining us today.
Dawn Mercedes, of Sunnyside Up


Saturday, January 12, 2019

The Key to Life


Sometimes it's fun to make a super fast card with a pun. That's the case with me today. And OF COURSE Eyelet Outlet has just the products needed at times like this!


And how fun is this - did you know you can color Washi Tape with Copic Markers? Okay, maybe you did - you probably did - but I had. no. clue. 

WOW! This is a game changer for me!

I needed that Washi Tape to look unique and now it does. {insert smiley face}


Eyelet Outlet Products Used:


Be sure to head over to the Eyelet Outlet store and check out all the products!


Thursday, January 10, 2019

Love You MOWER!

Let Eyelet Outlet Lawn Mower Brads tell your Valentine just how much you love them with this fun little card!


The double heart image is from the Cricut image library and I flattened the top layer so I could apply the green grass pattern to the image.  The font is also available with Cricut Access and it's called, "Be Free."  I loved how the capital W's looked like they had little hearts in the middle!


Thanks for being with us today!  Be sure to follow us on Instagram, too!  


Wednesday, January 9, 2019

Valentine, Je T'Aime!

Hi folks, it's Lauren again, here to show off a couple of Valentines with a French accent!


I love that Eyelet Outlet Eiffel Tower Brads come in two shades -bright silver and annodized copper- and that you get a mix of both in every packet. My first card features the silver, as well as one each of our Sun and Cloud Brads, to make a tiny landscape within a small heart shape. I've also added Heart Pearls to dot the I and J in "je t'aime" and two strips of Skinny Dot Washi Tape to set off the yellow cardstock panel.


But that's not to say I don't love the copper Eiffel Towers, as well! Here's one now, along with a Heart Brad, set against a carefully snipped panel of Wide Travel Washi, to show just the Parisian destination. My large heart panel was made by neatly lining up strips of Script Tape on plain white cardstock and then diecutting the result just like any other patterned paper.


There are so many cool ways to use Eyelet Outlet brads and tapes to make amazing and unique Valentines, I hope you'll stop by again soon to see what the design team is up to next! ♥

has a niece whose birthday
is on Valentine's Day!
♥

Tuesday, January 8, 2019

Heart Strings

Hi there.  It's Kim from Katydid Cards.

As card makers, we're busy doing Merry & Bright in October.  And we're ringing in the New Year in November.  So it should come as no surprise we've been thinking about Valentine's Day even before we put away the Christmas decorations and make (and sometimes already break) our New Year's resolutions.

Here's the first of several cards I'll be sharing with you to help celebrate matters of the heart.  This type of card is an X-Fold.  To create a custom opening for the Heart Jewel Bling, I scanned one of the hearts and imported it into my Silhouette design screen.  I offset it three times; once for the white heart mat, one for the red heart mat and then the third offset was used to create the opening in the 4 1/4" x 5 1/2" rectangle.


I cut four of the rectangles and scored them down the center.  I made one more offset of the rectangle and hearts to create the patterned paper panel.  The dots offered an opportunity to randomly place Red Jewel Bling.

I attached each of six hearts to the white mat to have hearts on both sides of the red mat.  Each was then attached to a red mat.  I lined up one set of three inside the opening of one of the rectangle panels.  When centered, I attached white bakers twine down the center back.  Then I flipped them over and aligned the second set, securing the baker's twine inside.


I attached the baker's twine on the back of the first folded rectangle panel.  Then I attached each panel back to back to create the X.  Here's a look down from the top to see the "X" effect.  To finish, I created the greeting banner to run down the front.  I have a similar blank panel on the back for a personal sentiment.


Next week I'll share another Valentine's Card.  And here's a link to another card I made using the Heart Jewel Bling if you care to check it out.


 Kim from Katydid Cards
Who provided the inspiration for these cards?  Katy did!

Monday, January 7, 2019

Covered in Gems


Bling can be used in all sorts of ways. 
An accent on a flower...or make them stand out!

Check out Eyelet Outlet's wide selection of bling. There are all sorts of shapes, sizes, and colors to choose from.


Have a sparkly day!!
Dawn Mercedes of Sunnyside Up!


Saturday, January 5, 2019

Whoo Whoo Is Out the Window?

Thanks for stopping by the blog today. I actually hope you stop by often... so you can see the wide variety of brads, stamps, washi tape, and other items that can be found at Eyelet Outlet.

On my card today I'm going to show you a unique way to use one of the Eyelet Outlet products.


The owl and the pinecones are Eyelet Outlet Brads:


But... what is the greenery in the window box? 
It's an Eyelet Outlet Paper Flower, of course.


The flower has ridges, so it was easy to sponge on some darker green ink to give it some depth. Then I cut out a small section of the flower, cut strips into it to fringe it. I crumpled it between my fingers gently (it is paper, after all) and glued the part that is behind the window box to secure it to the card.

One Pinecone brad is attached in the "greenery" and the other two are attached to the window box.


I hope you'll head over to the Eyelet Outlet store 
to see where your creativity will take you!


Jeanette - Cre8tive Play blog

Thursday, January 3, 2019

Funny Punny Valentines!

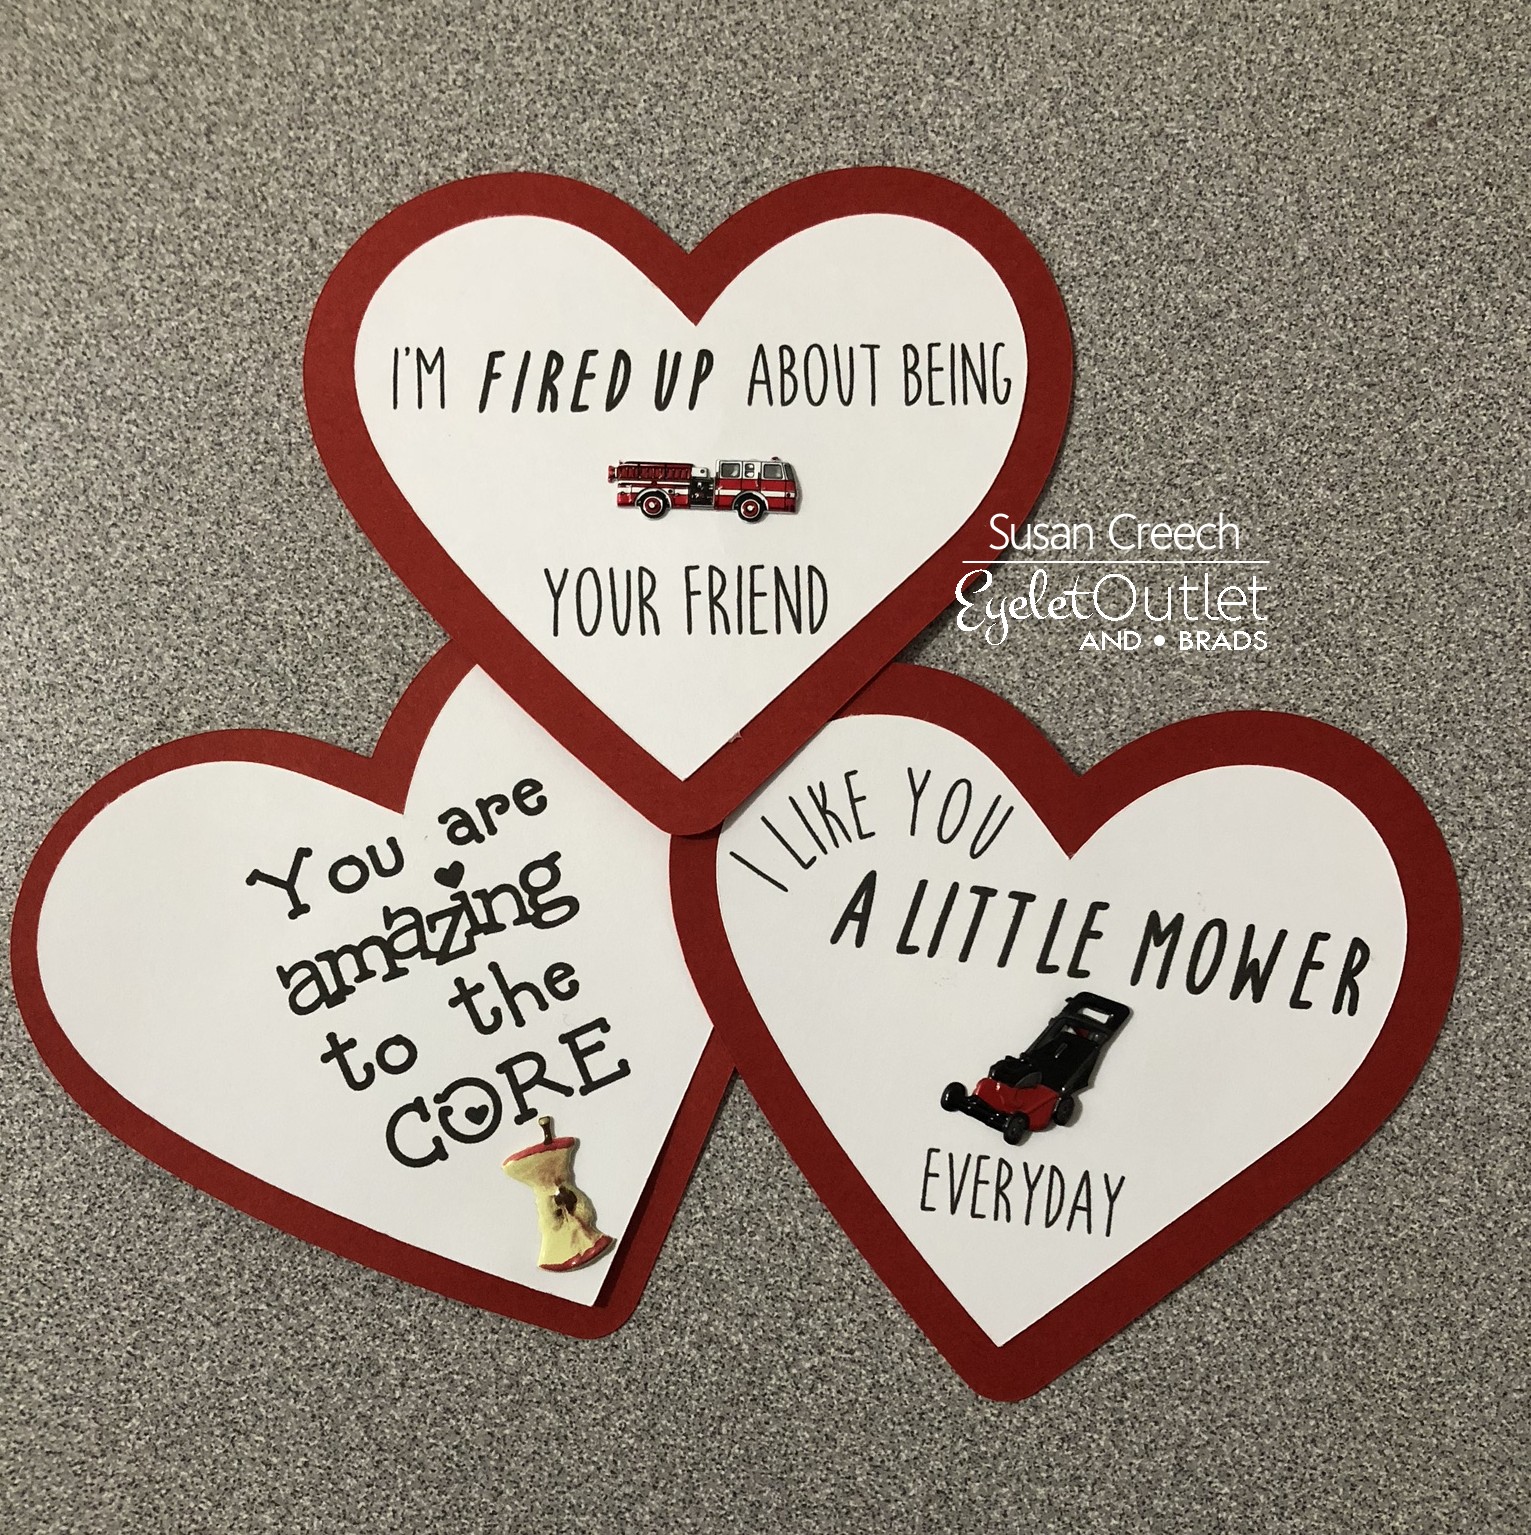
Back by popular demand....Funny Punny Kid-Friendly Valentines!  Last year I made 4" Valentines for the kids in my life to give at their school Valentine parties and they were such a hit, I decided to bring them back this year but with ALL NEW puns and fun from Eyelet Outlet's wonderful 2018 product releases!  So, without further ado.......

Eyelet Outlet released stamp sets for the first time in 2018 that coordinate with the brads.  You can see them all here, but today I used the Fan Stamp Set that coordinates with the Fan Brad as well as the Foam Hand Brad.


We also released a number of brand new animal brads last year.  The Jungle Mix Set is super cute and today I paired the giraffe from the set with some giraffe digital paper.  The Bear Brad set also comes with an adorable little bear cub and the Horse Brad, which I think will be a favorite for years to come, includes a Pony Brad. 


This Lawn Mower Valentine is my personal favorite and I think my great nephew will think so too! Isn't this Lawn Mower Brad so realistic?!  The Firetruck Brad comes from the First Responder Brad Set which includes an ambulance and police car brad.  And don't forget about our Apple Brad Set!  So, so cute and comes with whole apples, as well as apple cores!


I really "dig" the Sand Bucket and Shovel Brad Set as well as the Truck Brad Set!  Our Garden Trowel Brad would have been great on this one, too!


When I created these in 2017 I actually put "kits" together for the kids to assemble the Valentines themselves and my great niece had the best time with it! She even created a video of herself demonstrating the assembly! It was the cutest thing ever!!

You can see the 2017 Valentines here.  The dimension and texture that the brads add is such a hit with the kids so I hope you'll give this fun and easy project a try with the kids in your life!


Wednesday, January 2, 2019

Steampunk Valentine

Have you started thinking about Valentine's Day yet? Ok, yes, it's six weeks away, but I (Lauren) am guessing that time will fly by, so I'm working on a few ideas now. This one has a bit of a Steampunk vibe, don't you think?


I cut out a heart nearly big enough to fill my A2 card front, from a scrap of Prima's "Craftsman" collection I found lurking in my paper stash, and put the sentiment on with some sparkly, vintage-looking alphabet stickers. Then I added lots of mechanical themed Eyelet Outlet Brads: Gears, a Compass, large and small Screw Brads and even the valve from the Pipe Brad set! Finally I scattered several sizes of grey Jewel Bling around the spaces in between. I like that the result is a bit elegant, but also quite masculine!


There will be lots more Valentine inspiration here on the Eyelet Outlet Blog, all throughout January, so be sure to stop back often and see what the team is up to! ♥

wishes you a very 
Happy and Healthy New Year!
♥♥♥

Tuesday, January 1, 2019

World Traveler

Hi there!  It's Kim from Katydid Cards with you today!  Happy New Year!

If any of you were lucky enough to get a trip to an exciting destination from Santa or resolved to do more traveling in 2019, this card is for you!

I worked with the Travel and Mail Brads.  They combined well for this World Traveler card; a great way to help send someone off on a vacation abroad if you weren't on the receiving end of the tickets yourself.


I made a suspended spinner card so I could show the big old jet airliner (remember that song?) traveling the globe.  On the front, the start of the trip and on the flip side, the plane is nearing its destination.


Here's how I did it:

  1. I stamped the globe image (Globe Greetings by Concord & 9th) twice on watercolor paper and colored them with markers and an aqua painter. 
  2. Once dry, I attached them back to back with a 6" length of clear thread in between them.  I used double-sided tape to ensure good adhesion.
  3. I cut a circle in the card base and decorative panel slightly larger than the globe image.
  4. The background panel was covered with Paris Washi Tape, applied on the diagonal. 
  5. I attached the globe to the back of this panel, again with double-sided tape and then carefully attached them to the card base.
  6. The globe stand was heat embossed with clear embossing powder after coating it with Wink of Stella.  Two Green Glitter Enamel Dots were added as an accent.
  7. The banner was created to follow the curve of the globe and the greeting was a text to path in my Silhouette Design Screen.

Here's the globe, spinning.


And here's the inside of the card.  Here you see the reverse side of the globe and the plane further along its path.  I wanted to use the other travel brads, so I created a sentiment spaced to accommodate the brads.  So, it tells the traveler to:

Have fun. 
Pack wisely. 
Take lots of pictures. 
Remember to write. 


And here's another Eyelet Outlet card about vacation, perhaps when the world traveler reaches the French Riviera.


Kim from Katydid Cards
Who provided the inspiration for these cards?  Katy did!

Monday, December 31, 2018

Rolling past Monday...


This little red pickup truck brad is a fan favorite. 
Cards and scrapbook pages roll out quickly when you use Eyelet Outlet washi for the background and road!!


Saturday, December 29, 2018

Better Than Sliced Bread


Hello, Jeanette here from the design team. I'm glad you've stopped by the blog today. Did you have a good Christmas? I sure you were able to spend some time with those you love the most. And whether you saw them in person, called them on the phone, sent them a text, connected with them on social media... whatever... I hope you told them...

You've the best thing since
SLICED BREAD!


(from the Bacon Egg and Toast Brad set)


Have a great - and safe - New Year's celebration. I'll see you here on the Eyelet Outlet blog again next year (which is mere days away).


Thursday, December 27, 2018

Hooked On You

Valentine's Day is fast approaching and the Design Team at Eyelet Outlet is hard at work to give you lots of inspiration for your Valentine projects, but no need to wait on Valentine's Day to let your special someone know how you feel!  Here's a card perfect for just that!


This awesome fishing lure card stock was just what I needed to pair with Eyelet Outlet's new fishing lure brads, don't you think?!  And they go so well with our popular fishing pole brads, too!

And speaking of Valentine's Day and since it is Thursday, how about a little Throw Back Thursday?

Last year I had so much fun creating these little punny Valentine cards for my great niece to share at school.  I actually put together a little kit of all the parts and brads she would need and she assembled the cards herself.  The fishing pole brads are pretty versatile, right?!  


As 2018 comes to a close, we want to thank you for following Eyelet Outlet on our blog, Instagram, and Facebook this year and we're looking forward to bringing you lots more inspiration in the year ahead!  Happy New Year!


Wednesday, December 26, 2018

Christmas Leftovers

Don't put away your favorite Eyelet Outlet holiday brads just yet, because they have one more important job to do. Hi folks, it's Lauren here, and if, like me, you had a wonderful Christmas yesterday, you might like to say so to your friends and family, so why not use those last few brads in the packet to make some quick and easy thank you notes?


Holiday Light Brads really don't need much more than a string to anchor them. Mine happens to be machine stitched and a bit curly, but yours could be long or short, straight or curvy! Just lightly mark their path with a pencil, then draw, stamp or sew your string base. Add a sentiment et voila! One fun and fab mail-able card is DONE!


Ornament Brads are another fun and choice and all they need is something on which to hang. Again, my trusty sewing machine came to the rescue: I stitched five cords of various lengths and added a brad to the end of each. Alternatively, you could make hangers from twine or ribbon, or add  simple hand stitching with embroidery floss.


And now all that's left is for me to THANK YOU for dropping by, because I happen to know there's a different kind of Christmas leftovers awaiting me... in the fridge! ♥♥♥

can never resist a Christmas cookie or two,
especially the ones made by her niece, Lindsay Marie!

Tuesday, December 25, 2018

Oh Christmas Tree

Hi, Kim from Katydid Cards here.

Merry Christmas to those of you who celebrate the holiday.  Wishing a fabulous day to those who do not.

I wanted to share one last Christmas card celebrating the Christmas tree inspired by a card I saw on Pinterest.  I love the look of white on white with that pop of red provided by the Red Jewel Bling and greeting.  My photo doesn't do that bling justice...you should see how it catches the light in real life.


And speaking of white trees, I want to share one of my Christmas past memories with you.  For more than a few years, we had a white artificial tree (in the days when artificial trees were pretty darn ugly).  Each year my mother would decorate it with Christmas balls of a single color.  And then the piece de resistance was the color wheel to shine brightly its four colors on the tree.  Oh, how my mother loved that tree.  Me, not so much, but it's still a fond memory.

Here's a look at the card from the side so you can see the dimension provided by the In the Woods Thinlits Dies by Stampin' Up.


And here's the inside, simple but sincere sentiment.


See you next week, which will also be next year, with another card.


Kim from Katydid Cards
Who provided the inspiration for these cards?  Katy did!