Showing posts with label cas cards. Show all posts

Wednesday, November 20, 2024

Give Thanks

It's a week before Thanksgiving, but there's still time to send out some quick, easy cards! This super-simple CAS design features Eyelet Outlet Leaf and Mini Leaf Brads layered over stenciled leaves in fall colors. The background and diecut sentiment are made from beautifully neutral Nature Washi Tape. Change up the greeting and this design could be used for literally ANY autumnal occasion.


Shopping List:

Visit the Eyelet Outlet Store today for brads and tapes that'll work perfectly for EVERY season of your cardmaking year!

definitely prefers stenciling leaves to raking them!

Wednesday, November 13, 2024

Hello, Pumpkin

Celebrating autumn with a sweet and simple card featuring Eyelet Outlet Pumpkin Brads, a Squirrel from the Acorn and Squirrel set and a scattering of tiny, perfect Mini Leaf Brads.


Pumpkin-centric Shopping List:

Visit the Eyelet Outlet Online Store and get inspired by all of the embellishments for fall, winter, holiday and more!
 
confesses to NOT liking pumpkin pie; sorry!

Wednesday, October 6, 2021

CAS Question...

...is a card still "Clean and Simple" if it features five Eyelet Outlet Washi Tape styles and nine Brads?! I (Lauren) say yes; but then I'm not exactly a minimalist, lol! 

Inspired by this cute tree sticker I found in my stash, I started looking through my Eyelet Outlet goodies for autumnal items in the right colors, and found Pumpkin BradsSunflowersMini Leaves, and the orange calico cat from our Feline Brads. To ground my embellishment grouping, I made a tape stack starting with Pumpkin TapeWood Washi, and my favorite Script Tape, to which I added some shorter pieces of solid color Skinny Tape. Since I had obviously made a tiny stylized landscape, it seemed like a good idea to finish off with Sun and Cloud Brads... so I did! 

hopes you're enjoying autumn 
as much as she is! 

Wednesday, January 6, 2021

The Ultimate 2020 Brad Set

If I (Lauren) had to choose just ONE Eyelet Outlet product to sum up last year, it would surely have to be the brand new Mask, Hand Sanitizer and Soap Brads which debuted this week. They are not just super-useful for making cards, layouts and journal pages with distinctive 2020 style, they're also kind of adorable don't you think?

I've paired them with simple, computer-generated sentiments and fun rainbow-colored styles of EO Washi... (Elephant TapeStripes and Confetti to be exact!) ...but there are nearly endless possibilities for these, so stay tuned to the Eyelet Outlet Blog to see more ideas from our stellar design team!

looks forward to someday 
not needing a mask!

Wednesday, August 21, 2019

Here Comes the Sun(flowers)

The other day I (Lauren) was sorting through my big box of Eyelet Outlet goodies, when I suddenly realized I had never made a card with the gorgeous Sunflower Brads from the May release. Obviously I had to drop everything and attend to that!


These cards have quite a bit more white space than is usual for me and the white space is actually white in color, as well! But I had the beautiful Sunflower Brads and the equally lovely wide Glitter Sunflower Tape, so it's not like I needed a whole lot more than that. For my first card I affixed the brads to a circle of watercolor paper I custom painted with some very diluted Lemon Yellow ColorBurst. I added diecut leaves, a wordfetti sentiment and lots of Champagne Jewel Swirl Bling; with everything clustered on top of a little collage of Skinny Washi Tapes in shades of yellow and orange.


For my second card, I affixed the Sunflower Brads to some texty paper which had pretty little clusters of flowers and leaves. I covered the roses on the paper with our Sunflowers, but let the leaves show through. I added a bit more foliage and a couple of orange Mini Butterfly Brads. Again I mixed a few different Skinny Washi Tapes with the Glitter Sunflower Tape, and chose a typewriter print sentiment that coordinated well. 


I hope you're enjoying a day full of Sunshine and Happiness... not to mention creativity! ♥

used to live across the street 
from a sunflower farm!

Wednesday, December 26, 2018

Christmas Leftovers

Don't put away your favorite Eyelet Outlet holiday brads just yet, because they have one more important job to do. Hi folks, it's Lauren here, and if, like me, you had a wonderful Christmas yesterday, you might like to say so to your friends and family, so why not use those last few brads in the packet to make some quick and easy thank you notes?


Holiday Light Brads really don't need much more than a string to anchor them. Mine happens to be machine stitched and a bit curly, but yours could be long or short, straight or curvy! Just lightly mark their path with a pencil, then draw, stamp or sew your string base. Add a sentiment et voila! One fun and fab mail-able card is DONE!


Ornament Brads are another fun and choice and all they need is something on which to hang. Again, my trusty sewing machine came to the rescue: I stitched five cords of various lengths and added a brad to the end of each. Alternatively, you could make hangers from twine or ribbon, or add  simple hand stitching with embroidery floss.


And now all that's left is for me to THANK YOU for dropping by, because I happen to know there's a different kind of Christmas leftovers awaiting me... in the fridge! ♥♥♥

can never resist a Christmas cookie or two,
especially the ones made by her niece, Lindsay Marie!

Tuesday, April 18, 2017

Life in Full Color

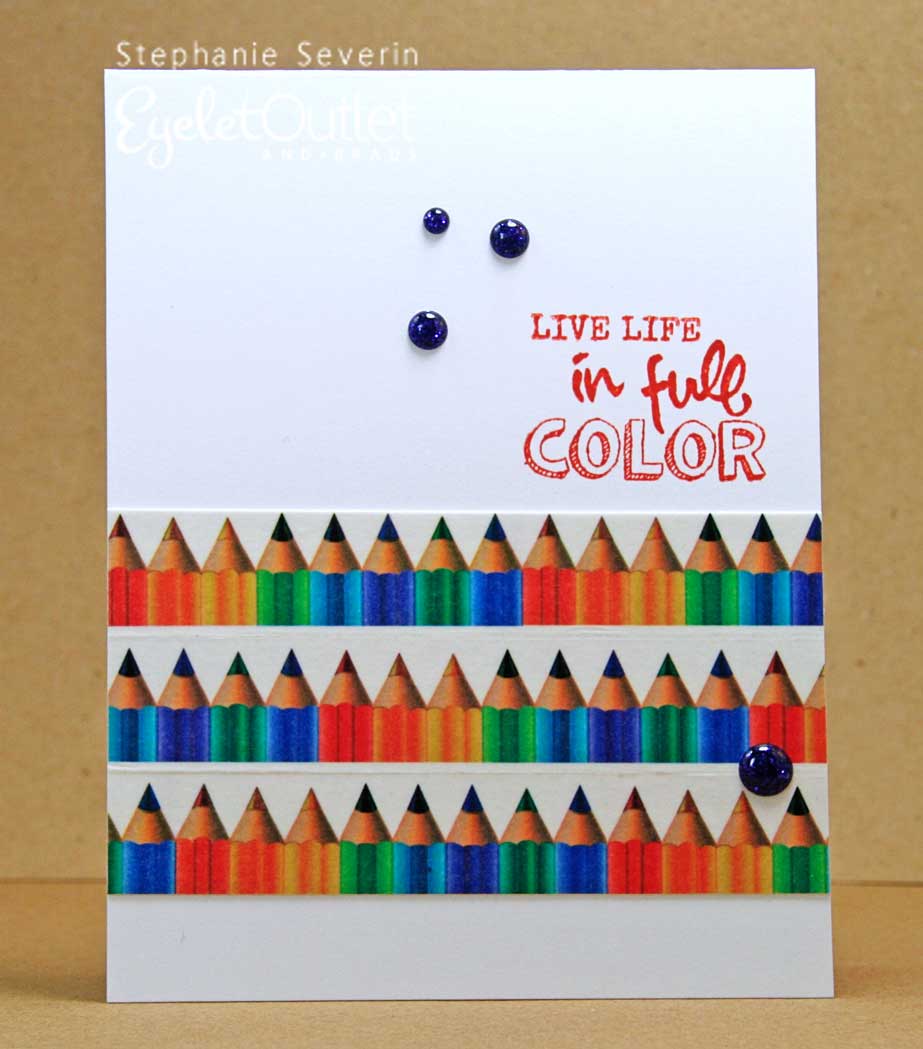
When I saw the Code Word Rainbow at the Addicted to CAS Challenge, I knew I had the perfect Washi Tape to join the fun.


I started by creating my rainbow using Wide Color Pencil Washi Tape.  After I had tape lined-up, I decided to create a CAS Set of cards to give to one of my artist friends as a gift (PS ... friends love receiving card sets).


The art pencils paired perfectly with sentiments from STAMPlorations Life in Full Color Stamp Set.


I added a few Purple Enamel Glitter Dots for some *color* outside the lines.


And one more for a set of three ... no erasers on these pretty pencils.


Products Used:


You can visit me in blogland at Ingenious Inkling


Sunday, December 4, 2016

Three Takes on a Poinsettia Wreath Card

Hey there, it's Lauren again, with a few new holiday cards that might just make you do a triple take. Yes, I've basically made the same card three times, each using the same fun sketch and each featuring fabulous Eyelet Outlet Poinsettia Brads adorning a simple holiday wreath, but I've approached it in three different-- equally easy-- ways:


You know I love watercolor, so of course I had to have a go at painting a wreath! I started by lightly marking a 2.5" circle on a piece of watercolor paper, mixed a little of my favorite light green pigment powder with water and painted rough V-shaped branches all the way around the circle. When my paper was completely dry, I took a little bit of fairly concentrated pigment in a darker shade of green, and used a fan brush to create a pine needle effect.


When that was completely dry, I added a few details in pen, cut around the wreath with scissors, and attached the beautiful Poinsettia Brads, a few tiny red "berries" from a Pearl Bling Strip, plus a sentiment fashioned from Merry Christmas Washi Tape stuck to plain white cardstock and trimmed into a neat little banner shape. And that was that!


If you hate to paint, here's another way to go: Use two circle punches to create a green cardstock ring, this will be the base of your wreath. Diecut or punch a dozen or so of your favorite greenery from several shades of green cardstock or patterned paper. Use a tape runner to attach the branches to the cardstock base in layers, trimming as necessary.


When the wreath is complete, top with Poinsettia Brads and a washi tape sentiment and affix it to your card with a bit of foam tape, for dimension.


My third card started with cardstock wreath sticker, which was very lovely, but alas, quite flat. Until... I added Poinsettia BradsTiny Red Pearls and one more Merry Christmas sentiment! (Ok, yes, this one's admittedly a bit of a cheat, but we're into December now, so it's time to get the Christmas cards in the mail!) 


I hope you'll be inspired to grab YOUR favorite Eyelet Outlet Holiday Brads and think up some fun new ways to use them.

PS: Follow the Eyelet Outlet Facebook Page and Pinterest Board to see new ideas from the awesome Eyelet Outlet Design Team every single day!!!

Lauren Bergold likes making holiday cards, blogging, and chocolate... 
but not necessarily in that order! ;)

Sunday, June 19, 2016

Trio of CAS Cards w/Video Tutorial **Plus Bonus Card from the GASC Make N Take**

Need to make lots cards for a big event, invitations, thank you notes, announcements, or just to have some cards on hand for that last minute party you got invited to?  Look no further.  Here is a trio of card using a black kraft card (4" x 5.5"), washi tape, bling, flowers, brads, and mists that you can reproduce many times over using the same materials for a little cost - and they are fast and easy too!!


Here is a video tutorial on how I made all 3 cards.


The supplies for each card allow you to make more than just one anywhere from 4 to 10 cards per package of bling, brads, or flowers.  Here is each card with the respective supplies.


http://www.eyeletoutlet.com/

 12 pk Bumblebee Brads, Green Foil Stripe Washi Tape, Solid Color yellow Flower

http://www.eyeletoutlet.com/

Yellow Paper Flowers, 10mm Jeweled Brads w/ sliver edge in Amber, Geometric Washi Tape


http://www.eyeletoutlet.com/

Solid Color Red Paper Flowers, Blue Glitter Washi Tape, Bumpy Clear Stickyback Bling


Now when you get stuck needing to make a bunch of cards, you have some ammo on how to do it!!

Supplies Used
Glue - Beacon

Did you miss the GASC in Arlington?  We had a fun make n take hosted my me!!  If you did not get a chance to come to the convention here is the card we made in the booth.


And here is the video tutorial for the card!!


And an even more fun video from the GASC convention floor of the Father's Day Card we had as the Make n'Take during the show.


Enjoy!