Sunday, October 26, 2025
Hey Chickie!
Sunday, November 10, 2024
Thanksgiving Wine Tag
Hello EO fans! This year my family have been invited for Thanksgiving dinner at a friend's house. I was thinking about how to thank them for this and it came to me that I could dress up a bottle of wine nicely with a wine tag decorated with EO brads and bling. So - that's just what I did!
I made the hangtag using a stitched slimline die. It turns out that this is the perfect size to make a wine tag. I scored the top of metallic rose gold piece and applied two pieces of fall patterned papers to the top of the scored piece and to the bigger bottom piece. I cut these to leave a 1/8" border on all side. I used a punch to make the hole for the wine bottle neck.
To decorate this, I stamped and cut a Thankful sentiment, made a twine bow and added a leaf and Pilgrim Hat pre-printed die cuts. Then I added all the EO goodness. I tucked a Rooster Brad in near the top of the hat. I also added Leaf Brads, Sunflower, and Squirrel Brads around the hat. At the top of the tag, I added an Acorn Brad. As a final touch, I added clear bling and small white pearls.
I am so pleased with this tag, I am definitely going to make some Christmas wine tags. I think they'll turn out beautifully.
Sunday, September 15, 2024
Harvest Thanks
Happy Saturday Eyelet Outlet fans!! I'm definitely into fall right now and EO always has just what you need to make cards great no matter the theme. Today, I have a harvest themed card that features EO's Scarecrow Brads, Rooster Brads, Pumpkin Brads, Sunflower Brads, and Orange Pearl Bling.When I run across unique ephemera like the one I used here, I can't help but get excited about how great EO products will elevate it into something even better and do it so easily!
To create the scene, I cut a gold stitched mat for my A2 card. I made a frame by nesting 2 other stitched frames together before running them through my die cut machine. I ran a piece of chocolate cardstock through a wood 3-D folder and cut it to fit inside the orange frame. I stamped and heat embossed the word Thankful on dark purple cardstock, and stamped and cut the For You sentiment.
I layered all these pieces together and glued the ephemera in place. I added all the brads and pearl bling to make a really great harvest scene that I look forward to mailing off to family soon!
Sunday, March 10, 2024
Meow Means I Love You
Sunday, May 21, 2023
I'm Kind of a Pig Deal!
Sunday, March 26, 2023
Hogs and Kisses!
Monday, March 2, 2020
Two for Monday!
Monday, June 24, 2019
Mooing with delight!
Monday, March 25, 2019
A few that needed to be posted!
I'll be there! Come say hello!
Saturday, February 9, 2019
Farmyard Animals on a Sunny Day
I've tried to recapture those memories with the card I created for today's blog post.
I used Washi Tape from Eyelet Outlet to create the blue sky and green grass in the background of my card. Eyelet Outlet has an amazing variety of Washi Tape and its potential is only limited by our ability to think outside the box. I'd suggest you look at the Washi Tape in the Eyelet Outlet store with new eyes - thinking of ways you can use it creatively.
Thanks for stopping by the blog today.
Let me leave you with one word of Barnyard advice that my grandfather often told me -
Tuesday, September 18, 2018
Dinner and Cocktails
It's been a while since I've worked with the Chicken Brads so I just had to make another card using them. I call this card, "Dinner Invitation" and you can see why. These two chickens have been invited to join their neighbor for dinner. Here they are at the front door.
And here they are inside. What's that on the menu?? Uh Oh! I used the Cooking, Baking, and Mixer Brads as well as Brick, Color Wheel, and Flower Washi Tape. The door handles are Black Enamel Dots.
If you're interested in recreating this card you will find the card base, kitchen, and cleaver in the Silhouette store. The chef is from My Favorite Thing's Recipe for Happiness. The chalkboard is free clip art I imported into the Silhouette and typed what's on the menu...inspired by my DT Sister, Susan's, Wednesday meal postings.
Here's a closer look at the brads and washi.
Winner, winner chicken dinner!
No dinner would complete with cocktails, so I'm sharing another card adding the Rooster brad. I showcased him in a shadowbox card. Each layer uses a different digital paper from the Cocktail Party collection by JazzyPatterns. I also used the Cocktail brads on either side of the greeting.
On the reverse of the card are my favorite chicken brads again!
I'll see you next week with another card...there's no shortage of ideas what with all the brads, bling and washi in the Eyelet Outlet store.
Tuesday, August 28, 2018
Old Goat
Do you remember old MacDonald? Well, here's his farm:
To make this card, I used the Rooster and the Cow & Goat Brads as well as a Black Glitter Enamel Dot on the weather vane. The barn was made using a combination of files from the Silhouette store.
I have a friend who's husband love goats. While she would never call him old in a card, she would have no problem poking fun at herself. This card was made with her in mind.
I'm enjoying working with these farm animals. I've used them on a card previously. In case you didn't see it, here's a link.
Wednesday, July 25, 2018
I Can Never Resist a Pun...
As soon as there is any kind of farm theme, I want to break out the red gingham... so I did. I considered making an entire landscape for the Chicken and Rooster to inhabit, but I wanted the sentiment to stand out most, so I abbreviated down to just the diecut fence, grass and clouds, on a tag. I think you still get the feeling of a scene, but without too much detail.
I dotted the "i" with a Heart Pearl, and placed my chipboard letters pretty randomly, for a casual look. I attached the Chicken and Rooster directly to the fence panel, then raised it up on foam tape for a little extra dimension.
Don't like constructing your own sentiments? Check out our new line of EO Clear Stamps! They're full of fun (and punny!) greetings for all occasions, and designed especially to work with so many styles of our fun Brads!
Wednesday, June 6, 2018
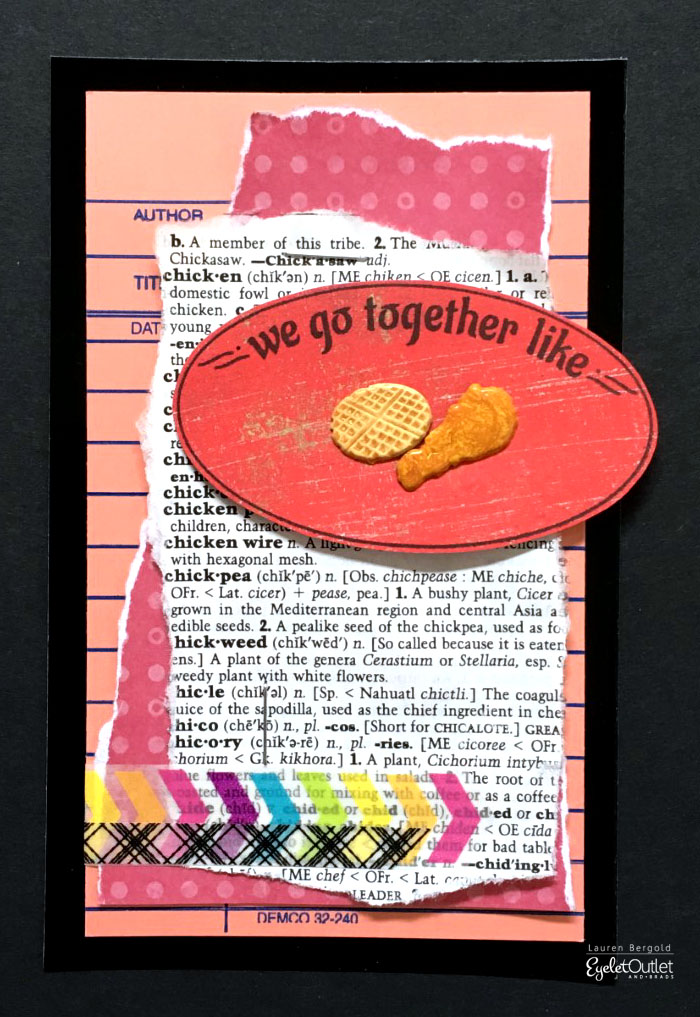
We go Together Like... (Pick One)
One of my favorites of the New May 2018 Brad Sets are the Jeans and Tee Shirt Brads. In each pack you get six pairs of denim blue trousers and six shirts of assorted colors, so they are super versatile!
The Chicken and Waffle Brads are also new, and again, they are just so fun you want to use them over and over. Although I feel I should probably warn you that, if you're anything like me, the Chicken and Waffle Brads may cause cravings for actual chicken and/or waffles, so please crave responsibly! :)
Neither the Coffee nor Donut Brads are new, but they never stop being AWESOME, imo! You'll have noticed that I've essentially made the same 3.5x5" mini card for each of these designs, using a fun reproduction library card and polka dot patterned paper in coordinating colors.
I've used the same two tapes: Chevron Washi and one of the black and white Pattern Skinny Tapes on top of torn bits of dictionary paper that relate to the brads. In this case, I've used a Chicken Brad and a Rooster Brad on top of the definition for "Hen".
And finally I've combined some bacon and an egg from our Breakfast Brads (the packets also have slices of toast!) on top of the definitions for various egg-related words.
Of course this idea would work for pretty much ANY combination of brads you can imagine, so I hope you'll be inspired to make your own versions! ♥
Tuesday, February 13, 2018
I Rule
Well, not me, Kim from Katydid Cards personally; but that's what I named this card featuring the Rooster, a new addition to the Eyelet Outlet store and the Chicken which I've used several times before here, here and here. This anniversary card is a cute way to pair these two:
I've seen the flip card many times, but I wanted a double flip and couldn't find a cut file anywhere. So I designed my own. I didn't get the calculations quite right as my intention was to have the folds meet in the middle. But I really like how it turned out and decided to say it's my great new design; just like I intended it that way. My secret is safe with you, right? If you like it, you'll find the template on the Freebies page.
I just love the colors in the rooster and that where I started when deciding on the color palette of my card. Next came the digital patterned paper from the Hello Sunshine Kit by Dani Mogstad. After I print and cut the mats, I was able to pick cardstock to match perfectly; Baja Breeze and Summer Sun (both retired Stampin' Up). The cute digital images I used behind the brads and inside are from a collection called Rise & Shine.
Since I had that center panel exposed, I had to get creative with the sentiment inside. Using the same circles as the front worked well. Here's a look down on the card so you can see how the starbursts are cut. You could place the starbursts on the front of the card if cutting is a problem
Thank you for stopping by. I hope you liked my card! I'm thinking there are a few more cards I could make with this pair, so stay tuned to see what I might come up with!


